SECTION 1 Lab Safety
In an
emergency
Call Campus
Heath Service 548-4848
Room NN256A
or
go directly to the
University Hospital Emergency Room
or
call 9-911
http://depts.washington.edu/hhpccweb/CampusHealth.html
http://www.ehs.washington.edu/forms/IncidentFillin.pdf
Tissue Culture Safety
1.
Every lab member should
attend the yearly Blood Borne Pathogen review class. http://www.ehs.washington.edu/forms/classes/bpecrform.htm
2.
Everyone who works in the
tissue culture room must:
Have taken or be taking the Hepatitis B vaccination (685-1071)
or
Sign a form with the occupational safety
nurse declining the offer (548-6117).
3. No
food or drink is ever allowed in the
tissue culture room.
4. Gloves and lab coats should be worn when working
in the tissue culture room.
5. If you
are working with human tissue, you should also wear goggles.
6. Mouth pipetting is never allowed.
7. The “Biohazard Safety Manual” is located on the
shelf over the bench by Peter’s office and in the K-089 tissue culture
room. Familiarize yourself with its
contents.
8. Contaminated sharps go into the red sharps
biohazard container. This waste must be
autoclaved before disposal.
9. Waste -- All tissue culture flasks must be treated
with bleach for at least 10 minutes before
disposal.
All waste in biohazard bags
must be autoclaved before disposal.
NEEDLE STICKS --
Wash immediately with soap
and lots of water.
Before 4:00 pm go to room NN 256A Campus Health Service
(548-4848).
After 4:00 pm go directly to the
University Hospital Emergency Room
Fill out an Incident report http://www.ehs.washington.edu/forms/IncidentFillin.pdf
Pay attention to what you are doing when you work with needles and you won’t be
stuck!!!!!
Chemical
Safety
1.
ALWAYS know the potential hazards
of a chemical BEFORE you work with
it. You can get this information from the MSDS (Material Safety Data
Sheets). These are filed in
alphabetical order in the MSDS book located above the bench by Peter’s office.
You can obtain on-line MSDS information through the LSS system (see next page) or by calling 3-0467.
2.
Check the Yellow Pages of the University Chemical Safety Manual on the shelf by Peter’s
office for procedures concerning commonly used chemicals
3.
Use
the fume hood when working with toxic or carcinogenic chemicals.
4.
Wear
gloves, goggles, and a lab coat when working with chemicals.
5.
Do
not wear open toed shoes in the lab.
6.
Mouth
pipetting is never allowed.
7.
Emergency eyewashbottles at every sink or use big hose on the sink.
8.
Emergency shower– entry way K-081.
9.
Spills – We have solutions to
neutralize chemical spill on the chemical bench. One is for acids, one is for bases and one is for organic
substances and toxins.
10.
The
“Chemical Safety Manual” is located on the shelf located above the bench by
Peter’s office. Familiarize yourself
with it’s contents.
11. Chemical inventory. Room and location in the front of the MSDS
book list all of our chemicals and in the red binder on freezer 4. They are
also listed on-line in the LSS.
12.
LOG IN ALL INCOMING
CHEMICALS ON THE INVENTORY SHEET ON THE
REFRIGERATOR.
Chemical control
Orders--
order the smallest reasonable amount of carcinogens or toxins. When possible,
order the hazardous substance premixed so you do not have to weigh the powder.
Waste -- Hazardous waste disposal
forms are in the front of the MSDS book.
USE THEM.
Sink logs -- Federal and Washington State laws require a record of chemicals
poured down the drain. Use the sink
logs by the sinks to record your waste.
In an emergency
Call Campus Heath Service 548-4848 Room NN256A
or
go directly to the University Hospital
Emergency Room
or
call 9-911
Chemical Spills
Copied from: http://www.ehs.washington.edu/Services/Spill_Response.htm
Chemical Spill Basics
Hazardous material spills that do not endanger workers in the immediate area
may be cleaned up by area personnel who have been trained and are properly
equipped to clean up the spilled material safely. Spill kits are
available from University Stores during business hours.
Our spill
kit is under the sink by the fumehood HSB K-081
The neutralizing absorbents are on the chemical bench in K-081
Hazardous material spills that cannot be safely adsorbed, neutralized, or otherwise controlled at the time of release by employees in the immediate release area are considered to be emergencies requiring outside assistance by the Seattle Fire Department (SFD), Environmental Health & Safety (EH&S), and possibly a spill cleanup contractor.
When in doubt about whether you need help or not, it is best to call for help. EH&S staff cannot clean up spills but can offer advice on how to handle spills. Call 206.543.0467.
When you need emergency help, do the
following:
- Alert others and evacuate all affected areas.
- Pull the fire alarm if needed or report the incident to UW police:
- UW Campus or UWMC dial 9-911
The UW Police will notify the Seattle Fire Department (SFD) who will respond, stabilize, and contain the spill. Environmental Health & Safety (206.543.0467) will advise SFD as needed. The incident may require use of a spill clean up contractor at the department's expense. All waste must be contained and labeled as instructed by EH&S.
Major Chemical Spills
Pull the Fire Alarm or call 9-911
A major chemical spill is:
- One that has caused
injury to personnel or is likely to cause injury, or
- Uncontained and
spreading out of the immediate area endangering other labs, or
- Has the potential to
cause a fire.
Pull the fire alarm if someone has been injured. This is the fastest way to get help and alert others nearby of the emergency. The Seattle Fire Department is the primary responder for major chemical spills.
Minor Chemical Spills
Call 206.543-0467
Laboratory employees are responsible for minor spills of the chemicals they commonly use. Cleanup of minor spills is part of managing your laboratory chemicals properly. EH&S can provide training and consultation but does not maintain a Hazardous Materials Response team.
|
If you can answer YES to the following 4 questions, it
is safe for you to clean up the spill: |
|
1. Do you know what chemical was spilled? 2. Do you know the hazards of the spilled chemical? 3. Do you have a chemical spill kit?
|
|
If you answered NO to any of the above questions or need
assistance with the spill cleanup, evacuate the area and call EH&S at
206.543.0467 for assistance. EH&S will help you find the answers to these
questions or bring in an outside Hazardous Materials Contractor to do the
cleanup for you. |
Chemical Waste
Copied from: http://www.ehs.washington.edu/waste/wastechemical.htm
Routine Chemical Collection
We have a routine collection set up for
70% ethanol-30% water: Routine 2000
We have a routine collection set up for
Xylene 99% ethanol 1% Routine 2022
Wastes that are generated on a regular basis may be
set up as a routine collection. To qualify for a routine request pickup, the
composition of the waste generated must be identical each time. This is an
extremely efficient process for collection. Your routine waste is assigned a
number that is kept in our database; when you call in or e-mail the routine
number to be picked up, we automatically know the waste's composition,
regulatory codes, disposal options, and where you are located.
- To set up a routine
collection you will need to fill out a Setup Routine
Chemical Request Form.
- If you already have a
routine set up and would like to request a pickup, please fill out a Routine
Chemical Collection Request Form or call us at 685-2848 with the
routine number and quantity to be picked up.
Do I have a Hazardous Waste?
In general, chemicals that are caustic, corrosive,
flammable, toxic, or explosive are considered hazardous. Be aware that not
everything that is non-hazardous is non-regulated. Refer to the Chemical Waste
Management Guide or call 685-2848 if uncertain.
- Certain acids and bases
may be neutralized and disposed of to the sewer by the person who
generated the material. Specific instructions and neutralizing agents are
available through EH&S at 685-3759.
Preparing Chemical Waste for Pickup and
Disposal
- Chemicals must be in an
appropriate container compatible with the waste, with a securely fastened
screw top lid. As a rule, containers that were designed for solid reagents
should not be used for liquids.
- All containers must be
labeled with a UW
Hazardous Waste Label (Acrobat
Reader)), unless the container has the original manufacturer's label
on it already. The label must state all components of the waste and their
percentages (percentages must add up to 100%).
- Complete a Chemical
Collection Request Form and mail to Box 354400 or FAX to 685-2915.
When filling out the form, do not use chemical abbreviations or empirical
formulas. Be sure to list all components in the mixture using percentage
by volume (percentages must equal 100%). You may list up to four
containers of the same mixture per line on the form. Standard turn around
time is 2-4 weeks. Be aware that large requests, volume, or number of
containers may take longer to be collected.
- If you have any
questions, please contact the technologist collecting in your area at one
of the following numbers.
|
Zone 3 |
HSB |
685-2849 |
|
Zone 4 |
South Campus, HMC |
616-3200 |
What if it's an unknown?
Unknowns present a serious problem for the University.
Without an accurate chemical name, chemicals can neither be handled nor
disposed of in a safe manner.
Unknowns should be processed for collection and disposal as soon as possible
following discovery. Do not store these wastes in satellite areas. Any information,
such as history and physical properties that can be provided to the hazardous
waste staff will aid in the investigation and identification of unknowns.
Disposal companies will not accept unknown chemical waste without an analysis.
To have an unknown scheduled for testing first complete a Chemical Collection
Request Form and mail it to Box 354400 or FAX it to 685-2915. Please
include a budget name and number on the form. Currently, the cost of analysis
is approximately $83 for unknowns of less than 4L (1 gallon).
The problems presented by unknowns can be reduced by periodic examination and
inventory of stock chemicals, promptly labeling new containers, and disposing
of all unused and waste chemicals from a satellite area prior to a faculty or
staff member's departure.
Instructions for LSS
1. To get into the system click
on "Uwick” in the program files, then “SSH secure”.
2. Type curie.u.washington.edu
for host name OR click on curie.u.washington.edu if it is an option.
3. Username= gollahon
Password= rablab1
5. When the tutorial screen
appears, bypass by pressing return
6. At the next menu, chose
Chemical Inventory Menu by choosing or typing “INV”
7. At the next menu, chose
view, update, or insert
V=
view
U=
update (for changing,
deleting, and looking at files)
I= insert (for
inserting new chemicals)
9. Next
screen will be blank version of screen that you will always be working
with. To get to the files you want to
look at or update, must enter building and room codes.
Bldg
ID: HSK -- press return
Room
ID: K 081 – press Shift return
10. The screen should fill with
product information at this point if you are in the update mode.
11. While in update screen:
(.)=
delete
(O)=
save
(1)=
see options
(4)=
add a comment onto a product line
(7)=
see the online MSDS
F3=
gets you out of any screen to the previous screen
F2=
help
for
other commands, see the official LSS manual
TO ADD A CHEMICAL TO AN EXISTING FILE:
1. Log on, go to the INV menu
and chose “I” = insert
2. Enter Bldg ID: HSK-- press return
Room ID: K 081-- press enter
3. Tab to the product name
field
4. Type name of chemical and
press enter on numeric keypad
5. Find the chemical from the
list the will appear by using the down arrow key
6. Press enter to select the
product and have it placed in the inventory
7. At the point, return acts
like TAB to move between columns so that you can add info like “amount”,
“unit,” “surplus,” etc.
8. In “unit” column, press
enter to see available codes, use down arrow to select correct unit (e.g. ML)
and press enter
*If Chemical is not in LSS, but you want to add
it: at step #4 above:
1. Move cursor to blank row
using down arrow
2. Type name of product, press return
3. Type “y” to confirm that you
want to add, and press return
Radiation Safety
All laboratory members who use radioactive materials
must take the Radiation Safety Course offered by Environmental Health and
Safety
http://www.ehs.washington.edu/training/radclass.htm
http://www.ehs.washington.edu/forms/RSClass_reg_form.htm
Our laboratory is authorized to use 3H
and 32P. 3H has
low energy (0.006 MeV) beta emissions and requires no shielding. The waste is regulated and must be disposed
of in LSA boxes. 32P has beta emission (0.7 MeV) and should be
shielded with plastic.
The waste for 32P is in SEPARATE boxes
from the 3H.
All 32P
waste is in K-081 (main lab).
All 3H
waste is in K-089 (tissue culture room).
Make sure you know where to put the waste for your
isotope.
All liquid 32P sewer waste MUST be
recorded on the clipboard that is on the shelf above the PCR machines. At the
present time, there is 3H in K-089 and 32P in K-081.
The Radiation Safety Manual is on the
shelf above the bench by Peter’s office.
NO
FOOD OR DRINK IS ALLOWED IN ROOM K-089 or K-081. BOTH ROOMS MUST BE LOCKED WHEN
NO ONE IS PRESENT. We can lose our license over these two things!!!
Performing Calibrations
http://www.ehs.washington.edu/RadSaf/Rad_Calibrations.htm
The
UW Radiation Safety Office (RSO) operates an instrument calibration facility
(call (206)543-6328 for more information). Costs of meter calibration at the UW
facility are comparable to other calibration facilities.
It is not required that the RSO calibrate your instruments. Calibrations may be performed by any qualified agency or by the instrument owner, provided that it can be demonstrated that the calibration is performed correctly.
To insure compliance with state regulations:
- All survey instruments
must be calibrated at least annually.
- A record of the results
and the method of calibration must be kept on file in the lab.
- The records must be made available to the RSO or the Washington State Department of Health.
- Even if the RSO does
not calibrate your instruments, it is important that you provide them with
copies of your calibration records to ensure compliance with the UW's
Radioactive Materials License.
Fire Safety
Fire Safety. You must leave the area when there is a fire alarm. Make sure your lab area is as safe as possible before leaving. Do not use elevators.
The fire extinguishers are located outside the lab door (room K-081) and in K-079 (flow cytometry room). You should know how to use them. There is a class for this if you would like to take it. http://www.ehs.washington.edu/forms/classes/fetform.htm
In case of a big fire, activate the fire alarm in the hall. Then leave the building.
Earthquake Safety
Class offered through EEHS http://www.ehs.washington.edu/forms/classes/edform.htm
When
the Earth Shakes
- If you're at WORK OR
SCHOOL, DROP under a desk or sturdy table. Stay away from windows,
bookcases, file cabinets, heavy mirrors, hanging plants, and other objects
that could fall. Stay under COVER until the shaking stops. HOLD
onto the desk or table. If it moves, move with it. Here are some
additional tips for specific locations.
- If you are in a
HIGH-RISE BUILDING and not near a desk or table, move against an interior
wall, and protect your head with your arms. Face away from windows. Do not
use elevators. Do not be surprised if alarm or sprinkler systems come
on.
After the Earthquake
At the University you should have a predetermined place for you and your
co-workers to meet -- kiosk outside K-wing.
- Evacuate slowly and
carefully. Look before exiting to make sure there is no overhead danger.
- As you evacuate take
note of utilities. Look for wires arcing, water running, and the smell of
natural gas.
·
Report to the kiosk outside K-wing, and take note of who is
missing and any injuries that may exist.
- Call or send a runner
to the Police on Boat Street to inform them of damage, missing persons,
injuries, and utility damage.
- At your meeting spot,
assist others, and check on loved ones. Let someone know if you leave.
Hazard
Hunt
Conduct a hazard hunt at work.. Most injuries occur from interior flying or
falling items. Check at least the following items:
Top heavy free standing furniture, Heavy or breakable objects
Electronic equipment and appliances.
Unsecured cupboard doors
Hazardous chemicals, Utilities (gas, water, electrical)
Needle Sticks
The UW Campus Health Service (CHS) is the program for occupational health needs of all UW employees, students, faculty, volunteers and other designated UW affiliates.
The CHS clinic is located at the UW Medical Center on the 2nd floor (NN256A) next door to the Emergency Medicine Service or at Hall Health Primary Care Center.
Call (206) 548-4848
http://depts.washington.edu/hhpccweb/CampusHealth.html
http://www.ehs.washington.edu/Services/accinc.htm
In case of a needle stick.
1. Report the incident to Katy, Martin, or Peter.
2. Seek medical care in the CHS clinic or Emergency Room without delay.
3.
Laboratory
tests and medication for HIV post-exposure prophylaxis should be started
within 1 to 2 hours after exposure.
4. Fill out an incident report form http://www.ehs.washington.edu/forms/IncidentFillin.pdf
Problems with Cooling, Heating, the Building or
Scientic Instruments
Chilled Water Failure in Flow Cytometry Room
Call Robert Davis at 5-9438
General Heating, Cooling, Fumehood, or Building Problems:
M-F call 3-3010 or put your request on line at http://www.washington.edu/admin/facserv/workrequest.html. You will need a budget number for any repair
that is not heating or cooling. The air-conditioner in the flow room requires a
budget # because it is not a standard part of the building.
Evenings
and weekends call the University Police at 3-3010 wait for the end of the
message and then dial 0. They will contact the physical plant manager who is
on-call.
Autoclave Failure
Call Steris at 1-800-333-8828. You will need to give them the institution,
the room number and the serial number of the autoclave. Account # 46860
Gravity Sterilizer Room K059 serial # 011589306
Vacumatic Sterilizer
Room K059 serial #
011589305
Gravity Sterilizer (dirty autoclave)
Room K092 serial #
012788315
Scientific Equipment Repair
Pipetmen
go to G-156 HSB along with a budget #
Small equipment can be taken to T-287
along with a budget #
Large equipment (eg. incubators) call
543-5580 again you will need a budget #
Laminar Flow Hood in TC
Kurt Geissel
Email: kutis@u.washington.edu
Phone: direct (206) 685-9343 (with Voice Mail) department (206) 543-9510
Fax: (206) 616-3360
Telephone Problems
Call 3-0133
Hospital Laundry
Call Michelle at 206-521-1740 (for pick up call 3-6729)
Pick ups are on Fridays only
SECTION 2
Record Keeping, Animal Use
AND Computer Use
Lab Notebook
All experiments must be recorded in a laboratory notebook. Katy can supply you with a notebook.
1. Use a numbered bound notebook for all entries. Number the pages and use the first few pages for an index.
2. Use pen for all entries
3. Date all entries. Write the day and full date at the top of the page. Try to keep different experiments on different pages.
4. Record ALL experiments – Successes, failures, and things you don’t understand.
5. Enter primary data immediately. Do not keep notes on scraps of paper or paper towels to enter later. Record details -- amount, concentration, how solutions were made, time and temperature of incubations, centrifuge speed, mistakes you made along the way, etc. Make sketches or diagrams if necessary.
6. Explicitly list, label, and identify your controls or standards.
7. If you run your experiment on the flow cytometer, make a note of the protocol used and the file names. It is a good idea to make a copy of the list you give to Thong with sample numbers for your notebook.
8. End each record with your conclusion and plans. Do this as soon as possible. You should have some hypothesis of what you expected from the experiment. Did this experiment confirm your hypothesis or not?
Frozen Cell Lines Log
N2 TANK LOG INSTRUCTIONS:
The frozen cell line catalog is in the TC lab K-089 (brown binder). In an effort to minimize database disasters, you should use this catalog and not the computer to look up, record, edit or remove entries. Judy and only Judy will edit the computer logs and update this catalog as needed.
THE FIRST SECTION IS AN ALPHABETICAL LISTING BY CELL NAME.
THE SECOND SECTION IS A RACK AND BOX LISTING.
INSTRUCTIONS FOR REMOVING OR EDITING:
1. Look up your cell line in the ALPHABETICAL LISTING.
2. If you remove a line, highlight it with the attached yellow pen.
3. If you edit a line, just write the appropriate change in pen next to the entry.
INSTRUCTIONS FOR ADDING:
1. Look up the appropriate slot in the RACK AND BOX LISTING.
2. Record your new entry in pen on the appropriate line.
3. Highlight the new entry with the attached yellow pen.
ParafFin block Log
Paraffin
BLOCK LOG INSTRUCTIONS:
The paraffin block catalog is in the K-081 (brown binder) under the bench in the middle bay. In an effort to minimize database disasters, you should use this catalog and not the computer to look up, record, edit or remove entries. Jeanne and only Jeanne will edit the computer logs and update this catalog as needed.
THE LISTINGS ARE BY DRAWER AND ROW
INSTRUCTIONS FOR REMOVING A BLOCK:
1. Look up your block.
2. Make a slip of paper and label it with the name of the block you will be taking.
3. Highlight the block name with the attached yellow pen. Write your initials and date by the block name
4. Remove the block and place the slip of paper in the slot so we will know where the block belongs when you return it.
INSTRUCTIONS FOR ADDING:
5. Identify the slot and drawer where the block lives. There should be a piece of paper in the slot.
6. Remove the paper and replace the block
7. In the log write returned and the date.
Computer Use
The computers in the
Rabinovitch Lab are maintained by the Department of Pathology. For computer support or questions go to the
following web site. http://www.pathology.washington.edu/tech/ or call (206) 221-5790
Access. In order to have access to a computer in the lab you must be assigned
a password. Peter or Mike will send a
request to info@pathology.washington.edu along with the individual’s name and email address.
Computer
glitches. Send a Tech request to Computer Support http://www.pathology.washington.edu/tech/
Computer Use. The computers in the lab are
research tools and as such they are to be used to write papers and reports,
process data, access journal articles, correspond with colleagues concerning
research information etc. They are NOT
for playing games or excessive correspondence with friends.
For questions concerning UW
policy see the following web site:
http://www.washington.edu/computing/rules/
|
Improper use
of UW computers and networks can get you into trouble. It is your
responsibility to know the rules. These UW guidelines and examples of the
rules and laws of the state of Washington will help you to use computing and
networking resources appropriately. Revised Code
of Washington (RCW) - Laws passed by the State Legislature RCW 9a.52.110 Computer trespass in the first degree. RCW 42.52.180 Use of public resources for political campaigns. RCW 42.17.260 Documents and indexes to be made public. RCW 42.52.160 Use of persons, money, or property for private gain. Washington
Administrative Code (WAC) - Rules and regulations for all state agencies
WAC 292-110-010 Appropriate and inappropriate use of state resources. (revised
04/98) Frequently
asked questions about email and Internet use Washington
State Attorney General's Office Junk Email - Information from the Consumer Protection Division Email and Computer Usage by Faculty
and Staff - Notice from the Provost and Executive Vice
President When you establish a UW NetID you open a gateway to a wealth of computing resources at the UW and beyond. Remember that inappropriate use of these computing resources can result in loss of access to them. Staff use of Uniform Access computers is subject to the approval of their departments and supervisors. |
Electronic Mail (EMAIL)
UW-GS 5
(Revised) January 1998
http://www.washington.edu/admin/recmgt/uw.gs5.html
Electronic mail is a technology that allows for the written exchange of information in machine readable format. Email represents not the system, but the information communicated through the system. Email messages are public records when they are created or received in the transaction of public business. They must be retained as evidence of official policies, actions, decisions or transactions. Email messages are considered public record material with legally mandated retention requirements, and are subject to the same rules and regulations as those which govern the management of paper records. Email is managed by its content, not its format.
Purpose. Email is meant for informal correspondence and scholarly
communications. It should not be used for official record-keeping purposes.
(For further guidelines on the uses of email, see Knowing
the Rules on the Computing and Networking page)
Electronic
Management. The University of Washington does not have central
processes or resources to manage email in a way that meets specific Washington
State Code regulating the management of public records. Backup of folders may
not exist or folders may only be kept for a very short duration, so inadvertent
deletion of messages can result in loss of information.
Privacy. Confidential and sensitive information should not be sent
via email. The privacy and integrity of an email message cannot be guaranteed.
Also, once created, there is no guarantee that attempts to erase or delete
email will be effective.
Release. Under the Public Records Act (RCW 42.17.250 et seq.), if
requested by a member of the public, email must be transmitted to the UW Public
Records Office for review and possible release. Tape or disk copies of deleted
documents are also subject to the Public Records Act.
Litigation. Unless protected by legal privilege, email can and will be
discoverable in litigation. This applies to email on disk or on a backup
medium.
Legal
Proceedings. Like other forms of records, and regardless of retention
requirements, email pertaining to pending audits, or judicial or public
disclosure proceedings must not be destroyed until the issue is resolved.
Email messages are subject to the guidelines in RCW 40.14 regulating the
preservation and destruction of public records and as such are managed through
records retention schedules.
Email that is
considered to have no administrative, legal, fiscal, or archival requirements
for its retention may be deleted as soon as it has served its reference
purpose. Refer to UW-GS4 .
The following
categories of messages have specific retention periods. Refer to the University
General Records Retention Schedule or your Departmental Records Retention
Schedule for the retention period of individual items.
These records must be printed out and saved as a paper document as it is difficult for a department or unit to retain electronic records since individuals, electronic media, and desktop hardware and software change. Backup procedures for desktop equipment are often neglected and disaster recovery routines are not practiced. The only way to assure the retention of information is to print it and file it by subject or function in the appropriate paper filing system.
Policy and Procedure Directives
Correspondence or memoranda related to official public
business
Agendas and minutes of meetings
Documents related to legal or audit issues
Messages which document departmental/office actions,
decisions, operations and responsibilities
Documents that initiate, authorize or complete a business
transaction
Drafts of documents that are circulated for comment or
approval
Final reports or recommendations
Appointment Calendars
Email distribution lists
Other messages sent or received that relate to the
transaction of University business.
Animal Protocols
1. Any one who works with animals is required to attend the animal training session given by the Department of Comparative Medicine every year. See policy page: http://cer.hs.washington.edu/iacuc/policies/index.html
2. The booklet written by the Department of Comparative Medicine in on the lab safety shelf above the bench by Peter's office (Laboratory Animal Regulations).
3. You must have an approved animal protocol for any procedure you perform on animals. It is a good idea to list the number of the protocol used in your laboratory notebook when you do the procedure. Our approved protocols are in the back of the Laboratory Animal Regulations book. Protocol forms are available on-line http://cer.hs.washington.edu/iacuc/iacucforms/index.html
4. If you need help with a procedure see Katy; she has worked with animals for many years and is familiar with most animal handling techniques.
5. If you have questions about a protocol or procedure and Katy does not know the answer, veterinarians are on call 24 hr. a day to help. Call 543-6257 for assistance.
SECTION 3 TISSUE CULTURE
Tissue Culture Media Preparation
MCDB 1531( liter)
Bottle
sterile water for irrigation
Autoclaved
flasks
Bell
filter
MCDB
153 from Sigma (in refrigerator crisper)
Sodium
Bicarbonate (7.5% solution) Invitrogen/Gibco
· Pour about half
of the distilled H20 into large beaker.
· Add MCDB 153
powder to the beaker.
· Rinse the MCDB
153 packet with bottle sterile distilled H20 and add it to
the beaker.
· Fill the beaker
up to about 900 ml mark
· Stir the
solution
· Add 15.7 ml of
NaHCO3
· While stirring,
bring the final pH to 7.2 by adding appropriate 4N HCl or
4N NaOH.
· Using 1 liter cylinder, add enough distilled
H20 to bring it to 1 liter
solution
· Filter with bell filter into 200 ml plastic
flasks.
L-15 (1 liter)
Bottle
sterile water for irrigation
Two
autoclaved 500 ml bottles
Bell
filter
L-15
from Sigma (in refrigerator crisper)
· Pour 1 liter of
the distilled H20 into graduated cylinder.
· Pour about half
of distilled H20 the large beaker.
· Add L-15 powder
to the beaker.
· Rinse the L-15
packet with some distilled H20 and add it to the beaker.
· Fill the beaker
with the rest of the water from the cylinder.
· Stir the
solution
· While stirring,
bring the final pH to 7.2 by adding appropriate 4N HCl or
4N NaOH.
· Filter with bell filter into 500 ml bottles.
Barrett's Media
Preparation
|
Reagent |
Final
Conc. |
1 liter |
200 ml |
Stock |
|
MCDB-153 |
1 X |
1 package |
|
|
|
Hydrocortisone |
0.4 mg/ml |
80 ml |
16 ml |
50 mg/ml |
|
EGF |
20 ng/ml |
2 ml |
10 mg/ml |
|
|
Cholera Toxin |
10-10 M |
84 ml |
16.8 ml |
100 mg/ml |
|
Adenine |
20 mg/L |
200 ml |
40 ml |
100 mg/ml |
|
Bovine Pituitary Extract |
140 mg/ml |
140 mg |
25 mg |
[see below] |
|
Fetal Bovine Serum |
5% |
50 ml |
10 ml |
|
|
Penicillin-Streptomycin |
100 unit/ml |
10 ml |
2 ml |
10,000 units/ml |
|
Amphotericin B |
0.25 mg/ml |
1 ml |
200ml |
250 mg/ml |
|
Insulin-transferrin- selenium |
5mg/ml |
1ml |
200ml |
10 mg/ml |
|
L-glutamine |
4 mM |
20 ml |
4 ml |
|
Media
storage: Store in refrigerator
--------------------------------------------------------------------------------------------
Preparation of Growth Factors
1.
Hydrocortisone (5 mg/ml stock) Sigma
H-0396
Dissolve in water and aliquot one ml vials
and freeze
2.
Epidermal growth factor R&D Systems
Cat.# 236-EG
3.
Adenine (100 mg/ml) Sigma A-2786
1
gram of adenine + 10 ml 1N NaOH
Aliquot
in 1 ml
Store
in freezer
4.
Cholera toxin (100 mg/ml) Sigma C-8052
0.5
mg Cholera toxin + 5 ml dH20
Aliquot
into microcentrifuge tubes
Store
in the refrigerator
5.
Bovine Pituitary Extract
**Preparation depends on source of
BPE**
**Test new BPE before old lot # runs
out**
Invitrogen/Gibco BRL catalog #
13028-014 (25 mg in 5 mls--store frozen)
-Thaw and place into centrifuge tube. Spin down 5 minutes
Add supernat to media
- Remove 5 ml of media and resuspend
BPE pellet. Spin down
another 5 minutes. Add
supernat to media.
- Discard pellet
6.
Fungizone (Invitrogen/Gibco)
Thaw and aliquot into 1.7ml. microfuge
tubes. Refreeze at -20.
7. L-glutamine
Aliquot in 8 ml volumes.
Store in freezer. Thaw until clear, then
add to media.
8.
Insulin-transferrin-selenium/ITS (10
mg/ml, Invitrogen/Gibco)
Biohazardous material.
50 mg ITS + 5 ml sterile dH20
Aliquot 200 mls into microcentrifuge tubes. Store in freezer.
Product Qty Price Company Product #
Adenine 1
7.80 Sigma A 2786
MCDB
153 1 69.00 Sigma M 7403
ITS 1 72.45 Sigma I
1884
EGF 1 120.00 R&D Systems
236-EG
Fungizone 1 10.80 Invitrogen/Gibco 15295-018
BPE(25
mg) 1 25.00
Invitrogen/Gibco 13028-014
Hydro-
cortisone 1
21.00 Sigma H-0396
Media
is a modification of that described in Washington, K. et al. Gut 1994 35:879-883.
Counting cells
Ref. Selected Method in
Cellular Immunology B. B. Mishell and S.M. Shiigi ed. W.H. Freeman and Co. pg15
1. Dilute cells in media (usually a total of 10 mls) and mix well.
2.
Remove
10 ml from the tube sterilely.
3.
Add
the 10 ml cell suspension to one side of the hemacytometer.
4.
Count
the cells in area 1 through 4 (see figure below). Count only those cells touching tow of the outside borders.
5.
Determine
the cell number using the following calculation
Cell/ml = (average of number
of cells per large square) x 104 x 1/dilution
![]() Ex. If you count 39 cells in four large squares.
Ex. If you count 39 cells in four large squares.
Cells/ml = (39/4) x 104
x 1/1 = 9.75 x 10⁴ cells/m
If you have 10 mls of cells than
you have a total cell count of 9.75 x
105
Calculation of Population doulbing
Population doublings or PDL are calculated in the following manner.
ln # of cells harvested
PDL= # of cells seeded______
ln 2
For example: You plated 1 x 10⁶ cells.
You harvested 4 x 10⁶ cells.
![]()
![]()
ln 4 x 10⁶
PDL= 1 x 106
= 1.38 =
2 PDLs
ln 2 0.69
If your PDL at plating was 40.5, then your new PDL is 42.5.
Esophageal Squamous Cell Media
Reagent Final Conc. 500 mls Stock
KBM 1X
Bovine Pituitary 2
ml 13 mg/ml
Extract
Hydrocortisone 0.5
ml 0.5 mg/ml
Human Epidermal 0.5
ml 0.5 mg/ml
Growth Factor
Epinephrine 0.5
ml 0.5 mg/ml
Transferrin 0.5
ml 10 mg/ml
Insulin 0.5
ml 5 mg/ml
Triiodothyronine 0.5
ml 6.5 mg/ml
GA-1000 (Gentamicin, 0.5
ml 50 mg/ml,
Amphotericin
B) 50
mg/ml
Calcium chloride .05
mM 83 ml 300
mM
L-Glutamine
20 mM 5 ml 200 mM
How to order ingredients:
Product Qty Price Company Product #
KBM w/o
Calcium 1 47.00 Cambrex (Clonetics) CC-3104
BEGM SingleQuots 1 46.00
Cambrex (Clonetics) CC-4175
Calcium Chloride 1 15.00 Cambrex
(Clonetics) CC-4202
How to use the BEGM SingleQuots kit:
1.
Remove
vial of retinoic acid and set aside in freezer. It will not be used.
2.
Let
remaining vials thaw overnight in refrigerator (preferable). Can also thaw at room temperature or in 37°C
incubator, but must be added to KBM as soon as
they are thawed.
3.
Wipe
outside of vials with ethanol and let air-dry.
4.
Carefully
remove contents of each vial with either plugged Pasteur pipette or pipetman
and add to KBM.
Warm media by leaving out at room temperature for
about 30 mins. It is best to aliquot the amount you need before warming. Do not warm in water bath--this causes the
media supplements to degrade faster.
Media is good for approximately 2-3 weeks after addition of supplements.
Media shelf-life can be extended by only warming the amount needed for each
feeding. Repeated warming cause
supplements to degrade.
Ref: Oda, D. et al. In Vitro Cell Dev. Biol. Anim.
1998 34:46-52
Feeding Cells
Ex. of Feeding Media: 500 mls DMEM
55 mls (10%) Fetal
Bovine Serum or Fetalclone III
(Hyclone,SH30109.03)
5.5mls (1:100 dilution) of
L-Glutamine
5.5mls (1:100 dilution) of
Penicillin-Streptomycin
write on label “FBS” or”FC” to
identify, and “modified” or
“complete”
There is a list of media for cell lines in the appendix and
two notebooks with cell line guidelines in the lab.
To start a new flask of cells:
Non-Adherent lines (ex. Jurkats and HL-60) T-125 flask:
Take 5 mls of cells from old flask and place in new flask (label). Draw off most of remaining cells from old
flask; leave 5 mls behind (3 mls if a Friday and cells won’t be fed until
Monday). Dump leftover cells in
bleach. To each flask add 15 mls
prewarmed (37°C) RPMI + FBS. Screw caps all
the way down, then turn back 1/2 turn.
Put in CO2 incubator.
To do a normal feeding:
Adherent lines (ex. HeLa, Barrett’s):
Take off all of media and place in bleach. Add prewarmed media (37 0 C), 15 mls for T75 flasks, 5
mls for T25 flasks. (See tissue culture
book for volumes of other types of plates and flasks) If cells are confluent, they need to be split.
To split a flask: (T75, volumes change for different flasks)
1.
Remove all old media and place in bleach.
2.
Wash
cells 1X with 3-10 mls of Versene buffer. Make sure entire flask gets rinsed
and remove all versene.
3.
Add
1X trypsin/EDTA (1ml/T25,2.5ml./T75 and 4-5/T150,T175) flask and place in
incubator for 5-10 minutes. Do not let
cells sit in trypsin longer than 10 minutes.
Knock flask on bench to dislodge cells.
Check under microscope to see that all cells have come off the flask.
4.
To
inactivate trypsin add media with FBS (at least 2x volume of trypsin), or
straight serum. Add entire solution to
15 ml conical tube.
5.
Count
cells by pipetting up and down in tube and adding 10ml cell mixture to hemacytometer.
6.
Spin
cells in swing arm centrifuge at 1000 rpm for 8 min. ( If you are just using
the cells to reseed flasks, you can skip this step if you are diluting the
trypsin at least 1 to10 in media.)
7.
Remove
supernatant and resuspend pellet in media.
At this point you can decide how many flasks to split the pellet into.
Add equal volume of pellet plus media mixture to each flask and bring to final
volume with more media. Write passage
number, cell type and date on flask and place in incubator.
Freezing Cells
For adherent cells: 1) Trypsinize cells with 1X
trypsin/EDTA
2) Inactivate trypsin w/ media
+ serum.
transfer to conical tube
3) Do cell count
4) Spin down for 8 min at 1000 rpms
For non-adherent cells: 1) Pull off media and
transfer to conical tube
2) Be sure to leave 3-5 mls media if planning to
continue
culture
3) Do cell count
4) Spin down for 6 min at 1000 rpms
Prepare freezing media:
40
mls supplement-free media
-use
DMEM for cells cultured in DMEM, or
MEM
-use RPMI for cells
cultured in RPMI,
Hanks, MCDB, or other
non-DMEM media
5
mls FBS
5
mls DMSO
1. While cells spin collect cryovials; clearly label and date them
- optimum cell # per vial
= 1 to 3 million/ml. for adherent cells,10 million/ml. for non adherent cells.
- e.g. 6 million cells
harvested: use 3 vials with 2 million cells in each
2. After spin, pour off supernate, resuspend pellet in freezing media,
and aliquot to cryovials;
-e.g. resuspend 6 million
cells in 3ml. Freezing media and place 1 ml of cells in each cryovial = 2million cells/vial.
3. Load cryovials into Mr. Frostee and place in -80°C freezer ASAP; not good to keep cells sitting in DMSO at room
temperature.
NOTE: when freezing
large numbers of cells, Mr. Frostee can be temporarily placed in refrigerator
freezer for up to 2 hours, but don’t forget to transfer them to the -80°C freezer!!
4
In
at least 4 hours or as long as three days, Judy will move cells to N2
tank, and record cryovial information in Blue Folder N2 tank log.
5. NEVER TOUCH THE COMPUTER N2 TANK LOG!!
Thawing Frozen Cells
1. Remove from one to three vials from the liquid N2 freezer at a time, or place the vials on dry ice.
2. Warm the vials immediately by gently shaking in a 37 C water bath to thaw quickly.
3. When almost all of the ice has thawed, take the vial to the hood. Wipe the vials with 70% ethanol. Open the cryovial very slowly. Pipet the thawed cells very gently into the appropriate size flask.
4. Add media to the cells dropwise and gently tilt the flask to mix the cells and spread them over the growing surface. Be sure flask is labeled with cell name, passage or PDL, cell number, and date.
5. Incubate overnight to 24 hours or long enough for attached cells to lay down of suspension cells to settle. Change the media to fresh media.
Starting Primary Cultures from Barrett’s Esophagus Biopsies
**Remember to keep everything as sterile as possible. Biopsies should be considered as biohazardous
material--be extremely careful when processing**
1.
Collect
biopsies in vial containing tissue culture medium without DMSO. Keep vial on ice until processing
biopsies. Ideally, use around 6 to 12
biopsies from each patient.
2.
Transfer
biopsies to a sterile 100 mm tissue culture dish. Rinse at least twice with 10 mls of 2X antimycotic solution. Leave a little liquid in plate to prevent
tissue from drying out while mincing.
3.
Using
sterile scalpel blades, mince biopsies until small enough to pass through the
tip of a 10 ml pipette (make sure to pre-moisten the inside of the pipette with
media to prevent tissue from sticking to pipette).
4.
Add
5 mls of tissue culture medium to pre-aliquoted collagenase III (25 mg in 15 ml
conical tube). Pipette up and down
until powder is completely dissolved.
5.
Add
collagenase solution to plate containing minces. Using a pre-moistened 10 ml pipette, transfer collagenase
solution containing minces to a sterile T25 flask. Place flask in incubator at 37°C and let tissue digest for
at least 5 hours.
6.
Transfer
minces and collagenase solution to 15 ml conical tube. Pipette up and down vigorously to dissociate
tissue. Some visible tissue pieces will
remain.
7.
Pellet
cells and tissue in centrifuge. Remove
supernate and add fresh medium (use 1 ml per dish or well). Transfer to sterile 35 mm or 6-well tissue
culture dish and place in incubator.
8.
Leave
dish undisturbed for 48 hours—check to make sure there is sufficient culture
medium to prevent tissue and cells from drying out but not so much that tissue
pieces float. If needed, add a little
more media during this time.
9.
Change
tissue culture media, being careful not to disturb any pieces of tissue that
have adhered to the plate. Add 2 mls of
fresh media. Change media twice
weekly. Epithelial cells should have
explanted out by 1 week.
Collagenase
preparation: (Collagenase III stored at 4°C)
Make
fresh before processing tissue. Weigh
out appropriate amount of collagenase III.
Transfer to tube. Add enough
modified MCDB 153 media for a final concentration of 1 mg/ml. Cap tube and tilt tube up and down to
dissolve.
Modified
MCDB 153:
See
Barrett’s media section
Product Qty Size Company Product Price
Collagenase type 3
1 1 g Worthington
LS004182 $126.00
Ref: Palanca-Wessels, MCA. et al. Gastroentrerology
1998 114:295-304
Set up of Esophageal Squamous cultures
(original protocol from Dolphine Oda--slightly modified by CPW)
**Remember to keep everything as sterile as possible. Biopsies should be considered as biohazardous material--be extremely careful when processing**
1.
Keep
biopsies on ice until ready to process.
2.
Transfer
biopsies into 60 mm tissue culture dish using sterile forceps (dip in ethanol and
flame).
3.
Mince
biopsies using sterile scalpel blades until the pieces can pass through the tip
of a 10 ml pipette. [When testing this, make sure to wet the inside of the
pipette with sterile liquid or else tissue will stick to the inside of the
pipette.] Add about 5 mls of 2X
antimycotic and transfer to 15 ml conical tube.
4.
Let
pieces settle to bottom of the tube then remove supernatant with pipette. Rinse biopsies at least 5 times with 2X
antimycotic solution (use total of 50 mls) by adding approximately 10 mls of
solution and letting the tissue pieces settle to the bottom of the tube. Remove supernatant after each rinse.
5.
After
last rinse, add 6 mls of supplemented KBM
(CC-3203 from Cambrex) containing 24 mgs of dispase II. Transfer biopsies into T-25 flask. Let incubate at least 16-24 h at 37°C.
6.
Pellet
tissue and remove supernatant.
7.
Add
1 ml supplemented KBM. Using sterile
plugged Pasteur pipette, triturate tissue for about 2 minutes until the
suspension contains mainly single cells.
Add 1 ml of DMEM + 10 % FBS (or any other media containing FBS) to
inactivate enzyme.
8.
Pellet
cells and remove supernatant.
9.
Resuspend
in supplemented KBM and plate, dividing between two T-75 flasks. Return to 37°C incubator.
10.
Can
spin cells down the next day and resuspend in new KBM and replate.
11.
Feed
three times weekly with supplemented KBM.
Should see islands of “cobblestone-like” cells by 7-10 days
post-plating.
Antimycotic solution: Thaw frozen Amphotericin B (250 mg/ml) and Pen-Strep (10,000
units Pen/10 mg Strep per ml) stocks.
[For Amphotericin B preparation, see Barrett’s media section.] Prepare 100X stock by adding 2 mls
Amphotericin B stock to 18 mls Penicillin-Streptomycin stock. Label and store at 4°C. Make fresh 2X antimycotic solution just before
processing tissue. Thaw 100X
stock. Add 1 ml stock to 49 mls sterile
PBS.
Dispase II: Weigh out 24 mg aliquots of Dispase II into 15 ml conical
tubes. Store at 4°C. Reconstitute by adding 6 mls of supplemented
KBM just prior to use.
Supplemented KBM: See Esophageal Squamous media section.
Product Qty Size Company Product # Price
Dispase II 1 5g Roche
(Boehringer-Mannheim) 165 859 27.00
Soft
Agar Assay for Colony Formation
Note: All volumes are calculated to cater for 4
plates per point.
Base Agar
1. Melt 3 ml aliquots of 1% DNA
grade agarose in heat block set to 100°C for about 1 hour until
melted.
2. Reduce temperature of heat
block to cool agarose to 40°C (about 1 hour). Meanwhile, also heat 2X MCDB 153 + 10% FBS
to 40°C.
3. Mix equal volumes of the two
solutions to give 0.5% agarose + 1X MCDB 153 + 5% FBS.
4. Add 1.5 mls of mix per 35 mm
petri dish/well of 6-well plate. Allow
to set. Plates can be stored at 4°C for up to 1 week.
Top Agar
1. Melt 3 ml aliquots of 0.7%
DNA grade agarose in heat block set to 100°C for about 1 hour until
melted.
2. Reduce temperature of heat
block to cool agarose to 40°C (about 1 hour). Meanwhile, also heat 2X MCDB 153 + 10% FBS
to 40°C.
3. Remove plates from 4°C about 30 minutes prior to
plating to allow them to warm up to room temperature (or place in 37°C incubator). Label plates/wells with base agar
appropriately.
4. Trypsinize and count
cells. It is very important to have a
positive control line (e.g. ras transformed).
5. Adjust cell count to 200,000
cells/ml. This will give a final
concentration of 5,000 cells per plate/well.
6. Place 0.1 ml of cell
solution in a tube. Add 3 mls of warm
2X media to tube.
7. Add 3 mls of the melted
agarose to the 2X media and cells to give 0.35% agarose + 1X MCDB 153 + 5%
FBS. Gently pipet up and down to
suspend cells evenly. NOTE: only do one tube at a time so that agar does
not set prematurely.
8. Add 1.5 mls of mix per 35 mm
petri dish/well of 6-well plate (usually plate out in triplicate). Allow to set.
9. Add 2 mls of regular growth
media on top of agarose layer. Incubate
assay at 37°C in humidified incubator
for 10-14 days.
10. Stain plates with 0.5 ml of 0.005% crystal violet for >1
hour. Count colonies using dissecting
scope.
**For agarose, mix appropriate
amount of powdered agarose in PBS.
Autoclave. While warm, place 3
ml aliquots in sterile polypropylene tubes with caps.
Freezing Whole Tissue
1. Fill plastic cryomold with OCT media.
2. Carefully place tissue in OCT media and submerge tissue gently using a wooden stick. Try not to create bubbles in the media.
3. Fill plastic beaker halfway with isopentane. Carefully submerge bottom of beaker in liquid nitrogen for 2 minutes to cool the liquid.
4. Carefully slide cryomold containing tissue and OCT media into cold isopentane.
5. Submerge bottom of beaker in liquid nitrogen until OCT media hardens (turns white).
6. Store frozen section wrapped in foil and placed in plastic bag at 70ºC before sectioning with cryostat. (Sections done by Gown Lab)
Product Company Size Product # Cost
Tissue Tek II Baxter (ASF) 15 x 15 x 5 M7114-13 $10.90
Cryomold 10 x 10 x 5 M7144-12
25 x 10 x 5 M7144-11
OCT Media Baxter (ASP) M7148-4 $5.13
2-Methyl Butane UW Stores # 0013-546 $58.84
(Isopentane)
Protocol described by Marilyn Skeely (Allen Gown Lab, UW Dept. of Pathology)
Lymphocyte Preparation from
Whole Blood
1.
Collect 20 ml blood (assume »1-1.5 X 10⁶ WBC/ml whole blood) in
green top tube (sodium heparin). Keep
at room temperature. Have donor sign
consent form and log book.
2.
Add 3 ml of Ficoll-Paque at
room temperature to each of six 15-ml clear plastic centrifuge tubes.
3.
Dilute the blood in each
50-ml tube with an equal volume of RPMI 1640 without FBS (or use Hank’s
balanced salt solution) at room temperature.
This will give you about 16 ml of diluted blood/50-ml tube.
4.
Mix gently, and then
carefully, down the side of the 15-ml tube, layer the diluted blood (5-7 ml) on
top of the Ficoll-Paque.
5.
Put tubes in centrifuge;
speed should be set at zero. Start
centrifuge and increase speed gradually to prevent disturbing the layer. Centrifuge for 40 min at 1200 rpm. Make sure the BRAKE IS OFF. You do not want
an abrupt stop. You want a gradual
start and a gradual stop.
6.
After spin, you should see a
clear separation of layers.
![]()
![]()
![]()
![]()
![]() Plasma (yellowish)
Plasma (yellowish)
![]() Mononuclear cell layer
Mononuclear cell layer
![]()
![]()
![]()
![]()
![]()
![]() (buffy coat)
(buffy coat)
![]()
![]() Ficoll-Paque
Ficoll-Paque
![]()
![]() (clear)
(clear)
![]() RBC
RBC
7.
Using a sterile, clear, plugged
Pasteur pipette, go through the upper layer down to the buffy coat and collect
as much of it as you can and as little of the other layers as possible. The buffy coat contains the mononuclear
cells (lymphocytes). Put the cells into
a new 15-ml tube.
8.
Add RPMI to dilute each tube
up to 13-ml line (sometimes this will mean adding only 3-4 ml).
9.
Spin 10 min at 1200 rmp.
10.
Carefully
aspirate off supernatant. Gently loosen
the pellet by tapping.
11.
Resuspend in
10 ml RPMI for washing.
12.
Spin 10 min
at 800 rpm.
13.
Aspirate
carefully. Loosen the pellet.
14.
Resuspend in
10 ml of RPMI
15.
Determine
cell count (use hemacytometer).
Preparation of Mouse
Embryo Fibroblast Cell Strains
(adapted from Laura Hays/
Meuth Lab protocol) 4/14/2004
1. Euthanize mouse and cut into abdominal cavity.
2. Tear open uterus and yolk sac with pair of
forceps, remove embryos and tear away amniotic sac/placenta. Cut off the head
and place it in an eppendorf tube. Place the body in a sterile petri dish with
PBS (from a bottle of sterile PBS) – the amount of PBS should be enough to
cover the bottom of the dish. Repeat for all – labeling both the plate and tube
for each pup.
3. Cut the body in half and remove the liver (this
removes the majority of RBC which will be toxic to the cultures). Take the remaining
pieces to new dish with 10 ml of 0.25% Trypsin/EDTA. Then, holding the
remaining embryo with forceps, slice several times with razor blade (This is a
sort of tenderizing step, and is better if the embryo is not cut into several
pieces). Mince finely with a razor blade. Pipette up and down a few times with
a wide bore pipette. Incubate 37° for 15 min. Do these steps
in batches up to 6 embryos before the 1st incubation. Then, start
working on the next batch.
4. Add 5 ml. more Trypsin/EDTA; pipette up and down
a few times and incubate 37° for 5 min. (This step can
go a lot longer so don’t worry).
5. Filter through Falcon 2360 100 micron filter into
a 50 ml conical tube containing 5ml medium. Spin 10 min. 1500 rpm. Remove s/n
very carefully with pipette (i.e.
don’t use an asprirator on a vacuum line). If the cells do not pellet well or
the pellet dislodges, respin. Resuspend in media.
DMEM with 4.5g/L glucose
BioWhittaker 12-614F with:
1X
glutamine GIBCO 25030-081
2X NEAA BioWhittaker 13-114E
1X
Pen/Strep BioWhittaker 17-602E
10% Fetal Clone
III Hyclone SH 30109.03
6. Pipette into T150 flask or other flask and put in
incubator. Incubate 24 to 48 hours in a 37C incubator with 5% CO2 and 3% O2. Do
not let cells grow to more than 70-80% confluency before splitting.
7. Trypsinize and count cells. Freeze 1-1.5 million
cells in cryovials in freezing media
with 10% DMSO. Label with cell name, number, date and PDL 0. Seed flasks at
0.5-1 million per T150 or 175 or 0.25 million cells per T75. Check daily so
that the cells are not allowed to become confluent.
Genotyping:
- Take a 1mm cube from
the head. Freeze the rest of the head.
- Add tail piece and 50
ul of 0.1M NaOH to PCR tube
- Boil for 30 min (PCR
machine).
- Add 50 ul of 1 M Tris
(ph7.6) to neutralize
- Vortex; quick spin to
settle debris.
- Need 1ul template for
PCR
- Run standard hCAT PCR
(or other PCR genotyping protocol) for genotyping
Fixation and embedding cultured cells in agarose for paraffin
1. For adherent cells trypsinize and suspend in media with serum. For non-adherent cells simply harvest.
2. Pellet cells by centrifugation and wash two times in PBS.
3.Gently resuspend pellet of washed cells in 0.5% paraformaldehyde in PBS. Incubate for 20 minutes at room temperature.
4.Wash cells two times in PBS.
5.Resuspend the pellet in 70% ethanol and incubate overnight at 4 °C.
6.NEXT DAY—wash cells two times in PBS and pellet by centrifugation in 1.6 ml microfuge tube.
7.Remove most of the PBS and mix the cells gently with a toothpick.
8.Warm the cells to about 70°C and add an equal volume of 3% agarose (melted and at about 80°C) (Sea Plaque GTG Agarose Cambrex (FMC BioProducts) Cat. No 50111 made in water). Gently mix the cells with the agarose using a toothpick to minimize bubbles.
9.Cool completely and remove agarose cell pellet
10. Wrap in tissue paper and place in a tissue mold. Put in 70% ethanol and store at 4°C until ready to embed.
11. Take the mold to Hisopathology lab (C-417) with a budget number and instructions. The turn around time for processing and cutting blocks is about 1 week.
Section 4 Maintenance and calibration of Incubators
Changing the CO2 Tanks
Before beginning make sure the manifold has
changed to the spare tanks by turning the
switch
with an arrow painted on it to the side of the spare tanks (The side with
pressure in the tanks). Also inspect
all three gauges for the correct CO2 pressure (obviously one will be
almost zero).
1.
To
change the CO2 tanks first turn the valves on the used tanks to off. Loosen the pigtail at the tank. Some gas will be released however the
whistle from the escaping gas should end in a matter of seconds. If it does not retighten the pigtail and
close the valve more.
2.
After
disconnecting the manifold from the tank screw the safety cap on. Always place the safety cap on the tank before attempting to
move it. If the tank is
dropped the safety top will protect the valve from breaking and possibly
causing an explosion.
3.
Undo
the chains confining the empty CO2 tanks.
4.
Carefully shuffle the empty tanks
(watch your toes) out of the area under the manifold by rolling it back and
forth across the floor.
5.
Remove
the tag that is in the pocket attached to the tank. Rip off the bottom portion that has “Full” printed on it. Reinsert the tag so that the word “Empty”
faces outward.
6.
Undo
the chains on the replacement CO2 tanks. Loosen the Safety Caps if very tight (Do not remove them).
7.
Roll
the new tanks under the manifold, where the used tanks were and remove the
safety top.
8.
Roll
the old tanks to the wall where the new tanks were and chain them so the empty
sign faces out.
9.
The
screw at the top of the tank should be covered with a piece of foil and marked
“FULL”. Remove the foil.
10.
Wrap
the screw with plumbers tape (on the shelf in TC) in the same direction as the
pigtail will tighten.
In order to ensure a tight joint between the
pigtail and the CO2 tank an O-ring must be placed at the seal. Look down the end of the pigtail. If no O-ring is present use one of the black
ones provided with the tank (usually attached with a rubber band). Tighten the pigtail to the tank. Slowly open the valve if it sounds like gas is leaking tighten the valve
until it is not. Repeat for second
tank.
Inspect the gauges one more time to see they are now all reading a normal
pressure.
Order new tanks (See stores catalogue for
ordering instructions).
Testing CO2 levels in the incubators
Testing the
level of CO2 in the incubator is accomplished using the Bacharach
kit located to the right of the two incubators stacked upright. Before beginning calibrate the Fyrite
cylinder to zero. Add Fyrite CO2
indicator refill (#11-0057) if necessary.
Testing the CO2 level of incubator 1 and 2 (Forma Scientific)
Place the translucent yellow tubing from the Bacharach kit over the black knob with a hole marked "sample". Place the other end with the black shaped head over the top of the Fyrite cylinder. Depress plunger with head and pump bulb 20 times. Do not depress plunger while Fyrite is inverted. Release plunger. Invert Fyrite until fluid fills the clear tube. Orient the Fyrite to it's original direction. Wait until bubbles have cleared to get an accurate CO2 reading.
CO2 levels of incubators 3 and 4 (Sheldon Man. Corp.)
The basic procedure remains the same for these incubators with one small variation. Push the translucent tube inside of the larger tube sticking out the top of incubators 3 and 4 to take the sample.
After finding the CO2 level record it on the paper taped to the outside of the incubator. Also record the temperature, CO2 setting, and water level, fill water with autoclaved deionized water if necessary. If there is any anomaly in the incubator's temperature or CO2 seek assistance. A normal CO2 level should be about 5%.
Section 5 Flow protocols For Apoptosis and Proliferative Survival
Hoechst 33342/SYTO 11 Protocol for Apoptosis
Ref. Syto – Poot, M. Gibson, LL, Singer, VL (1997) Detection of apoptosis in
live cells by MitoTracker Red CMXRos and SYTO dye flow cytometry. Cytometry 27:358-364
PI – (really
Ho/FDA/PI) Stohr M and Vogt-Schaden M. A new dual staining technique for
simultaneous flow cytometric DNA analysis of living and dead cells IN Laerum,
OD, Lindmo T. Thorud E. (eds) “ FlowCytometry “ Vol IV Bergen; Norrway
Universitetsforlaget pp 96-99 (1979)
Hamori, E.,
Arndt-Jovin, D.J. Grimwade, B.G. and Jovin, T.M. Selection of viable cells
with known DNA content. Cytometry
1:132-135. (1980).
This protocol determines the relative number of live (Hoechst 33342 positive/PI negative), early apoptotic (Hoechst 33342 positive/PI negative, SYTO 11 low), dead (PI positive) cells and debris signals.
1. Make the following stock solutions:
1 mM Hoechst 33342 (in distilled water (do NOT use PBS, since phosphates will precipitate the dye)
10 mM SYTO 11 dye (add 2 mL of the 5 mM stock solution from Molecular Probes, Inc. cat. # S-7573 to 1 mL distilled water)
1 mg/mL Propidium Iodide in distilled water.
The Hoechst 33342 and propidium iodide solutions keeps in the refrigerator in the dark for weeks; the SYTO 11 has to be diluted on the same day as being used.
2. Bring cells into suspension; preferably at a density of 0.2 to 0.5 million per mL.
3. Add sequentially per mL cell suspension:
10 mL Hoechst 33342
10 mL SYTO 11
5 mL Propidium iodide
4. Incubate at 37 °C for 30 minutes.
1. Analyze on the flow cytometer using the HO-PI-SYTO 11 protocol.
Hoechst 33342 from Molecular Probes cat # H-1399
SYTO 11 from Molecular Probes cat # S-7573
Propidium iodide from Molecular Probes cat # P-1304
Hoechst 33342/SYTO 11/CMXRosamine Protocol for Apoptosis
Ref.
Syto – Poot, M. Gibson, LL, Singer, VL
(1997) Detection of apoptosis in live cells by MitoTracker Red CMXRos and SYTO
dye flow
cytometry. Cytometry 27:358-364
PI –
(really Ho/FDA/PI) Stohr M and Vogt-Schaden M. A new dual staining technique
for simultaneous flow cytometric DNA analysis of living and dead cells IN
Laerum, OD, Lindmo T. Thorud E. (eds) “ FlowCytometry “ Vol IV Bergen; Norrway
Universitetsforlaget pp 96-99 (1979)
Hamori, E., Arndt-Jovin, D.J. Grimwade, B.G. and Jovin, T.M. Selection of viable cells with known DNA content. Cytometry 1:132-135. (1980).
This protocol determines the absolute number of live
(Hoechst 33342 positive/SYTO 11 and CMXRos high) vs. early apoptotic (Hoechst
33342 positive/SYTO 11 and CMXRos low) cells and debris signals. In this protocol two dyes that are sensitive
to early events during are used. CMXRos
is sensitive to changes in mitochondrial membrane potential; SYTO 11 separates
early apoptotic from “normal” cells by a not yet known mechanism. The reason for using both dyes at the time
is that not all pathways to apoptosis involve changes in SYTO 11 fluorescence;
lowered mitochondrial membrane potential appears to be a more general indicator
of apoptosis.
1. Make the following solutions:
A.
1
mM Hoechst 33342 (see Solutions section)
-- Be sure to use distilled water
(do NOT use PBS, since phosphates will precipitate the dye)
B.
10
mM SYTO
11 dye
-- Dilute
stock solution by adding 2 mL of the 5 mM stock solution
to 1 mL distilled water.
C.
20
mM
MitoTracker Red CMXRos in DMSO
-- Dilute 1:10
of the 200mM stock solution (see
Solutions section) in DMSO.
Solution Notes:
The Hoechst 33342 solution
keeps in the refrigerator in the dark for weeks.
The MitoTracker Red CMXRos
solution keeps in the freezer in the dark for weeks.
The SYTO 11 has to be diluted on the same day as being used.
2. Bring
cells into suspension; preferably at a density of 0.2 to 0.5 million per mL.
3. Add sequentially per mL cell suspension:
10 mL Hoechst 33342
10 mL SYTO 11
1 mL CMXRosamine
4. Incubate
at 37°C for 30 minutes.
5. Analyze
on the flow cytometer using the HO_Syto11_CMXRos_Apoptosis protocol. Cells
should be analyzed as soon after staining as possible.
Reagents
used in this protocol and their sources:
Hoechst 33342 from CalBiochem cat # 382065
SYTO 11 from Molecular Probes cat # S-7573
MitoTracker® Red CMXRosamine from Molecular Probes cat
# M-7512
Hoechst
33342/SYTO 11/PI Protocol for Apoptosis
Ref. Syto – Poot, M. Gibson, LL, Singer, VL (1997) Detection of apoptosis in
live cells by MitoTracker Red CMXRos and SYTO dye flow cytometry. Cytometry 27:358-364
PI – (really Ho/FDA/PI) Stohr M and Vogt-Schaden M. A new dual staining
technique for simultaneous flow cytometric DNA analysis of living and dead
cells IN Laerum, OD, Lindmo T. Thorud E. (eds) “ FlowCytometry “ Vol IV Bergen;
Norrway Universitetsforlaget pp 96-99 (1979)
Hamori, E., Arndt-Jovin, D.J.
Grimwade, B.G. and Jovin, T.M.
Selection of viable cells with known DNA content. Cytometry 1:132-135. (1980).
This protocol determines the
relative number of live (Hoechst 33342 positive/PI negative), early apoptotic
(Hoechst 33342 positive/PI negative, SYTO 11 low), dead (PI positive) cells and
debris signals.
1. Make the following solutions:
A.
1
mM Hoechst 33342 (see Solutions Section)
-- Be
sure to use distilled water (do NOT use PBS, since phosphates will precipitate
the dye)
B.
10
mM SYTO 11 dye
-- Dilute stock solution by adding 2 mL of the 5 mM stock solution
to 1 mL distilled water.
C.
1
mg/mL Propidium iodide in distilled water.
Solution Notes:
The Hoechst 33342 and propidium iodide solutions keep in the
refrigerator in the dark for weeks; the SYTO 11 has to be diluted on the same
day as being used.
2. Bring cells into suspension; preferably at a density of 0.2 to
0.5 million per mL.
3. Add sequentially per mL cell suspension:
10 mL Hoechst 33342
10 mL SYTO 11
5 mL Propidium iodide
4. Incubate at 37 °C for 30 minutes.
5. Analyze on the flow
cytometer using the HO_Syto11_PI_Apoptosis protocol.
Reagents used in this protocol and their sources:
Hoechst 33342 from
CalBiochem cat # 382065
SYTO 11 from Molecular
Probes cat # S-7573
Propidium iodide from Sigma
cat # P 4170
Hoechst
33342/SYTO 11/PI/CEN Protocol
for Apoptosis
Ref. Syto – Poot, M. Gibson, LL, Singer, VL (1997) Detection of apoptosis in
live cells by MitoTracker Red CMXRos and SYTO dye flow cytometry. Cytometry 27:358-364
PI –
(really Ho/FDA/PI) Stohr M and Vogt-Schaden M. A new dual staining technique
for simultaneous flow cytometric DNA analysis of living and dead cells IN
Laerum, OD, Lindmo T. Thorud E. (eds) “ FlowCytometry “ Vol IV Bergen; Norrway
Universitetsforlaget pp 96-99 (1979)
Hamori, E., Arndt-Jovin,
D.J. Grimwade, B.G. and Jovin, T.M. Selection of viable cells
with known DNA content. Cytometry
1:132-135. (1980).
Poot M.,
Gollahon, K.A. Gollahon, P.S. Rabinovitch (1999) Werner syndrome lymphoblastoid
cells are sensitive to camptothecin-induced apoptosis in S-phase, Human
Genetics 104, 10-14.
This protocol determines the absolute number of live (Hoechst 33342
positive/PI negative, early apoptotic (Hoechst 33342 positive/PI negative, SYTO
11 low), dead (PI positive) cells and debris signals. Thus, one can follow cells through various stages of apoptosis
and decay.
1. Make the following solutions:
A.
1 mM Hoechst 33342 (see Solutions Section) --
Be sure to use distilled water (do NOT use PBS, since phosphates will
precipitate the dye)
B.
10 mM SYTO 11 dye -- Dilute
stock solution by adding 2 mL of the 5 mM stock solution
to 1 mL distilled water.
C.
1 mg/mL Propidium iodide in distilled water.
Solution Notes:
The Hoechst 33342 and
propidium iodide solutions keep in the refrigerator in the dark for weeks; the
SYTO 11 has to be diluted on the same day as being used.
2.
Bring
cells into suspension; preferably at a density of 0.2 to 0.5 million per mL.
3.
Add
sequentially per mL cell suspension:
10 mL Hoechst 33342 (Molecular
Probes cat # H-1399)
10 mL SYTO 11 (Molecular Probes
cat # S-7573)
5 mL propidium iodide
(Molecular Probes cat # P-1304)
1 mL CEN (CEN Singlet Cytometry
Control; Riese Enterprises, Inc. Grass Vly, CA)
4.
Incubate
at 37 °C for 30 minutes
5.
Analyze
on the flow cytometer using HO_Syto11_PI_Apoptosis protocol. Cells should be
analyzed as soon after staining as possible.
Reagents used in this protocol and their sources:
Hoechst 33342 from
CalBiochem cat # 382065
SYTO 11 from Molecular
Probes cat # S-7573
Propidium iodide from Sigma
cat # P 4170
CEN are Singlet
chicken erythrocyte nuclei, Riese Enterprises, Inc. Grass Valley, CA
Processing data by the
Hoechst 33342/SYTO 11/PI/CEN Protocol for Apoptosis
This protocol determines the absolute number
of live (Hoechst 33342 positive/PI negative, early apoptotic (Hoechst 33342
positive/PI negative, SYTO 11 low), dead (PI positive) cells and debris
signals. Thus, one can follow cells
through various stages of apoptosis and decay.
1.
Open
your data files with MPLUS (in case of difficulties with this step ask Mike
Shen for assistance).
2.
Click
on GATE 2D (blue field on the bottom of the base page).
3.
Select
PMT2 and PMT PK (red options on the GATE 2D page). This will select the PMT2 data (in this assay intensities of
Hoechst 33342 fluorescence signals) on the X-axis and the PMT2 PK (peak height
of the Hoechst 33342 fluorescence signals) on the Y-axis. A picture similar to the one shown in the
top panel of the figure should appear.
4.
Draw
a diagonal as shown in the figure.
Single cells will appear above the diagonal, while clumps will appear
below the diagonal. This is because
clumps have a relatively lower peak height than do single particles of the same
total fluorescence intensity.
5.
Click
“DONE”.
6.
Select
PMT 2 LOG and PMT 5 LOG. This selects
the Log distribution of the Hoechst fluorescence signals of all cells on the
X-axis and the Log distribution of the SYTO 11 and PI fluorescence signals of
all cells on the Y-axis. The green
fluorescence of SYTO 11 “bleeds” into the channel of the red PI fluorescence
(PMT 5). In this way “normal” cells
(high SYTO 11 and PI negative) appear in the middle of the screen, “apoptotic”
cells (low SYTO 11 and PI negative) appear in the bottom half of the screen and
“dead” cells (PI positive) appear on the top of the screen.
7.
Draw
the regions as indicated in the bottom panel of the figure and save the result
by clicking on “WINPRINT”. This saves
the image and the signal numbers within each frame.
8.
After
you are done with all your data files, you can exit MPLUS by clicking “exit”
and use PRINT ALL to print all saved files.
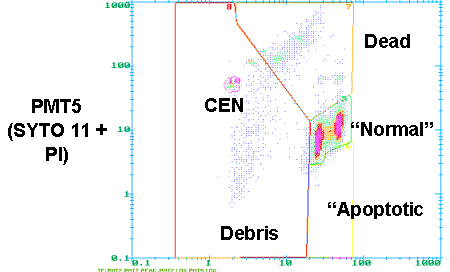
Gating to exclude clumps PMT2 (Hoechst or DAPI) Gating of “Normal”, Apoptotic and Dead Cells and Debris in the Hoechst/SYTO 11/PI/CEN Assay PMT2 LOG (Hoechst 33342)
Hoechst
33342/MTG/CMXRosamine Protocol for Apoptosis
Ref. Poot, M. and Pierce, R.H. (1999) Detection of changes in mitochondrial function during apoptosis by simultaneous staining with multiple fluorescent dyes and correlated multiparameter flow cytometry. Cytometry 35; 311-317.
Poot M and Pierce RH. Analysis of mitochondria by flow cytometry. Methods Cell Biol 2001;64:117-28
Poot M Mulitparameter Analysis of Physiological Changes in Apoptosis Current Protocols in Cytometry (2000) 9.15.1-9-9.15.7.
This protocol determines the number of live (Hoechst 33342 positive and
MTG/CMXRos high) vs. early apoptotic (Hoechst 33342 positive and MTG/CMXRos
low) cells and debris signals. In this
protocol, three dyes are used. Hoechst
stains all cells that contain DNA and resolves cells according to cell cycle
stage; CMXRos is sensitive to changes in mitochondrial membrane potential; MTG
reports the level of mitochondrial protein in cells. The reason for using MTG
and CMXRos simultaneously is that this combination gives a better resolution
between apoptotic (compromised mitochondria) and normal cells.
1. Make the following solutions:
A.
1
mM Hoechst 33342 (see Solutions section) -- Be sure to use distilled water (do
NOT use PBS, since phosphates will precipitate the dye)
B.
20
mM MitoTracker Green (MTG) in
DMSO. -- Dilute1:10 of the 200 mM stock solution (see
Solutions section) in DMSO.
C.
20
mM MitoTracker Red CMXRos in
DMSO -- Dilute 1:10 of the 200mM stock solution (see
Solutions section) in DMSO.
Solution Notes:
The Hoechst 33342 solution
keeps in the refrigerator in the dark for weeks.
The MitoTracker Red CMXRos
solution keeps in the freezer in the dark for weeks.
The MitoTracker Green (MTG)
solution keeps in the freezer in the dark for weeks.
2. Bring cells into
suspension; preferably at a density of 0.2 to 0.5 million per mL.
3. Add sequentially per mL cell suspension:
10 mL Hoechst 33342
1 mL MTG
1 mL CMXRosamine
4. Incubate at 37˚C for 30 minutes
5. Analyze on the flow cytometer using the
HO_MTG_CmxRos protocol. Cells should be
analyzed as soon after staining as possible.
Reagents used in this protocol and their sources:
Hoechst 33342 from
CalBiochem cat # 382065
MitoTracker® Green MTG from
Molecular Probes cat # M-7514
MitoTracker® Red CMXRosamine
from Molecular Probes cat # M-7512
Proliferative Survival Protocol
Poot M, Silber JR, Rabinovitch PS.A novel flow cytometric technique for drug cytotoxicity gives results comparable to colony-forming assays. Cytometry 2002 May 1;48(1):1-5This procedure is based on the BrdU/Hoechst method according to:
Kubbies
M and Rabinovitch PS (1983) Flow cytometric analysis of factors which influence
the BrdUrd-Hoechst quenching effect in
cultivated human fibroblasts and lymphocytes. Cytometry 3:276-281
Rabinovitch
PS, Kubbies M, Chen YC, Schindler D, Hoehn H (1988) BrdU-Hoechst flow
cytometry: a unique tool for quantitative cell cycle analysis. Exp Cell Res
174:309-318.
This protocol determines the number of proliferating and
non-proliferating cells in cell cultures.
The protocol involves exposure of cells to 5-bromodeoxyuridine,
harvesting them, staining with a buffer that contains Hoechst 33258 dye and a
known number of chicken erythrocyte nuclei (CEN). Incorporation of BrdU into the DNA leads to quenching of Hoechst
fluorescence. In this way, cells that
have undergone one or two rounds of DNA replication can be distinguished from
resting cells. To resolve cells in the
G1, S and G2 phase of the cell cycle samples are counterstained with ethidium
bromide. By dividing the number of
cells in the G1, the S and the G2 compartments of the first, second and third
cell cycle by the number of CEN their numbers per unit of sample volume is
determined.
1. Make the following stock solutions:
10 mM 5-bromodeoxyuridine
(BrdU; Sigma B-5002) in phosphate buffered saline (PBS). You may need to warm the PBS to 37oC,
since 10 mM is close to the maximum solubility of BrdU. Filter sterilize and store at 4oC
in the dark. This solution keeps for at least one month.
Hoechst
buffer (see next page)
200 mg/ml ethidium bromide.
Dilute 200 mL of a 10 mg/ml stock
(Sigma: E-1510) into 10 mL distilled water.
Store at 4 oC in the dark. This solution keeps for at least
one month.
2. Culture cells for at least
one cell cycle duration in the presence of 100 mM BrdU. (See BrdU/Ho/EB protocol in this lab manual
for BrdU treatment) Note: some cell
types may be sensitive to BrdU, which leads to G2 phase arrest. In case an elevated level of G2 arrest is
suspected, it is recommended to test a series of BrdU concentrations (see
Rabinovitch et al., 1988). During BrdU
labeling, all cell cultures should be protected from light by wrapping all
plates or flasks in aluminum foil.
3. Harvest cells according to
standard procedures (keep cells protected from light all stages of handling).
4. Strongly vortex chicken
erythrocyte nuclei (named CEN Singlet Cytometry Control; Riese Enterprises,
Inc. Grass Vly, CA) and add 1 mL of CEN per mL of Hoechst
buffer.
5. Resuspend cells in Hoechst
buffer; preferably at a density of 0.2 to 0.5 million per mL.
6. After at least 15 minutes of staining at room
temperature in the dark (usually in a cabinet) add 20 mL of ethidium bromide per mL
of cell suspension.
7. Stain for another 15 minutes in the dark.
8. Analyze samples on the flow
cytometer by using the Z-Prol-Surv protocol.
Hoechst Buffer: 500 mls
Final concentration Amount
to add
0.154 M NaCl 4.5 g NaCl
0.1
M Tris, pH 7.4 50 ml of 1 M Tris pH 7.4
0.1%
NONIDENT P-40 500 ml of NONIDENT P-40
(IGEPAL CA-60)
1
mM CaCl2 1 ml of 500 mM CaCl2
5
mM MgCl2 5
ml of 500 mM MgCl2
0.2%
BSA 1 g BSA
2.5 mg/ml Hoechst 33258 2 ml of 590 mg/ml Hoechst
33258
qs to 500 ml with dH20
Processing data for the
Proliferative Survival Protocol
This protocol determines the number of proliferating and
non-proliferating cells in cell cultures.
The protocol involves exposure of cells to 5-bromodeoxyuridine,
harvesting them, staining with a buffer that contains Hoechst 33258 dye and a
known number of chicken erythrocyte nuclei (CEN). Incorporation of BrdU into the DNA leads to quenching of Hoechst
fluorescence. In this way, cells that
have undergone one or two rounds of DNA replication can be distinguished from
resting cells. To resolve cells in the
G1, S and G2 phase of the cell cycle samples are counterstained with ethidium
bromide. By dividing the number of
cells in the G1, the S and the G2 compartments of the first, second and third
cell cycle by the number of CEN their numbers per unit of sample volume is
determined.
1.
1.Open
your data files with MPLUS (in case of difficulties with this step ask Mike
Shen for assistance).
2.
2.Click
on GATE 2D (blue field on the bottom of the base page).
3.
Select
PMT2 and PMT PK (red options on the GATE 2D page). This will select the PMT2 data (in this assay intensities of
Hoechst 33258 fluorescence signals) on the X-axis and the PMT2 PK (peak height
of the Hoechst 33258 fluorescence signals) on the Y-axis. A picture similar to the one shown in the
top panel of the figure should appear.
4.
Draw
a diagonal as shown in the figure.
Single cells will appear above the diagonal, while clumps will appear
below the diagonal. This is because
clumps have a relatively lower peak height than do single particles of the same
total fluorescence intensity.
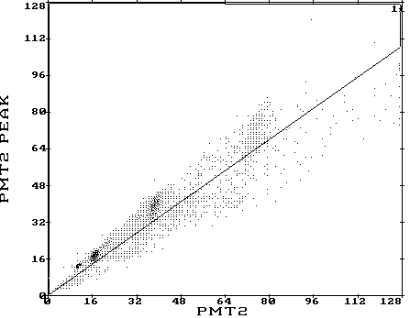
5.
Click
“DONE”.
6.
Select
PARAM A and PARAM B. This selects the
distribution of the Hoechst fluorescence (quenched DNA) signals of gated cells
on the X-axis and the distribution of the EB fluorescence (unquenched DNA)
signals of gated cells on the Y-axis.
7.
Click
“Set Region” to draw gates of different cell cycle phases in various regions
(see figure next page)
a.
G0
cells in region #5
b.
First
cycle (G0+S+G2) cells in region #6
c.
Second
cycle (G1’ + S’ + G2’) cells in region
#7
d.
Third
cycle (G1’’ + S’’ + G2’’) cells in region #8
e.
CEN
cells in region #9
Can include in gate #6
![]()
![]()
![]()
![]()

![]()
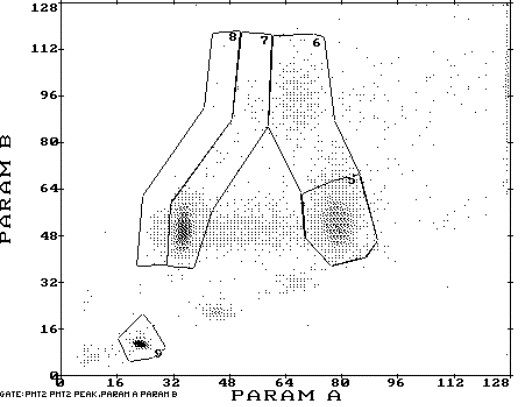
8.
Regions
from #5 to #9 are set in counter clockwise direction starting from lower right
corner for region #5
9.
Draw
the regions as indicated in the bottom panel of the figure and save the result
by clicking on “WINPRINT”. This saves
the image and the signal numbers within each frame.
10.
After
you are done with all your data files, you can exit MPLUS by clicking “exit”
and use PRINT ALL to print all saved files.
Calculations for
Proliferative Survival
There is probably an easier
way to describe this, but this is the way I understand.
A. List the gates in the following order then enter the number of events in each gate.
|
1st
cycle |
2nd
cycle |
3rd
cycle |
CEN
|
|
|
Enter # cells |
Enter # cells |
Enter # cells |
Enter # cells |
Enter # cells |
B. Correct for the number of cells relative to CEN then multiply each corrected number by 10,000
|
Corrected # cells in 1st cycle |
Corrected # cells in 2nd cycle |
Corrected # cells in 3rd cycle |
|
|
(# cells gate #5/ |
(# cells gate #6/ |
(# cells gate #7/ |
(# cells gate #8/ |
C. Calculate the total
number of proliferating cells
Add the Corrected # of cells in the 1st cell cycle + (Corrected # of cells in the 2nd cell cycle) divided by 2 + (Corrected # of cells in 3rd cell cycle) divided by 4. This gives you the total # of proliferation cells (corrected for the number of divisions they have undergone). Then average the replicates.
D. Normalize the # of proliferating cells from each treatment group to the control. The control will always be 100%.
For example
|
Group |
Total number of proliferating cells |
Proliferative survival |
|
Control |
1276 |
(1276/1276) X 100 = 100% |
|
2 nM CAM |
1395 |
(1395/1276) X 100 = 109% |
|
4 nM CAM |
1024 |
(1024/1276) X 100 = 86% |
|
8 nM CAM |
259 |
(259/1276) X 100 = 19% |
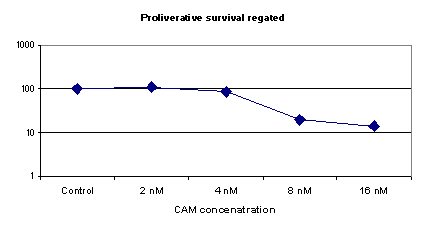
Section 6 Protocols for FISH and Antibody Stains
Slide preparation for sorts
1. To clean slides for sorts place pre-cleaned frosted slides into staining racks (holds about 20 slides).
2. Set up ethanol baths 30%, 70% and 100%.
3. Dip slides up and down three to five times in the 30% bath.
4. Dip slides up and down three to five times in the 70% bath.
5. Dip slides up and down three to five times in the 100% bath.
6. Allow the slides to air dry.
Deparaffinization of tissues on slides
Be sure to have tissue mounted onto CHARGED slides.
1. Bake slides in 90˚C heat block for 30 min.
2. Wash slides in Xylene 3x for 5 min each.
3. Dehydrate slides in 100%, 90%, 85%, 70% ethanol for 2 min each.
4. Dip slides in water and air dry.
5. Mark tissue area with diamond pen.
6. Store under nitrogen or at –20°C
Staining
for Pericentrin
1. Wash slides with 1X Hanks buffered saline solution.
2. Cover with 80 mM PIPES for 1 minute. (PIPES was stored in refrigerator therefore 4°C).
3. Fix with methanol (-20C) for 5 minute. (Methanol stored in freezer therefore –20 C)
4. Hydrate with cold PBS until IF (stored in refrigerator if not stained immediately).
5. Incubate with PBS + 1% BSA + 0.1% Triton + 10% NGS (PBA buffer) for at least 15 min at RT. Do not let cells dry out at any point during the staining procedure.
6. Prepare affinity purified anti-pericentrin (M1-100) diluted 1:500 in PBA buffer. You will need 100ml per well (4 well slide).
7. Remove plastic chambers from slide. Cover each well with prepared antibody. Incubate in a humidified chamber for minimum of one hour at room temperature.
8. Prepare secondary GAR-FITC (Cappel) antibody as follows: Dilute antibody in PBA buffer 1:100 in an eppendorf tube. You will need 100ml per well plus 50 ml. Spin in microcentrifuge at highest speed for 10 minutes. Transfer to new tube leaving last 50 ml in bottom of tube (this removes any aggregates). Use only the antibody transferred to new tube—do not use remainder. Do not pipette up and down after spin. Leave on ice until needed.
9. After incubation with pericentrin antibody is done, wash slide with PBA buffer.
10. Cover each well with prepared secondary antibody. Incubate for at least 30 minutes light tight and in humidified chamber at room temperature.
11. Wash with PBA buffer
12. Counterstain with 1 part PBS to 3 parts PBS with DAPI (0.1mg/ml).
13. Wash with PBS.
14. Mount onto slide with DABCO. Some people edge the coverslip with fingernail polish for longer storage.
15. Store flat and light tight in refrigerator.
MPM-2/DAPI Protocol
Protocol from
C. Sanchez in B. Reid Lab
1. Harvest both floating and adherent cells. Pellet cells and remove supernate.
2. Fix each sample in 500 ml of 1% paraformaldehyde in PBS for 10 minutes at room temperature.
3. Add 3 mls NST + 0.1% BSA. Count cells (optional). Centrifuge for 8 minutes @1500 rpm (463G). Remove supernate.
4. Resuspend in NST + 0.1% BSA at desired concentration. [Cells can be stored in refrigerator before continuing with the rest of the protocol.]
5. Transfer desired amount of cell suspension into eppendorf tubes. Add 1 ml of NST + 0.1% BSA + 10% NGS. Centrifuge 8 minutes same as above. Remove supernate.
6. Resuspend in 100 ml NST + 20% goat serum. Dilute MPM-2 antibody 1:20 in NST + 20% goat serum. Add 2.5 ml of diluted MPM-2 antibody to the tubes. Incubate on ice for 30 minutes.
7. Add 1 ml NST + 0.1% BSA. Centrifuge 8 minutes same as above. Remove supernate.
8. Resuspend in 100 ml NST. Add FITC-conjugated goat anti-mouse IgG (0.5 mg/ml). Incubate on ice for 30 minutes in dark.
9. Add 1 ml NST + 0.1% BSA. Centrifuge 8 minutes same as above. Remove supernate.
10. Resuspend in 200 ml DAPI. Run on cytometer.
NST
buffer: solvent = dd H2O, store at 4°
|
Compound |
Concentration |
Component for 500 ml |
|
NaCl |
146 mM |
4.25 g |
|
Tris base* |
10 mM |
0.6 g |
|
CaCl2 |
2 mM |
2 ml |
|
NONIDENT P-40 |
0.1 % |
0.5 ml |
*Adjust the pH to 7.4 with HCl after NaCl + Tris Base
Assay for Detection of Cyclin B by Flow Cytometry (small cell number)
1. Harvest and count cells. Centrifuge for 7 minutes at 1000 rpm (all subsequent centrifugation steps are similarly performed). Resuspend in PBS at 2 x 10⁶ cells/ml and aliquot 250ml of each sample into a serum coated eppendorf tube (1.5 ml). Add 500 ml PBS and pellet cells.
2.
Aspirate PBS.
Resuspend in 250 ml of fresh PBS. Add 750 ml of
paraformaldehyde and let cells fix for 10 minutes at room temperature.
3.
Pellet cells.
Aspirate supernate. Resuspend
cells in 1 ml of 1% BSA, 0.25% triton X-100 in PBS and place on ice for 5
minutes.
4.
Add 5 mls of 1% BSA in PBS. Pellet cells.
5. Aspirate
PBS. Resuspend cells in 100 ml of
PBS containing 1% BSA, 10% NGS. Add 10 ml
anti-cyclin B antibody (BD (Pharmingen)) and incubate sample at 4°C
overnight.
6.
Add 500 ml 1%
BSA in PBS. Pellet cells.
7.
Aspirate supernate and resuspend in 250 ml
DAPI. Run on flow cytometer.
Double Staining with Cyclin B and Pericentrin (sequential staining)
1. Incubate with PBS + 1% BSA + 0.1% Triton + 10% NGS (PBA buffer) for at least 15 min at RT. Do not let cells dry out.
2. Prepare anti-cyclin B (BD (Pharmingen)) as follows: Dilute antibody 1:1000 in PBA buffer in an eppendorf tube.
3. Incubate in anti-cyclin B (BD (Pharmingen)) in PBA buffer (at appropriate dilution) overnight at 4°C in a humidified chamber.
4. Wash with PBA buffer.
5. Incubate with affinity purified anti-pericentrin (M1-100) diluted 1:500 in PBA buffer at RT in a humidified chamber for minimum of one hour.
6. Wash with PBA buffer.
7. Prepare secondary GAR and GAM-antibodies as follows: Dilute antibodies in PBS + 10% NGS to appropriate concentration in an eppendorf tube. Spin in microcentrifuge tube at highest speed for 10 minutes. Transfer to new tube leaving last 50 ml in bottom of tube (this removes any aggregates). Use only the antibody transferred to new tube—do not use remainder. Do not pipette up and down after spin.
8. Incubate with secondary GAR-FITC (Cappel) 1:100 and GAM-Cy3 (Caltag) 1:80 in PBS + 10% NGS for at least 30 minutes light tight and in humidified chamber.
9. Wash with PBA buffer
10. Counterstain with 1 part PBS to 3 parts PBS with DAPI (0.1mg/ml).
11. Wash with PBS.
12. Mount onto slide with DABCO. Some people edge the coverslip with fingernail polish for longer storage.
13. Store flat and light tight in refrigerator.
Epi shake off procedure to isolate G1 cells for FISH and G2 cells for anaphase bridge scoring
Experiment: Isolation of epithelial cells
using epi-shake off methodology
Date:
Solutions to make:
- Buffer A: Hanks (without
calcium or magnesium) + 5mM DTT.
- Soaking solution: Buffer A + EDTA (To 4
mL of buffer A, add 40 mL 500mM EDTA). This
solution should be heated to 37oC.
- Shaking solution: 4 mL buffer A + 40 mL of 500mM Ca2+ +
40 mL of 500 mM Mg2+ +
400 mL DMSO.
Method:
- Remove colon sample
from –80C freezer, pour contents of the sample tube into a petri dish,
wash piece of tissue with PBS and pour out excess liquid.
- Manipulate colon sample
with the use of needles to bring the stroma side up (the sample should be
concave). Put some superglue on a wooden stick, just enough to coat the
bottom of the stick. With the stick, touch the stroma side of the colon
sample and stick the rest of the sample upon the edge of the stick,
manipulating it with an needle. Note: if the sample is less than
1mm x 3mm, DO NOT GLUE, put it directly into the soaking solution.
- Stick a needle into the
end of the stick, just as far enough so that the sample will be suspended
in the soaking solution in the centrifuge tube.
- Put the stick into the
15 mL centrifuge tube containing 2 mL SOAKING
SOLUTION at 37oC in a heat block. After 5 minutes, remove
the stick from the soaking solution and remove the needle.
- Place the stick into 2
mL SHAKING SOLUTION on ice and
shake for approx 30 secs (this time will vary depending on exp been
performed). You can embed the remaining tissue to check if epithelial
cells remain after this procedure (this is optional).
- The cells are now in
Shaking solution. The cells can remain on ice in this solution or can be
frozen at –80°C until ready to use.
Take a cell count using 10 mL of the total cell
suspension.
- To proceed with the
protocol, cells are centrifuged at 1,000 rpm for 8 min, cell pellet is
washed with PBS, and centrifuged at 1,000 rpm for 8 min.
- Resuspend pellet in 1%
paraformaldehyde for 15 min at room temp. Centrifuge cells at 1,000 rpm
for 8 min, remove supernatant and wash pellet in 1X PBS.
- Centrifuge cells at
1,000 rpm for 8 min, remove supernatant and resuspend cells in PBS+1%BSA +
0.25% Triton-X-100, incubate for 5 min on ice.
- Centrifuge cells at
1,000 rpm for 8 mins, remove supernatant and wash pellet in PBS,
centrifuge cells at 1,000 rpm for 8 min, remove supernatant and resuspend
pellet in DAPI (without NP40, but containing DMSO). At this stage the
sample can be frozen -20C until ready to be flow sorted. The flow protocol
to use to sort G1 and G2 cells simultaneously is named:
“JOS DAPICOMPENSATED 3-12-02”
Epi shake off: isolation of epithelial cells
updated by
Rosana Risques, 10/16/03
(material
needed is in a box labeled ‘epi’ over Judy’s bench)
Solutions to make:
- Buffer A: Hanks (without
calcium or magnesium) + 5mM DTT.
- Soaking solution: Buffer A + EDTA (To 4
mL of buffer A, add 40 mL 500mM EDTA). This
solution should be heated to 37oC. Prepare 2ml per sample.
- Shaking solution: 4 mL buffer A + 40 mL of 500mM Ca2+ +
40 mL of 500 mM Mg2+ +
400 mL DMSO. Prepare 2ml per
each batch of epithelial cells collected (normally two).
Method:
- Remove colon sample
from –80C freezer, pour contents of the sample tube into a petri dish
(wash with PBS is not necessary).
- Manipulate colon sample
with the use of needles to bring the stroma side up (the stroma is in the
concave side and is shinny and brighter than the epithelial side, fig1).
Put some superglue on a wooden stick, just enough to coat the bottom of
the stick. With the stick, touch the stroma side of the colon sample and
glue it. Try to fold up all the stroma surface towards the stick,
manipulating it with an needle (fig.2). Note: if the sample is less
than 1mm x 3mm, DO NOT GLUE, put it directly into the soaking solution.
- Nail a needle into the
end of the stick, just as far enough so that the sample will be suspended
in the soaking solution in the centrifuge tube (fig 3).
- Put the stick into the
15 mL centrifuge tube containing 2 mL SOAKING
SOLUTION at 37oC in a heat block or water bath. After 5
minutes, remove the stick from the soaking solution and remove the needle.
- Place the stick into 2
mL SHAKING SOLUTION on ice and
vortex high speed for approx 5 secs (first batch: superficial
epithelial cells). If desired, take 10ul of cell suspension and mix with
200ul of DAPI (dil 1/20) to check in the microscope and estimate the
amount of cells and the need to shake longer.
- Place the stick into 2
mL SHAKING SOLUTION on ice and
vortex high speed for approx 20 secs (second batch: deep crypt
epithelial cells). (The cells can remain on ice in this solution or can be
frozen at –80 until ready to use).
- Centrifuge at 1,000 rpm
for 8 min, remove supernatant and resuspend in 500-600 ul of DAPI with
NP40 and DMSO (10 mg/ml) (in refrigerator 1). No extra washes are needed.
Samples can be frozen at –20C until ready to be used.
- Put the stick with the
tissue in a new tube containing aprox. 2ml of 1XPBS. Vortex 2 min (third
batch: mixture of epithelial and stroma cells). If desired these cells
can also be centrifuged and resuspended in DAPI as the other two batches.
- Put the stick with the
remaining tissue (stroma) in a Petri dish. Scrape the tissue from
the stick and add 1ml of DAPI. Mince the tissue using two scalpels. Then
collect it in an eppendorf and filter it to a glass tube using a Millipore
filter (SX0001300). Clean the filter after used with a toothbrush to
recycle it.
- Take the sample to be
sort for G1 in the flow cytometer. The epithelial cells don’t need to be
filtered, just pass through a syringe.

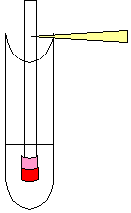
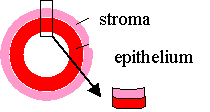
Fig 1.
Fig2. Fig 3.
Tissue Digestion and CK Staining
(dissociating
nuclei from formalin-fixed tissue) Updated by Rosana, 10/9/03
DAY 1
Cut 60uM sections, place them in a mesh bag and insert into green
cassette with large holes. If tissue is large, put only one section per
cassette. If small you can put up to 8 sections, cutting away the extra
paraffin. If very small, wrap the tissue in special tissue paper or use tape to
keep them on place. Usually Priscilla cuts them the day before and keeps them
overnight in xylene.
Run samples through the automatic processor in Priscilla’s lab: (takes 2.5 hours)
Bin#1 100% Xylene
Bin#2 100% Xylene
Bin#3 100% Xylene
Bin#4 100% Xylene
Bin#5 100% ETOH
Bin#6 100% ETOH
Bin#7 95% ETOH
Bin#8 70% ETOH
Bin#9 50% ETOH
Bin#10 30% ETOH
Bin#11 deionized water
Bin#12 deionized water
Fill Bins#11,12 with
water before beginning
Make sure other bins
are full as well
With green cassettes in and covered, press “go to 1”
Push “lower”, “reset”,
“autostart”
When finished (black
dots don’t blink), press “raise”
Empty Bins#11,12 and
wipe the water
Xylene removes paraffin, the ethanol
gradient helps to rehydrate the tissue. If we don’t start immediately we can
keep the cassettes in a beaker in water and in the fridge.
PREPARE:
collagenase 1mL aliquots (two per sample): remove from freezer 30 min
before samples come out of processor and thaw in 37°C water bath with agitation
– in glass beaker filled with water.
15ml FCS-coated falcon tubes (see note at the end)
Pour 2mL collagenase (two aliquots) into each falcon tube,
Remove samples from cassettes with tweezers and place the mesh bag into
the collagenase.
Incubate in 37°C water bath with agitation
for 4 hours. (Samples can be stored at 4°C after removing collagenase
and filling the tube with 1XPBS).
Collagenase breaks cells apart. FCS prevents the cells to
stick in the plastic.
PREPARE:
pepsin (one aliquot per sample, two if the tissue is in tape): remove
from freezer (-80C at BB246) at least 15 min before samples are done incubating
and thaw in 37°C water bath with agitation
(in glass jar). Shake and vortex to mix before using
Triton-PBA, PBA (PBA is 1 gram of BSA per liter of PBS) and 1X PBS:
place then on ice. They are in the fridge.
15ml FCS-coated falcon tubes (two per sample) and 1.5ml FCS-coated
eppendorf tubes (two per sample: neg and pos)
timer for 10.5 min.
Add pepsin (one aliquot) to a 15ml FCS falcon tube.
Remove samples from water bath (one at a time), take mesh bag out of
the tube, scrape the tissue using a plastic pipet and put it in the pepsin. If
the tissue is in tape, take out collagenase with a platic pipet and add pepsin
in the same tube.
Incubate in 37°C water bath with agitation
EXACTLY 10.5 min. (Leave 2 min between samples at least).
Vortex 15 sec high speed.
Fill tube to top with cold 1xPBS to stop pepsin action.
Filter using 74 micron mesh (in drawer with scalpels) in new Falcon
tube opening like a funnel (fold the mesh in 4 equal parts, poke sealed corner
into tube). Take the sample with a plastic pipet, be careful not to overflow,
squeeze mesh at the end. Fill to top with PBS for balance. Wait in here to
finish all the samples
Spin for 10 min @ 1700rpm @ 2°C .
Remove supernatant (pour down sink, using orange pad at end to not lose
pellet).
Add 500ul PBS and mix with pipet.
Count with hemocytometer: put 10ul in each chamber. Microscope 40X. To
count we need min 25 cells/square.
10000/count = number of cells in positive tube
put the remaining in negative tube (if we don’t count or there are few
cells, put 100ul in neg and the rest in pos)
Pepsin reverses the fixative action. The filtering is
important to avoid clogging in the flow cytometer. The amount of antibody has
been calculated for a specific amount of cells. Do not exceed it.
Add same volume of 0.2% triton-PBA to the volume of cells in both neg
and pos tubes. Incubate on ice 3 min.
Add cold PBA to stop triton action. Use dropper, fill to top.
Spin for 10 min @ 1700rpm @ 2°C.
Pour supernatant into sink (using orange pad at end)
Triton makes the membrane of cells permeable, without
destroying it.
Add antibody (in bottom drawer of fridge – neg. and pos.) and mix.
8ul of AE1/AE3 to positive samples
3ul of neg. antibody to negative samples
Incubate in the dark in the fridge overnight.
Anti-Cytokeratin (CAM 5.2)-FITC labeled, Becton Dickinson Catalog
#347653 (positive)
Mouse IgG2a-FITC labeled, Becton Dickinson Catalog #349051 (negative control)
Anti-Rabbit IgG-RPE labeled (Fab)2, Sigma Catalog #P-8172 (RPE =
R-Phycoerythrin) (negative control)
Anti-Cytokeratin (AE1/AE3) unlabelled, Roche Catalog #1-124-161 (no)
AE1/AE3 antibody needs to be conjugated Custom PE conjugation by Intergen at 1-800-468-7436
(positive)
FITC and PE are different fluorocroms. Both work equally
well. Usually we use the PE ones. Both CAM5.2 and AE1/AE3 are
antibodies for a broad spectra of cytokeratines.
DAY 2
Add PBA to fill tubes. Invert the tubes few times to clean.
Spin for 10 min @ 1700rpm @ 2°C.
Decant and re-suspend in 500ul working DAPI/DMSO (1:4 dilution pH 7.8,
in fridge). If the sample is going to be analyzed the same day keep it in the
fridge. For the next day keep it in the freezer.
Syringe with a 25G needle and transfer sample to a 3ml glass tube.
Sort in the cytometer for CK pos and CK neg cells. The sorted cells are
in 1XPBS.
DAPI stains the DNA. It works instantaneatly, but the results
look better if we wait 30 min before analysis.
NOTE: To coat the 15 ml and the 1.5 ml tubes with FCS just take 1ml of
Fetal Calf Serum (FCS) and shake it up and down to cover all the surface of the
tube (or pipet up and down in the 1.5 ml tubes). Re-use the 1ml of FCS up to
10-15 tubes.
Using a Counting Chamber
For microbiology, cell culture, and many applications that require use
of suspensions of cells it is necessary to determine cell concentration. One
can often determine cell density of a suspension spectrophotometrically,
however that form of determination does not allow an assessment of cell
viability, nor can one distinguish cell types. A device used for cell counting
is called a counting chamber. The most widely used type of chamber is called a
hemocytometer, since it was originally designed for performing blood cell
counts.

To prepare the counting chamber the mirror-like polished surface is
carefully cleaned with lens paper. The coverslip is also cleaned. Coverslips
for counting chambers are specially made and are thicker than those for
conventional microscopy, since they must be heavy enough to overcome the
surface tension of a drop of liquid. The coverslip is placed over the counting
surface prior to putting on the cell suspension. The suspension is introduced
into one of the V-shaped wells with a pasteur or other type of pipet. The area
under the coverslip fills by capillary action. Enough liquid should be
introduced so that the mirrored surface is just covered. The charged counting
chamber is then placed on the microscope stage and the counting grid is brought
into focus at low power.
It is essential to be extremely careful with higher power objectives,
since the counting chamber is much thicker than a conventional slide. The
chamber or an objective lens may be damaged if the user is not not careful. One
entire grid on standard hemacytometers with Neubauer rulings can be seen at 40x
(4x objective). The main divisions separate the grid into 9 large squares (like
a tic-tac-toe grid). Each square has a surface area of one square mm, and the
depth of the chamber is 0.1 mm. Thus the entire counting grid lies under a
volume of 0.9 mm-cubed.
Cell suspensions should be dilute enough so that the cells do not
overlap each other on the grid, and should be uniformly distributed. To perform
the count, determine the magnification needed to recognize the desired cell
type. Now systematically count the cells in selected squares so that the total
count is 100 cells or so (number of cells needed for a statistically
significant count). For large cells this may mean counting the four large
corner squares and the middle one. For a dense suspension of small cells you
may wish to count the cells in the four 1/25 sq. mm corners plus the middle
square in the central square. Always decide on a specific counting patter to
avoid bias. For cells that overlap a ruling, count a cell as "in" if
it overlaps the top or right ruling, and "out" if it overlaps the
bottom or left ruling.
Here is how to determine a cell count using a standard hemocytometer. To
get the final count in cells/ml, first divide the total count by 0.1 (chamber
depth) then divide the result by the total surface area counted. For
example if you counted 125 cells in each of the four large corner squares plus
the middle, divide 125 by 0.1, then divide the result by 5 mm-squared, which is
the total area counted (each large square is 1 mm-squared). 125/ 0.1 = 1250.
1250/5 = 250 cells/mm-cubed. There are 1000 mm-cubed per ml, so you
calculate 250,000 cells/ml. Sometimes you will need to dilute a cell suspension
to get the cell density low enough for counting. In that case you will need to multiply
your final count by the dilution factor. For example, suppose that for
counting we had to dilute a suspension of Chlamydomonas 10 fold. Suppose we
obtained a final count of 250,000 cells/ml as above. Then the count in the
original (undiluted) suspension is 10 x 250,000 which is 2,500,000 cells/ml.
Slide Fixation for CK-sorted cells dropped from Flow Cytometer
After the cells are sorted on to slides, and
slides marked, and air dried overnight.
Next day proceed as follows.
1. Fix each slide in fume hood by adding 1 ml cold methacarn (3:1 methanol:acetic acid).
2. Let slides sit in hood for 8 minutes.
3. Remove methacarn by tilting slides onto a paper to towel to remove the methacarn.
4. Rinse the slides once in 2X SSC for 2 minutes.
5. Dehydrate in 70%, 85%, 90%, 100% EtOH, 3 minutes each.
6. Store the slides above liquid nitrogen.
Fixation of Sorted Cells for FISH
1. Allow the cells that have been sorted onto slides to air-dry overnight.
2. Mark the drop of cells on the bottom of the slide with a diamond top pen.
3. In the fume hood fix each sample by adding 1.0 ml of cold methacarn (3:1, methanol : glacial acetic acid) to the top of the slide.
4. Leave the slides at room tempurature in the fume hood for 10 min.
5. Remove the methacarn by tilting the slide and letting the liquid empty into a methacarn waste container.
6. Wash slides in 2X SSC for 2 min.; use fresh 2X SSC for each group of slides being washed.
7. Soak slides in 1% paraformaldehyde in PBS for 8 min. Only do this step if you have NOT already fixed cells in paraformaldehyde while prepping them.
8. Wash slides in 2X SSC for 2 min.; use fresh 2X SSC for each group of slides being washed.
9. Dehydrate the slides by soaking in ethanol at room temp. 3 min in each of the following concentrations: 70%, 85%, 90%, and 100% EtOH.
10. Store the slides under nitrogen vapor at -70° C.
FISH PROTOCOL – BAC PROBES
DAY 1
1.
Take
35ml tube of formamide out of -20 freezer and place in 73°C water bath until thawed. When ready, add 2X SSC up to 50ml and pour
into glass Coplin jar. Incubate at 73°C until solution
equilibrates to 73°C.
2.
Wash
slides in 2X SSC for 2 minutes. (If
slides have been stored overnight from cell prep, do this step. Otherwise, proceed straight from the cell
prep).
3.
Place
slides in 70% ethanol @ room temperature for 2 minutes, then in 85%, 90% and
100% ethanol respectively, all at room temperature for 3 minutes each.
4.
Let
slides air dry for 3 minutes.
5.
Prepare
FISH probes: (these amounts are per
slide)
BAC Probe
To BAC/Cot-1 Probe (400ng BAC and 20mg Cot-1) ADD :
1.0ml CEP Probe (Vysis)
8.0ml Trask Hybridization buffer OR Vysis LSI buffer
6.
Denature
probes at 73°C for 10 minutes then
incubate at 37°C for 30-60 minutes before applying it to slides. The
incubation at 37°C is very
important! This is a pre-hybridization
step.
7.
Place
slides in the formamide/SSC solution at 73°C in the water bath for 3
minutes.
8.
Place slides into 70% ethanol at –20°C for 2 minutes, then in 85%, 90% and 100%
ethanol respectively, all at –20°C for 3 minutes each.
9.
Place slides on 37°C heat block for 2 minutes to let ethanol
evaporate. While waiting, place
paraffin around all of the ethanol containers because they can be used 5-10
times.
10.
While slides are sitting on the 37°C heat block, add 10ul of the appropriate
probe.
11.
Cover
Slip being careful to avoid air bubbles, this also to be done on the heat
block.
12.
Add
rubber cement to edges of cover slip (using a disposable 3cc syringe) to seal,
and heat at 37°C for about 10 minutes until dry.
12.
Incubate
at 37°C overnight in moist chambers.
Day 2
1.
Pre-heat
2 boats of 50% Formamide and 2 boats of 2X SSC to 45°C.
2.
Remove
cover slips with razor blade and place slides into gray holder.
3.
Place
slides in 50% Formamide at 45°C for 5 minutes. Agitating occasionally.
4.
Repeat.
5.
Wash
slides in 2X SSC at 45°C for 5 minutes. Agitating occasionally.
6.
Repeat.
7.
Wash
slides in 2X SSC + 0.005% tween for 2 minutes.
8.
Add
100ml of
Blocking Reagent and let sit 5 minutes.
9.
Rinse
quickly in 2X SSC + 0.005% tween.
10.
Add
50ml of
11.7ug/ml of Avidin-Rhodamine solution I, cover slip and incubate at 37°C for 40 minutes.
11.
Wash
slides 3 x 3 minutes in 2X SSC + 0.005% tween at room temperature.
12.
Add
100ml
blocking reagent and let sit 5 minutes.
13.
Rinse
quickly in 2X SSC + 0.005% tween.
14.
Add
50ml of
5ug/ml of Anti-Avidin solution, cover slip and incubate at 37°C for 40 minutes.
15.
Wash
slides 3 x 3 minutes in 2X SSC + 0.005% tween at room temperature.
16.
Add
100ml
blocking reagent and let sit 5 minutes.
17.
Add
50ml of
11.7mg/ml
Avidin-Rhodamine solution II, cover slip and incubate at 37°C for 40 minutes.
18.
Wash
3 x 3 times in same buffer as in #13.
19.
Apply
counterstain – 13ml
20.
Check
slides on scope.
21.
Store
at –20°C under nitrogen.
Reagents
Avidin-Rhodamine solution I Anti-Avidin solution
5ml 1:6 Avidin-Rhodamine 10ml Anti-Avidin
45ml of Blocking Reagent to
1 ml of Blocking Reagent
(per slide)
Avidin-Rhodamine solution II Counterstain
5ml 1:6 Avidin-Rhodamine 5ml DAPI
45ml of 1X PBS 200ml Antifade
(per
slide)
Digoxigenin Labeling of BAC DNA for FISH
10μl BAC DNA (~1μg)
32μl dH2O
8μl DIG mix (Invitrogen mix)
1. Mix together in PCR tube
2. Incubate at 15°C for 3 hours
3. Put on ice and check size on gel (load 5 μl) – sample will look like a smear and should be 200-800bp
4. Add 5μl 0.5M EDTA to stop reaction
Preparation, dropping, and fixing of lymphocyte metaphase slides
Solutions to be made:
Hypotonic solution: 1.2 g potassium chloride,
0.4 g sodium citrate dehydrate
400 mL water
Carnoy’s fixative (methacarn): 3 parts absolute methanol
1 part glacial acetic acid
Method:
1. Place hypotonic solution in 37°C water bath to warm before use.
2. Centrifuge cells in suspension at 1000 rpm for 8 min.
3. Add 8 mL hypotonic solution, re-suspend well with Pasteur pipette.
4. Incubate for 20 min at 37°C.
5. Add 10-15 Pasteur pipette drops (about 0.5 mL) of fixative. Mix well.
6. Centrifuge at 1000 rpm for 8 min.
7. Aspirate supernatant, leaving 1 mL of solution. Flick tube to re-suspend well.
8. Gently add 3 pipettes of fixative, letting the fixative run down the side of the tube.
9. Re-suspend well with pipette.
10. Let sit for 10 min. at room temp.
11.
Centrifuge at 1000 rpm for 8 min. (okay to refrigerate until
ready to make slides).
12.
Clean slides by placing in coplin jar containing 95% EtOH.
13.
Rinse in water until water runs off in sheets, then shake off
slide until only a film of water remains.
14.
Pipette off supernatant from pelleted cells as close as
possible without disturbing the pellet.
15.
Add enough fixative to form a somewhat cloudy suspension
(amount of fixative is dependent on the size of the pellet).
16.
Set up dropping station.
17.
Drop 15-20 μl onto each slide.
18.
Allow slides to air-dry overnight.
Fixation (next day):
1.
Mark cells with diamond pen to help locate during later
experiments. If unable to locate cells, breathe on slide to help visualize
drop.
2. Fix slides in methacarn for 8 min.
3. Wash slides in 2xSSC for 2 min.
4. Dehydrate slides in 70%, 85%, 90% and 100% EtOH at room temp for 3 min.
5. Freeze at -20°C under nitrogen.
FISH work on sorted cells
FISH
Protocol for Direct Labeled Alpha-satellite Probes
(adapted from protocol by Shawna R. of T.
Brentnall lab. Revised 8/31/00; revised again 11-18-02 by J. O’Sullivan)
17p FISH PROTOCOL
Solutions to make and/or heat before beginning
protocol:
Formamide: Take 35 mL tube of
formamide out of –20°C freezer and place in 37°C water bath until thawed. When ready, add 2
x SSC up to 50 mL and pour into Coplin glass jar. Incubate at 73°C until solution equilibrates to 73°C.
2 x SSC: Heat 40 mL of SSC in a
Coplin jar at 37°C for at least 1 hour.
0.01N HCl: To 100 mL purified water,
add 100 ml 10N HCl. Mix well and
store at 4oC for up to 3 months. Have a concentrated 10N HCl stock
in the lab.
Pepsin working solution: To 40 mL 0.01N HCl, add
200 mL 1% pepsin stock solution. Aliquots of the
1% pepsin stock (stored in the –20°C freezer).
Note: thaw until no longer
looks cloudy.
Day 1
1.
Make
70% formamide: add 15 mL 2X SSC to 35
ml formamide, put Coplin jar (4 slides per Coplin jar)
2.
Warm
formamide (35 ml) in water bath at 73°C for 30 mins
3.
Prepare
FISH probes, vortex, spin and keep on ice until denatured
Prepare sufficient probe
mixture for each slide and one extra per probe mixture for metaphase control
slide
LSI p53 and CEP 17 Mixture Actual for 5 slides
Rack
7 Box
3
![]() 0.1 ml
CEP 17 0.5 ml
0.1 ml
CEP 17 0.5 ml
1.0 ml
LSI p53 5.0 ml
7.0 ml
LSI hybrid buffer 35.0 ml
1.9 ml dH2O 9.5 ml
4.
Wash
slides in 2XSSC for 30 min at 37C.
5.
Incubate
slides in formamide at 73°C 3 minutes.
6.
Wash
in 70%, 85%, 90%, 100% ETOH @ RT, 1
minute each.
7.
Denature
probes 73°C, 8 minutes, and
then place in 45°C heat block.
8.
Dry
slides on 45 degree heat block ~ 2
minutes.
9.
Add
11 ml probe while slides on heat block
10.
Add
cover slip immediately following each probe, 24x30mm
11.
Add
rubber cement (use 3 cc syringe)
12.
Incubate
slides overnight in moist chamber at 37°C, use slide moat with
water.
Day 2
1.
Heat
0.4 X SSC/0 .3% NP-40 to 73°C 30 minutes prior to adding
slides.
2.
Remove
cover slips and place in gray slide holder.
3.
Agitate
slides 1-3 seconds and incubate slides at 73°C for 2
minutes.
4.
Agitate
1-3 seconds and wash slides in 2X SSC/0.1% NP-40 1 minute.
5.
Make
anti-fade
100 ml anti-fade
2.5 ml 10 ng/ml DAPI (stored at –20°C)
6.
Add
13 ml of anti-fade to each slide
7.
Add
cover slips
8.
Store
slides at –20°C under nitrogen in ziploc
bags
Notes:
1.
Replace
EtOH series (both) after 5 sets of 4 slides (20 slides total)
2.
Use
LSI buffers NOT CEP buffers
3.
Wash
solutions should be pH 7
FISH Slide preparation
(1) For
adherent cultured cells
1.
Grow
cells on a chamber slide.
2.
Remove
media and rinse once with PBS. Cover cells with freshly made methacarn
(methanol:acetic acid 3:1). Fix for 8
minutes at room temperature.
3.
Remove
methacarn. Rinse once with 2XSSC.
4.
Cover
cells with 1% paraformaldehyde. Fix for
8 minutes at room temperature.
5.
Remove
paraformaldehyde. Rinse once with PBS
and let air-dry overnight.
6.
Remove
plastic chamber after cells have dried on the slide. Make sure to scrape as much of the silicon gasket off as possible
so a cover slip will fit evenly on the slide during hybridization. A razor blade helps with this. Mark where the cell are on the slide with a
diamond tip pen.
(2) For cells
in suspension:
1.
Add
5 mM calcium/5 mM magnesium buffer up to 500 ml.
2.
Add
10% NONIDENT P-40 (IGEPAL CA-60) for a final concentration of 0.1% (5 ml to 500 ml).
3.
Centrifuge
cells at 1000 rpm for 15 minutes.
4.
Remove
supernatant. Resuspend cells in 10-50 ml of deionized water.
5.
Drop
8-10 ml onto each slide.
6.
Let
slides dry for at least 30 minutes at room temperature, then overnight if
possible.
·
Just
make a couple of slides first and check them under the phase contrast scope to
see if they are good. If the cells look
crystalline (very bright fluorescent green color), stop here and try the cell
prep again.
(3) Re-probing: Carefully remove coverslip and proceed with
FISH—Day 1.
Probe
Preparation:
Let probes come to room temperature before
mixing. Centrifuge briefly to bring
contents down to bottom of tube.
Probe
mixes: (Use 5 ml of each probe mix per sample)
Alpha-satellite
Chromosome 8 (Oncor)—FITC labeled
0.6 ml probe
30 ml hybridization buffer
(Hybrisol VI)
*enough for 6 wells (4 well slide)
Alpha-satellite
Chromosome 3 (Oncor)—TR labeled
0.5 ml probe
30 ml hybridization buffer
(Hybrisol VI)
*enough for 6 wells (4 well slide)
Probes:
Cyclin D1/CEP 11 {rack 4,
box 2}
Actual
amount for 4 experimental & 1 control slide
2.25 mL dH2O 11.25 mL
0.75 mL CyclinD1/CEP11 3.75 mL
7 mL LSI hybrid buffer 35.00 mL
Add in this order.
10 mL mixed probe per slide.
LSI p53 and CEP 17 mixture {rack
4, box 2}
Actual
amount for 4 experimental & 1 control slide
1.9
mL dH2O 9.5
mL
0.1
mL CEP 17 0.5
mL
1.0
mL LSI p 53 5.0
mL
7mL LSI hybrid buffer 35.0 mL
Add in this order.
10 ml mixed probe per slide.
Anti-fade reagent:
To 100 mL antifade reagent, add 2.5 mL 10 ng/mL DAPI (stored at –20oC)
For 2-color
FISH:
Heat each probe individually at 72°C for 5 minutes, then soak at 4°C until ready to use. Centrifuge briefly to bring contents to
bottom of tube. Mix probes together
prior to application. Apply 10 ml of combined probe mix to each well.
Notes on
reagents:
·
Formamide
(Ultrapure): cat #75828 United States
Biochemical (1-800-323-9750); 500 ml $46.
Thaw and divide into 35 ml aliquots in 50 ml tubes. Store at -20°C.
·
20X
SSC (Ultrapure): cat #15557-036
Invitrogen/Gibco; 4 L $62.00. Store at
room temperature. Make up new 2X SSC
for each experiment. 2X SSC with or
without Tween 20 can be made up ahead of time and stored at room temperature.
·
Ethanol
washes: Ethanol can be reused up to 6
times. Store in paraffin covered
containers either at room temperature or at -20°C.
·
FISH
probes: cat. # Varies, suffix for #
either TR or FITC depending on label, ONCOR; $158. Comes with antifade.
After our
meeting today and continued discuss with Alex, I propose the following
designation for 4 reds/2 greens as normals for FISH. When scoring cells,
and 2 sets of 2 duplets are seen, the cell will be scored as 4dd2; and, will be
tallied as a 2/2 (similar to a 4DD green score for dicentrics being tallied as
2 green). The lower case "d" will minimize the confusion with
"D" for dicentrics. For the Pancreas PO1 project, we can begin this
designation for all future slides except for the concluding slides for the Bell
study. For this, we have to wait for Alex's re-analysis of the Bell study.
As to
what is a duplet, I propose that the 2 signals must be next to each other
"as a duplet, or side-by-side". The distance between the two signals
for a single duplet should not exceed the width of one signal. To be a normal 2
red, both duplets should meet the above within a single cell. At this time, a
3d2 is too controversial (thank goodness, low in frequency) to be taken out of
the abnormal category. Wed 1/31/2001
2:44 PM Al Farrand -- Peter R and Teri B. concurred.
Karyotyping
Adherent Cell Cultures
/Colcemid Treatment
(Protocol from UW Hospital Pathology Cytogenetics lab)
Harvesting
the cells
1. Watch culture for mitotic cells. When culture is growing well, add 0.1 ml of
colcemid solution (10 mg/ml) per 5 mls media. Depending on the proliferation rate of the cells, let the cells incubate in
the colcemid from 2 to 12 hours.
[Ideally, you would like to have a percentage of mitotic cells such that
there will be 50 mitotic cells per slide.
If colcemid is left too long, chromosomes will become shortened and it
will be difficult to distinguish bands.]
2. Place hypotonic solution in 37°C water bath to warm while trypsinizing the
cells. Collect the medium in 15 ml
conical tubes. Trypsinize culture: rinse flask gently with versene (3 ml/T25; 4
ml/T75) and add rinse to the medium in the tubes. Add trypsin-EDTA to flask (1 ml/T25; 2.5 ml/T75) and let incubate
@ 37°C for 5 minutes. Shake flask to detach cells.
Tap flask on the counter (cells side down) several times. Check in microscope. Cells should be in a single cell
suspension. Add cell suspension in
trypsin to medium and Versene in centrifuge tubes. Spin 1000 rpm for 8 minutes.
3. Aspirate or pour medium to leave 1-2 ml in
tube. Flick or pipette tube to
resuspend cells well. Cells
should be single cell suspension. Add 8
mls of 37°C hypotonic solution (see
reagents below). Resuspend well with
Pasteur pipette. Incubate 20 minutes @
37°C.
Add 10-15 Pasteur pipette drops (about 0.5 mls) of fixative (see
reagents below). Mix. Spin at 1000 rpm for 10 minutes.
4. Aspirate medium to 1 ml. Flick tube to resuspend well. Gently add 3 pipettes of fixative by letting
fixative run down the side of the tube.
Resuspend well with pipette. Let
sit 10 minutes @ room temperature. Spin
1000 g for 8 minutes. Can refrigerate
until ready to make slides.
Slide Preparation
1. Clean slides by placing in Coplin jar
containing 95% ETOH. Rinse in water
until water runs off in sheets. Shake
off slide till only a film of water remains.
Place slides on wet paper towel.
2. Pipette off supernatant from pelleted cells
as close to pellet as possible without disturbing the pelleting. Then add enough fixative to form a somewhat
cloudy suspension (amount of fixative is dependent on size of the pellet.
3. Drop 1 drop of cell suspension with Pasteur
pipette (can add more drops if cell concentration is low). Wait till drop spreads then add one drop
of fixative with Pasteur pipette. Can use a kimwipe to wipe outside edge of
slide if there is excess liquid. Let
air dry.
4. Examine slides on low power (10X) phase
contrast to visualize chromosomes.
Staining slides: G banding (done in Cytogenetics lab)
1. Bake slides at 95°C for 1 hour (if using cytogenetics oven,
time using button #3 marked slides on timer on bench opposite from oven). This “ages” slides and decreases the
trypsinization time.
2. Trypsinize slides for 30-60 seconds (length
of time depends on cell type); use high trypsin concentration. While waiting, measure 4 mls of pH buffer
into small beaker. When trypsinization
is done, briefly rinse 2X through rinse buffer.
3. Lay slide face up on staining rack over
sink. Add 1 ml of Wright stain to
buffer in beaker and swirl to mix. Pour
over slide in rack and stain 60 seconds (time is dependent on cell type). Rinse out beaker with distilled water. Rinse slide after staining is finished. Air dry.
4. To visualize, focus using 10X magnification
on light microscope (use green filter).
Add 1 drop of oil and use 63X objective.
--------------------------------------------------------------------------------------------
Reagents and Solutions
Colcemid (Invitrogen/Gibco
#15210-016)
Hypotonic solution:
1.2g potassium chloride
(KCl)
0.4g sodium citrate
dihydrate (Na3C6H5O7.2H2O)
in 400 mls ddH2O
Carnoy’s fixative: (Make fresh)
3 parts absolute methanol :
1 part glacial acetic acid
Staining of Tissue OR CELLS WITH CATALASE (can be used for most antibody stains)
Materials:
- Rabbit Anti-Human
Catalase = in box “unlabeled primary antibody” in frig #2, top drawer
- BSA (Bovine
Albumin)= frig #1 in the white box on top shelve
- Alexa 647 chicken
anti-rabbit = frig #2, top drawer, 2nd Antibody box
- V=vertical in a
coplin jar or bath, h=horizontal – the reagent is made up in a small
quantity and applied directly to the slide.
Day 1
----------------------------------------------------------------------------------------------------------------------------------------------------
If the slides are formalin
fixed and cut from paraffin blocks:
Deparaffinization
:
- Be sure that slides are
labeled in pencil and that the tissue is circled with a diamond pen (mark
on bottom of the slides)
- Transfer slides to a
slide rack
- Immerse Slides in
Xylene 3x 5minutes, waste goes to glass bottle in hood (v)
- Immerse slides in 100%
ethanol 2x5minutes (v)
- Immerse slides in 90%
ethanol 1x5minutes (v)
- Immerse slides in 85%
ethanol 1x5minutes (v)
- Immerse slides in 70%
ethanol 1x5minutes (v)
- Immerse slides in 50%
ethanol 1x5minutes (v)
- Immerse slides in 30%
ethanol 1x5minutes (v)
- Wash slides with ddH20
2x5 minutes with rocking (v)
Antigen retrieval:
- Heat 10mM Sodium Citrate (pH 6.5) to 88°C in a water
bath
- Immerse Slides in
Sodium Citrate for 15 minutes (v)
- Allow to cool in 1xPBS
(v)
- MOVE STRAIGHT TO
STAINING
----------------------------------------------------------------------------------------------------------------------------------------------------
If the slides are fresh
tissue culture chambers with living cells:
Fixation
& Permeabilization:
- Wash cells with PBS 2x
- Fix for 2 minutes on ice with ice cold 10:1 methanol:acetic acid
- Wash with PBS 2x
- 30’ at RT in 5% NGS + 0.005% Triton X-100 (blocking and
permeabilization)
- Remove the chambers
-------------------------------------------------------------------------------------------------------------------------
Staining
- Block 30’ at room
temperature with 10% NGS in PBS (h)
- Remove blocking
solution by wicking
- Apply primary antibody
(1:100) (h-with coverslip) in PBS +3% BSA (optimize for your primary
antibody)
- Incubate overnight at
4°C in humidified chamber
Day 2
- Remove coverslip and
wash slides 3x5’ with PBS + 0.05% tween
with rocking (v)
- Apply secondary
antibody (1:100) in 1% NGS +PBS (h)
- Incubate at room
temperature for 1 hour (in the dark from this step forward)
- Wash 2x5’ with PBS+0.05% tween and 1x with PBS with rocking (v)
- Remove slides from PBS,
blot off excess liquid, add a drop of vectashield (can add DAPI to vectashield if nuclear
counterstain is desired) and coverslip. Be sure to remove bubbles from
under coverslip. Wipe off excess vectashield and coat the edges with nail
polish.
- Store in dark at 4°C
until ready to view at microscope
RC DC Assay Protein Quantification
The RC DC assay is a
colorimetric assay for protein quantification.
1. Prepare 3-5 dilutions of a protein standard from 0 ug/ml to 2 mg/ml protein. (using lysis buffer as the dilution buffer)
2. Pipet 25 ul of standards and samples into microfuge tubes.
3. Add 125 ul RC reagent I into each tube. Vortex, and incubate for 1 min at RT
4. Add 125 ul RC reagent II into each tube. Vortex, and centrifuge the tubes at 15,000xg for 3-5 mins
5. Discard supernatant by inverting tubes. Allow liquid to completely dry out from tubes (may leave overnight)
6. Add 127 ul Reagent A’ to each tube. Vortex, and incubate for 5 mins at RT.
5ul of DC reagent S to each 250
ul of DC reagent A = 255 ul Reagent A’
7. Add 1 ml of DC reagent B to each tube and vortex immediately. Incubate for 15 mins at RT
8. Pipet 200 ul of each sample into a 96-well plate. Triplicate for each sample.
Absorbance can be read at 750nm.
*BioRad RCDC
reagents are located in the cabinet of Nancy’s bench.
OXYBLOT PROTEIN
OXIDATION DETECTION
I.
Sample Lysis:
Preparation of buffer:
Make up Lysis buffer (store in cold room – can make
as a concentrated stock and dilute for use)
·
50mM
Tris-HCL (ph8.0)
·
150mM
NaCl
·
1%
NP-40
The day before:
- Freeze water in the cooling chamber of the transfer apparatus
- Make up blocking buffer according to chemiflouresence kit
instructions
- Label tubes for lysis (1 2059 tube if tissue is to be homogenized
on polytron + 3 microfuge tubes
Immediately before:
- Calculate the amount of lysis buffer needed for experiment and add
100ul of each of phosphatase inhibitor cocktail I + II & 1 complete
mini protease inhibitor tablet per 10ml of lysis buffer immediately before
use.
Preparation of samples:
Cell culture:
- Wash samples 2x in ice cold PBS
- Add 1ml/100mm plate of lysis buffer
- Scrape samples into microfuge tube
Animal tissues:
- Add tissue (fresh or frozen) to lysis buffer in 2059 tube at 150ul
minimum/50mg tissue. Immediately homogenize on polytron or equivalent –
keeping cold.
All:
- Let sit on ice for 30 minutes
- Vortex for 30 seconds
- Spin in refrigerated centrifuge (cold room) at 10,000xg for 15 min
- Transfer 25ul of supernatant to a new tube for running the BCA or
RCDC assay to determine protein concentration (refer to the BCA assay or
RCDC assay protocol to determine protein concentration).
- Transfer the rest of supernatant to a new microfuge tube &
store at -80°C
- Concentrate (using YM3 column which holds 500ul max) or dilute
samples to 2mg/ml for running 10-30ug on a gel
II.
Western:
Preparation:
1)
cut
3mm filter papers and PVDF membranes (wear powder-free gloves) to the size of
the transfer sponges.
2)
Obtain
enough gels from biochem stores
3)
Make
up 12% SDS in ddH20
4)
Make
up 10x gel running buffer
·
30.3g
Tris base
·
144g
Glycine
·
10g
SDS
·
Bring
to 1 liter with ddH20
5)
Make
up Transfer buffer (store in cold room)
·
3.36g
Tris
·
14.4g
Glycine
·
bring
to 800ml with ddH20
·
add
200ml Methanol
Cassette Assembly:
*Using BIO-RAD Mini-PROTEAN 3 Electrophoresis
Aparatus.
- Remove the Ready-to-go Gel from the storage pouch
- Rinse the gel with dH2O and dry it with paper towel
- Cut along the dotted line at the bottom of the gel, and pull the
clear tape at the bottom to expose the bottom edge of the gel
- Refer to the Mini-PROTEAN 3 Electrophoresis Module Assembly guide
for assembly instruction
Sample loading:
- Calculate the volume needed for 20 ug of protein, and volume for
5x SDS loading buffer
- Heat samples at 80°C for 5 mins
- Load samples onto gel
- Run at 200V for 35-40 mins
Gel Transfer:
- Refer to Mini Trans-Blot Electrophoretic Transport cell
Instruction Manual
- Run at 100V for 1 hr
DNPH Derivatization
*Continuous shaking during
all steps
- Remove PVDF membrane, and immediately immerse into 100% MeOH for 1
min
- Incubate the membrane in 20% MeOH-80% PBS for 5 min
- 2N HCL for 5 min
- Incubate membrane in 2,4-dinitrophenylhydrazine (100ug/ml) in 2N
HCL for exactly 5 min
- Wash membrane 3x 5 min in 2N HCl
- Wash membrane 5x 5 min in 100% MeOH
Immunostaining
- Incubate membrane in PBS for 5 min
- Block with 5% milk overnight at 4°C
- Wash 3x 5 min with 0.05% tween in PBS
- Incubate membrane with primary antibody of 1:150 dilution using
5%milk and 1% tween at RT for 1hr
- Wash membrane 1x 8 min and 2x 2 min with 0.05% tween in PBS
- Incubate membrane with 1:500 secondary antibody using 5%milk and
1% tween at RT for 1hr
- Wash membrane 3x 5 min with 0.05% tween in PBS
- Place a piece of Saran Wrap on the bench and smooth out, ensure no
air bubbles. Pipette 1ml ECF substrate/PVDF membrane onto the SaranWrap.
- Lay the blot, protein side down. Incubate for 1 min at RT
- Scan the membrane on the Phosphoimager
Section 7 Protocols to evaluate telomere length
Preparation of Tissue for Telomere Probe
Light fixation of fresh or frozen tissue
Please note that fresh or frozen tissue is considered an infectious
agent (risk of HIV or hepatitis). Wear
gloves, eye protection, and a lab coat when handling tissue. Treat all waste with 10% bleach at least 30 minutes
in the bucket in TC marked Biohazard Decontamination
1.
Rinse
tissue three times in two to three mls of cold PBS.
2.
Place
tissue in 2 mls of 1% paraformaldehyde for 30 min.
3.
Rinse
three times in 2 mls PBS.
4.
Fix
overnight in 70% ethanol at 4° C.
5.
Place
tissue in LABELED cassettes and take to the appropriate lab to be embedded in
paraffin.
a.
Don't
take tissue to the histochemistry on Fridays.
They are too busy to deal with it.
b.
If you get tissue on Friday you have two choices. Process it and leave it in 70% ethanol until
Monday and then take it to the Histochemistry lab or freeze it in freezing
media until it can be processed in a timely manner. The latter option is preferred.
c.
Fill
out a form and list each cassette.
Attach large form with red letters that says: Do NOT Fix in Formalin!! Do NOT Fix in
Methacarne!!.
d.
Follow
the procedure for making sure the tissue does not go into fixative.
e.
Blocks
are filed in the Nitrogen container near the slide moat moat. Record the
location of the block in the log book.
6.
When you need sections cut from these blocks,
remove them and make a note in the logbook.
Take the blocks to the histology lab so that sections can be cut. Make
sure one H& E section cut for reference.
7.
When
you pick up the slides, to return the blocks to the appropriate slots. Put
the H & E slides in the H& E box and record in the log book.
Unstained slides are baked at 90°C for 30 min and then deparaffinized as below.
Slide Deparaffinization
1.
Place
tissue on heat block at 90oC for 30 minutes.
2.
Wash
in xylene 3 x 5 minutes at room temperature. Dispose of xylene in waste bottle
in hood.
3.
Wash
in 100%, 90%, 85%, 70% for 3 minutes each at room temperature, with a final
brief rinse in water. Air dry and store in liquid nitrogen tank.
Hybridization PNA and Amadate Probes
Ref: Lansdorp, P.M., Verwoerd,
N.P., van de Rijke, F.M., Dragowska, V., Little, M.T., Dirks, R.W. Papp A.K.,
and Tanke, H.J. 1996. Heterogeneity in telomere length of human chromosomes
Human Molecular Genetics 5(5):685-91.
Slijepcevic, P., Hande, M.P.,
Bouffler S.D., Lansdorp, P., and Bryant P.E. 1997. Telomere length, chromatin
structure and chromosome fusigenic potential Chromosoma 106(7):413-21.
Before beginning:
Turn on one slide moat to 37°C and a second slide moat to
78°C
Turn on waterbath to 85°C
Make and warm pepsin to 37°C in a Coplin jar in a
waterbath
Thaw RNase in ice bucket
Thaw and make working PNA/Amidate solution.
Sign up for confocal time
BioRad http://128.95.114.51:8086/confocal/d02/002/2001?display=M&style=B&positioning=S
Lieca https://depts.washington.edu/keck/cgi/calendar/calendar.cgi
Morning:
1. Sections - These will either be embedded in paraffin
or frozen sections.
Paraffin embedded lightly fixed –
Incubate in 10mM sodium citrate pH 6.5 for 8 min at 85°C. Briefly dip slides in
ethanol series (25%, 50 %, then 95%) and air dry.
Frozen sections
– Put 50mL of 2% Paraformaldehyde on
slide, place cover slip over and let sit for 10min. Rinse with 1X PBS pH 7.2
for 1 min. Briefly dip slide in 25%, 50%, then 95% ethanol. Air-dry completely.
2.
Treat
with working pepsin solution (heat to 37 °C) for 2 min.
3.
Rinse
with 1X PBS for 1 min.
4.
Dip
slides through ethanol series (25%, 50%, then 95% ethanol) and air dry.
5.
Add
80 mL of RNase to each slide,
cover with coverslip and let sit for 10 min at 37 °C.
6.
Rinse
with 1X PBS for 1 min.
7.
Ethanol
series and air-dry.
8.
Cover
slide with hybrid well. Seal the hybrid well by pressing the edges firmly with
the special popcicle stick
9.
Add
100 mL of working PNA solution to
each slide.
10.
Heat
slides to 78°C for 10 min.
11.
Cover
or put slides in dark place, at RT, for 3 hours (overnight is better).
Next day
1.
Rinse
off probe with 70% Formamide buffer 4 x 15min. It is a good idea to work with
the formamide under the fume hood. Waste can be put down the drain but must be
recorded on the waste sheet by the drain.
2.
Rinse
with Tween 20 buffer 4x 5 min.
3.
Drain
and dip slides through ethanol series and air dry.
4.
Add
80 ml DNA counter stain for 5
min (TOTO-3).
5.
Wash
with PBS for one minute, ethanol series, and air dry.
6.
Add
20mL Vectashield (viscous –
pipette slowly ) and coverslip
7.
If
possible, look at with confocal or slides can be stored in –20°C.
Solutions
10 % Blocking reagent (Store
at 4 °C in refrigerator 1)
Dissolve 5 grams blocking
reagent (cat. # 1096 176 Roche)
In 50 mls of 150 mM
Maleic acid, 150 mM NaCl, pH 7.5
(adjusted with NaOH) on
heating block. Autoclave and store at 4°C
70% Formamide Buffer for
rinsing one liter (Store at RT)
10 mL 1M Tris pH 7.2
290 mL ddH2O
700 mL Formamide
70% Formamide Buffer with
Blocking reagent (Store at RT)
10 mls 10% Roche blocking
agent (see above)
90 mls Formamide Buffer
Tween 20 Buffer (Store at RT)
3 L 1X PBS
1.5 mL Tween 20
(pipette very slowly – viscous)
Pepsin (store aliquots at –20°C Freezer 4 Rack 7 )
Stock Pepsin
(10 mg/ml)
100 mg pepsin
10 ml dH2O
1% Working solution
1:100 dilution into .01M HCl
400
mL pepsin stock
39.6
mL .01M HCl
Heat
to 37°C
RNase Stock/working 10mg/mL store aliquots at –20°C
In Freezer 4 Rack 7
100 mg RNase
10 mL sterile water
Boil for 10 min to
destroy DNase activity
PNA probe FITC and Texas Red
both are telomere specific
Stock should be adjusted to
1 ug/ul ~ 100uM
Stock FITC PNA in Refrigerator 2 bottom drawer in a foil wrapped
container. We are using this at 1:250 diluted in the formamide blocking solution
Stock Texas Red PNA is in Freezer 4 Rack 4
Box 3
Amidate probe (store aliquots at –20°C) NEEDS
Mg++
Amidate stocks are at 500 mg/ml in TE (a 260 OD at 16 =
500 mg/ml)
104 is Centromere probe with FITC label (Freezer 4 Rack 6 Box 3)
104R is Centromere probe with TAMARA label
(Freezer 4 Rack 6 Box
3)
67 is a telomere probe with FITC label (Freezer 4 Rack 6 Box 5)
Working solution:
We are using all three probes at 1:300
300 mL of 70% formamide with
blocking solution and 1 mL of probe
5 mL of 500 mM MgSO4 or
MgCl2 (You may need to shake the bottle before
using)
PNA/Centromere Probe solution:
Per 3 slides 300 mL 70% fomamide with blocking
solution
5 mL 500 mL MgSO4 or MgCl2
1 mL PNA probe
1 mL Centromere probe
10 mM Sodium Citrate pH 6.5 (store at RT)
For 1 liter:
2.94 g Sodium citrate
800 mL water
pH to 6.5
with 4N HCl
Bring up to 1 liter with
water
.01 M HCl (store at RT )
1 mL of 4M HCl
400 mL of dH2O
or
Make 1M HCl : 8.62 mL of
concentrated HCl + 100 mL dH2O
Dilute to .01 M (5 ml 1M HCl : 495 mL dH2O )
TOTO-3 stock solution is at 1000 mM
Working solution is a 1:200 dilution in PBS
Stock kept in freezer 2
Confocal Microscope set up for photos
General guidelines for Leica
https://depts.washington.edu/keck/cgi/calendar/calendar.cgi
1. Take all pictures at 40x or 100x
2.
Format
1024 x 1024
3.
Keep
a record of the confocal settings used on that day
4.
Determine
a sub saturating PMT setting for Green (PMT 1) and Red (PMT 2) on bright
telomeres and centromeres. Do this with
the Glowover –Glowunder setting. Do not change the setting once you have begun
to take pictures. If it is obvious the
settings you initially choose are not going to work then you must reshoot ALL
the slides at those settings
5.
Save
all images in the Rabinovitch folder in the KECK computer. Then move them ASAP to the U drive.
To move them while you are in the KECK center do the following:
a. Click on the Start icon in the lower left hand corner of the screen.
b. Click on the Run icon in the Start menu.
c. Type the following in the Open space \\fileserver3.pathology.washington.edu\Lab_Rabinovitch and Click OK.
d. You will then be asked for your user and password. For your user name type pathology\your
name (the name you use to login on Path computers). For your password, use your current path
password. You will then be in the U drive.
f. Then on the screen of the computer
in the KECK center use My Computer to find your files.
g. Then move them.
6. To move your files when you
are back in the lab do the following:
a. Click on the Start icon in the lower left hand corner of the screen.
b. Click on the Run icon in the Start menu.
c. Type the following in the Open space \\128.95.245.42 and Click OK.
d. You will then be asked for your user and password. Use Rabinovitch and then the lab password
e. You will then be in the KECK
computer.
f. Then use My Computer to find the
destination you want for your file.
g. Then move them.
7.
You
are responsible for cataloging your photos so that you can retrieve them..
General Guidelines for
BioRad
(scanning confocal microscope in the Immunology Cell Analysis Facility)
http://depts.washington.edu/immunweb/cellanalysis/scheduling.html
IP address: 125.95.114.227 (for ftp-ing files to our computer)
**
Never turn the BioRad box off while the software is open **
1.
Turn
key on laser box so the lights are on. (This is usually already turned on for
us because it needs to warm up for ~20 minutes prior to use.)
2.
Turn
on mercury arc lamp.
3.
Turn
on BioRad box (down is ON).
4.
Log
in to computer – if this a first-time use, get a username and password from
Michelle or Fred.
5.
Double-click
on LaserSharp2000 Software icon on desktop.
6.
Log
in to software. (If this is the first time the software is opened during the
day, it will take a few minutes (up to 15) to find the laser.) – This may be
different from the username and password used to logon to the computer.
7.
Check
that the joystick is controlling the x-y stage properly. If it is not, close
LaserSharp and restart.
8.
It
should open with the appropriate method for looking at telomere/centromere
probe. If not, go to “Methods” and select the appropriate method.
9.
Check
your light excitation and filter paths.
a.
Select
the “light path” icon (2nd from the right) on the controller panel
onscreen. This will bring up the light paths. We need to check each individual
sequence since we will be scanning sequentially rather than simultaneously.
b.
Select
“Seq1” – check that PMT 1 is highlighted
i.
568
excitation
ii.
B1
– Beamsplitter
iii.
585
EFLP
c.
Select
“Seq2” – check that PMT 2 is highlighted
i.
488
excitation
ii.
B1-
Beamsplitter
iii.
T2A-560DF
iv.
522
DF 35
d.
Select
“Seq3” – check that PMT 3 is highlighted
i.
647
excitation
ii.
B1
– Beamsplitter
iii.
680
DF 32
10.
To
look through the oculars, push the filter assembly in the middle of the
microscope all the way to the left (blue light should come out through the
objective) and push the lever on the bottom left all the way in (to the right)
– Find your tissue using the 40x (needs oil) objective. Then switch to the 63x
(needs oil) objective.
11.
Make
sure the “63x” objective and the “1024x1024” format is selected on the
controller panel.
12.
Test
each laser individually to determine saturation and contrast of each color –
make sure you are using “x4” speed and “Direct”. Other things to remember:
a.
Don’t
turn the “Iris” higher than 2.5.
b.
Laser
power 10 usually gives enough fluorescence. Occasionally turn it up to 30, but
risk photobleaching faster.
c.
Red
== oversaturated; Green == undersaturated (black) – use “offset” to get a
balance of these two. Usually don’t want to oversaturate too much.
- Do not change the setting once you have begun
to take pictures. If it is obvious
the settings you initially choose are not going to work then you must
reshoot ALL the slides at those settings.
- Acquisition: Once the settings are adjusted for
the slide, to acquire a picture,
- Change speed to “Normal”
- Change to “Kalman” and 8 scans – if on the 8th
scan, the image is still changing, increase the number of scans.
- Hit the “Sequential acquire” button (2nd
from the left) – each laser will scan through and resolve the pictures
based on the number of Kalman scans you make.
- The fourth picture is a composite of the three
colors you are looking at – RIGHT click the mouse and “Export” à D:Drive à Experiments à Jeannel à 0_Tif_images. Save
the file as the number on the slide plus a letter A-J.
- You must also save the image as a file; “Save”
à number on the slide
plus a letter A-J. By hitting save, you will automatically be saving it
to your profile folder on the D:Drive.
- You must then open a NEW scan.
Protocol For Image
Analysis Using
Optimas 6.51
- Open Excel and Power Point and minimize
- Open Optimas
- Go to File click on Open Image File
- Open file from U/PUBLIC/confocal
images/2004/hyperplastic polyps/# of image
- Go to Macro and click on Run
- Look in Macros and open june19tissue.mac (You
only have to click Run the first time using Optimas in a session, every
consecutive time after you can click Run Last. Must click Run again when
exit the program and re-open later)
- Is there centromere staining: click YES
- Enter color code of DNA: click OK
- DNA Blue: click OK
- Red=1, etc: Click YES
- Is DNA segmentation ok: click OK
- Click ok to select group 1: click OK
- Instructions: click OK
- While holding down the “A” button, use the
mouse to click all the epithelial cells that are dark blue. They can have
pink dots, but must be uniform in color with none of the green or yellow
background showing through.
- While holding down the “B” button, use the
mouse to click on the neighboring stromal cells that surround the chosen
epithelial cells. Notice that they are highlighted in yellow instead of
white. Again, only choose cells that have a uniform dark blue color, pink
dots are okay but no green or yellow background should be showing through.
- To un-click either an epithelial or stromal
cell just click the cell again and it should un-highlight.
- When you are finished choosing cells right
click the mouse.
- Click ok to select group 1: click CANCEL
- Evaluate DNA Zoom: click CANCEL
- DNA segmentation ok: click OK
- Evaluate Telomere Zoom: click CANCEL
- Telomere segmentation ok: click OK
- Evaluate Centromere Zoom: click CANCEL
- Centromere segmentation ok: click OK
- Data is ready: click YES, make sure that Excel
IS open before saying yes
- Open Excel, go to File and choose Save As
- Save in U/PUBLIC/telomere/hyperplasticpolyps
and create a new folder for each photo batch
- Close the newly saved Excel document and open a
blank one and minimize it.
- Double Click the shortcut to Irfan View and
open Options
- Choose Capture
- Select Client Area and highlight Optimas in the
Menu and click start
- Highlight the picture including the title bar
and choose copy
- Paste the picture on a blank slide in Power
Point and adjust the size
- Select File and Click Save As
- Save all the photos in a single batch in
U/PUBLIC/confocalimages/2004/hyperplasticpolyps/Date of Picture/ # of
photo batch
EXCEL MACRO INSTRUCTIONS FOR THE ANALYSIS OF OPTIMAS DATA
(protocol updated by Rosana, March 17, 2004)
· Open macro: U:\Public\telomere\colon\MsSummary
· Enable macros? Yes
· Control S. Include just ratio in the summary? Y (appears by default) OK
· Destination file is not present. Choose following: 1 (create new) OK
· Enter the name of the destination file: name with the number and the case – summary
· Browse for the Excel files and select all files in the case, click OPEN
· Choose Method: choose method 1 and click OK
· Choose Threshold: A should be selected already, click OK
· The program should calculate the average for telomeres, centromeres, and ratios of the two, etc. and produce a final Excel sheet
· Copy the final data and paste it into U:\Public\telomere\hyperplastic polyps\hyperplastic polyps final.xls and SAVE
· Close all of the Excel windows for the individual files of the case and save changes
· When closing MsSummary click SAVE ALL
TERMINAL RESTRICTION FRAGMENT (TRF) PROTOCOL
(Rosana Risques, 4/7/04)
- DNA EXTRACTION
Extract genomic DNA. The best methods to obtain telomeres in good shape
are Phenol-Chloroform extraction or Amersham kit (GenomicPrep Cells and Tissue
DNA Isolation Kit #27-5237-01). Freeze-thaw cycles make the telomeres sticky,
therefore keep the DNA at 4°C if you have to reuse it in
the following days (if not keep it at -20°C). Run DNA in agarose gel
to confirm quality. Measure in spectrophotometer or fluorimenter and adjust to
340ng/ul.
- DIGESTION
Digest 20ug (10ug x2 tubes) of DNA with either Hinf1 and Alu1, Hinf1
and Msp1 or Hinf1 and Rsa1. (We use Hinf1 and Msp1 from New England Biolabs)
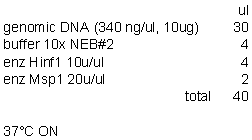
After digestion pool the 2 tubes of each samples and quantitate the
genomic DNA in spectrophotometer or fluorimeter (2ul of DNA + 78ul of water).
Concentration should be around 200ng/ul (total of 80ul). Run 0.7% agarose gel
in 1X TAE to check that the digestions worked. Load 200ng (aprox.1ulDNA + 3ul
water + 4ul LB2X).
- ELECTROPHORESIS
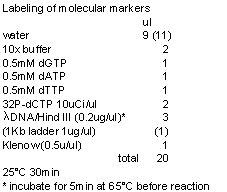 Make a 0.7% agarose gel in
1XTAE. Load around 2-4ug of DNA (20-40ul). Use P32-labeled markers. Run 16-18
hours at 60v. (enter DNA at 120v. for 3min).
Make a 0.7% agarose gel in
1XTAE. Load around 2-4ug of DNA (20-40ul). Use P32-labeled markers. Run 16-18
hours at 60v. (enter DNA at 120v. for 3min).
Klenow is
from Invitrogen (5u/ul). Dilute to 0.5u/ul in provided dilution buffer.
10X buffer
is 10X React2 buffer. lDNA/HindIII is Gibco. 1Kb ladder is Invitrogen.
Purify markers with Qiagen purification kit. Use only 600ul of buffer
PE because 700ul tends to spill and contaminates the centrifuge. Elute in
15+15ul of water. Pool the 2 tubes. Take 1ul to read in the scintillation
counter. Estimate cpm/ul. Load 100.000cpm in each well.
4. 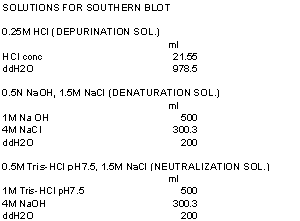 SOUTHERN BLOT
Once the gel has run take a picture of it without taking it out of the
box (minimize the risk of breaking it!). Then move it to a tray to do the
washes:
-
15
min in depurination sol.
-
30
min in denaturation sol.
-
Prepare
the blot as shown in the picture. Cut a triangle in the upper left corner in
both the membrane and the gel to keep track of the orientation. Don’t forget to
put saran wrap around the gel to prevent the liquid to move towards the paper
towels. Soak the sponges in the same denaturation sol. used for the gel. Cover the sponges with saran
wrap to keep the moisture.
-
Blot
ON (min: 6 hours, max: all the weekend, as long as it’s well wrapped).
Membrane is Hybond-N from Amersham Biosciences.
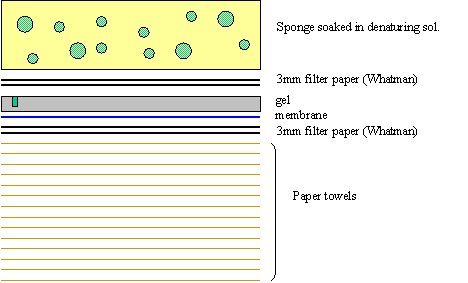
After blotting:
-
UV
crosslink the membrane: 100mJ/cm2. Use the UV-crosslinker from
Stratagene (Fausto lab) and press ‘autocrosslink’ = 120mJ (membranes usually are around 120cm2, so that’s
fine). This step immobilizes the DNA in the membrane. If the membrane is
charged is not necessary, but it doesn’t hurt.
-
15
min in neutralizing solution
-
Put
the membrane on Whatman paper to blot the excess of liquid, let it air dry few
minutes and cover with saran wrap until pre-hyb.
- PREPARATION OF THE PROBE
Probe is a Tel C oligo: CCC TAA CCC TAA CCC TAA CCC TAA (from Qiagen,
dissolve in water to make 100pmol/ul and then dilute to 5pmol/ul). To have
adequate amounts of probe (i.e. 1-5x10⁶ cpm/ml) label 15pmol of
oligo. Run duplicates.
Use gamma-P32-ATP from ICN: >7000 Ci/mmol (2mCi, 120ul).
T4 polynucleotide kinase is from New England Biolabs.
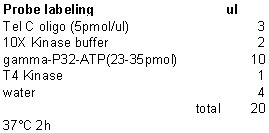
Purify the probe with Microspin G25 colums (from Amersham):
-
reaction
is 20ul and the recommended volume is 25-30ul, so add 10ul of 10mM Tris-HCl to
increase volume up to 30ul
-
apply
to the columns and spin down (follow manufacturer’s protocol)
-
Collect
the volume aprox 30ul x2= 60ul.
-
Take
1ul to measure in the scintillation counter. The hyb solution is 20ml, so I
need 1-5x10⁶ cpm/ml x 20ml= 20-100 x106 cpm.
- PRE-HYBRIDIZATION AND HYBRIDIZATION
-
Warm
pre-hyb and hyb solutions at 37°C
-
Cut
mesh (#H9088, Apollo, CLP) size of membrane
-
Pre-wet
in 2X SSC
-
Roll
in bottle, using 2X SSC to get rid of bubbles
-
Discard
2X SSC and add warmed pre-hyb solution
-
Incubate
in hybridization oven at 37°C for 2h. Spin the bottles
in the opposite direction that the membrane was rolled. If not it will roll
over itself.
-
Denature
probe: 5 min in boiling water and put on ice
-
Add
probe to the warmed hyb solution
-
Remove
the pre-hyb solution and add hyb solution.
-
Incubate
in hybridization oven at 37°C overnight (again make the
spinning opossite to the direction the membrane was rolled).
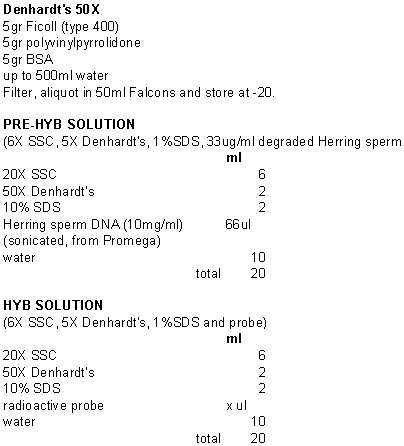
- WASHES
-
Rinse
in 5X SSC + 0.1% SDS, RT
-
Wash
3X in 0.1X SSC + 0.5% SDS, RT for 8 min.
-
Put
membrane in Whatman paper to remove excess of liquid. Wrap it in saran wrap.
-
Expose
in Phosphorimage screen for few hours-days, depending on radioactivity (check
signal with Geiger counter).
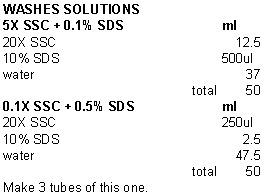
Q-PCR for Telomeres
Ref. Cawthon RM. Telomere measurement by quantitative PCR, Nucleic Acids Res. 2002 May 15;30(10):e47Ref. Cawthon RM. Conditions for quantitative PCR of telomere length, August 7, 2003.
This protocol is used to determine relative telomere length. In order to do this you must run each set of
samples with a different set of primers.
The first set is 36B4 primers for acidic ribosomal phosphoprotein PO
1. This is a single copy gene. The second set of primers, tel 1 and tel 2
amplify the telomere length. The relative telomere length is determined by a
ratio of the PCR product of the single copy gene and the PCR product of the
telomere.
The primer sequences written 5'![]() 3':
3':
tel 1b, CGGTTTGTTTGGGTTTGGGTTTGGGTTTGGGTTTGGGTT
tel 2b, GGCTTGCCTTACCCTTACCCTTACCCTTACCCTTACCCT
36B4u, CAGCAAGTGGGAAGGTGTAATCC
36B4d, CCCATTCTATCATCAACGGGTACAA
36B4 = acidic ribosomal phosphoprotein PO located on
chromosome 12
|
Q-PCR (for telomere PCR) |
|
|
|
|
|
|
|
|
|
|
|
MIX |
|
|
|
|
|
|
|
|
1X |
100X |
dilution |
final conc. |
|
|
Primers: |
|
|
6-ROX 50X |
0.40 |
40.00 |
1/50 |
1X |
|
|
tel 1b |
300nM |
|
SybrGreen I 10X |
0.80 |
80.00 |
1/25 |
0.4X |
|
|
tel 2b |
300nM |
|
Buffer 10X |
2.00 |
200.00 |
1/10 |
20mM Tris-HCl pH 8.0 + 50mM KCl |
|
|
||
|
MgCl2 50mM |
0.60 |
60.00 |
1/33.3 |
1.5mM |
|
|
|
|
|
dNTPs 10mM |
0.40 |
40.00 |
1/50 |
0.2mM |
|
|
|
|
|
DTT 100mM |
0.50 |
50.00 |
1/40 |
2.5mM |
|
|
|
|
|
DMSO 100% |
0.20 |
20.00 |
1/100 |
1% |
|
|
|
|
|
Taq (5u/ml) |
0.16 |
16.00 |
|
0.8u |
|
|
|
|
|
Tel 1b 3uM |
2.00 |
200.00 |
1/10 |
300nM |
|
|
|
|
|
Tel 2b 3uM |
2.00 |
200.00 |
1/10 |
300nM |
|
|
|
|
|
H2O |
8.94 |
894.00 |
|
|
|
|
|
|
|
DNA (ng/ml) |
2.00 |
|
|
adjusted |
|
|
|
|
|
Check Sum |
20.00 |
1800.00 |
|
|
|
|
|
|
|
|
|
18.00 |
|
|
|
|
|
|
|
Q-PCR (for single copy gene PCR) |
|
|
|
|
|
|
|
|
||
|
|
|
MIX |
|
|
|
|
|
|
||
|
|
1X |
100X |
dilution |
final conc. |
|
|
Primers: |
|
||
|
6-ROX 50X |
0.40 |
40.00 |
1/50 |
1X |
|
|
36B4u |
300nM |
||
|
SybrGreen I 10X |
0.80 |
80.00 |
1/25 |
0.4X |
|
|
36B4d |
500nM |
||
|
Buffer 10X |
2.00 |
200.00 |
1/10 |
20mM Tris-HCl pH 8.0 + 50mM KCl |
|
|
|
|
||
|
MgCl2 50mM |
1.40 |
140.00 |
1/14.29 |
3.5mM |
|
|
|
|
||
|
dNTPs 10mM |
0.40 |
40.00 |
1/50 |
0.2mM |
|
|
|
|
||
|
DTT 100mM |
0.50 |
50.00 |
1/40 |
2.5mM |
|
|
|
|
||
|
DMSO 100% |
0.20 |
20.00 |
1/100 |
1% |
|
|
|
|
||
|
Taq (5u/ml) |
0.10 |
10.00 |
|
0.5u |
|
|
|
|
||
Primer a 10X |
2.00 |
200.00 |
1/10 |
300nM |
|
|
|
|
||
|
Primer b 10X |
2.00 |
200.00 |
1/10 |
500nM |
|
|
|
|
||
|
H2O |
8.20 |
820.00 |
|
|
|
|
|
|
||
|
DNA (1ng/ml) |
2.00 |
|
|
adjusted |
|
|
|
|
||
|
Check Sum |
20.00 |
1800.00 |
|
|
|
|
|
|
||
|
|
|
18.00 |
|
|
|
|
|
|
||
Notes:
1) The taq being used is Platinum TaqPCRx DNA Polymerase purchased from
Invitrogen (Cat. # 11509-015).
2) 6-ROX is purchased from Invitrogen (Cat. # 12223-012).
3) SybrGreen is purchased from Molecular Probes (Cat. # S-7563).
4) Amount of mix can be adjusted depending on number of samples.
5) Amount of DNA can be adjusted depending on experiment.
Methods of
Analysis:
DDCt Method
A reference sample is used as the calibrator. The following set of equations are used in the determination of 2DDCt:
DCt = Ct(tel) - Ct (36B4)
DDCt = DCt(calibrator) - DCt(sample)
2DDCt = 2DDCt
The magnitude of 2DDCt is a measure of the telomere length of the sample. A larger 2DDCt implies a longer telomere.
Example of Plate Setup
|
1 |
2 |
3 |
4 |
5 |
6 |
7 |
8 |
9 |
10 |
11 |
12 |
|
1 |
2 |
3 |
4 |
5 |
6 |
7 |
8 |
9 |
10 |
11 |
12 |
|
1 |
2 |
3 |
4 |
5 |
6 |
7 |
8 |
9 |
10 |
11 |
12 |
|
13 |
14 |
15 |
16 |
17 |
18 |
19 |
20 |
21 |
22 |
23 |
24 |
|
13 |
14 |
15 |
16 |
17 |
18 |
19 |
20 |
21 |
22 |
23 |
24 |
|
13 |
14 |
15 |
16 |
17 |
18 |
19 |
20 |
21 |
22 |
23 |
24 |
|
Ctr.1 |
Ctr.1 |
Ctr.1 |
Ctr.2 |
Ctr.2 |
Ctr.2 |
Ctr.3 |
Ctr.3 |
Ctr.3 |
NTC |
NTC |
NTC |
|
X |
X |
X |
X |
X |
X |
X |
X |
X |
X |
X |
X |
The setup of the plate can be adjusted according to the experiment. The unknowns should at least be in triplicates to ensure accuracy.
Numerical numbers (1-24) represent the unknown DNA samples. Ctr.1-3 are 3 different DNA controls of known relative telomere length respectively. By Q-PCR, the telomere lengths of the unknown DNA samples can be estimated by comparison with that of the DNA controls.
PCR protocols:
|
For tel primers |
|
|
For 36B4 primers |
|
|
|
Temp |
Time |
Cycles |
Temp |
Time |
Cycles |
|
95°C |
10 min |
one |
95°C |
10 min |
one |
|
95°C |
15 sec |
|
95°C |
15 sec |
|
|
56°C |
1 min |
cycles |
56°C |
20 sec |
cycles |
|
|
|
|
72°C |
20 sec |
|
Remember to add dissociation stage.
Last updated 04/30/2004, KL
Using ABI PRISM 7900
Set-up
- Open SDS 2.1 Program (double click on SDS 2.1
icon on desktop)
- Click on File à New
- Under Container, select 96 Wells Clear Plate,
then click OK
- Select all wells by clicking on the square at
the top left hand corner of the picture of the plate
- Click on Tools à Detector Manager
- Select the detector used, click on Copy to
Plate Document, then click on Done
- Check the box under Use next to the selected
detector
- Click on the Instrument tab
- Enter Sample Volume
- The box next to 9600 Emulation should be
checked (this should be the default)
- Click Add Dissociation Stage
- Enter time, temperature, number of cycles in
the Thermal Profile
- Make sure Ramp Rate of the last step of the
dissociation stage is 2%, while other steps are 100% (this should be the
default)
- Make sure the date collection symbol shows up
in stage 1, stage 2, the last ramp and last step in the dissociation stage
(this should be the default)
- Save file by clicking File à Save As
- Click Open/Close button
- Put sample plate in the machine. Remember to have pad on top of plate to
prevent evaporation
- Click Open/Close button again
- Click Start button
Analysis
- Select all wells by clicking on the square at
the top left hand corner of the picture of the plate
- Click on Tools à Detector Manager (skip
steps 21-26 if detector already has the correct name)
- Click on New
- Type in Name, select the right Reporter and
choose Quencher to be Non Fluorescent.
Click OK. This is just to
rename the detector
- Select this new detector, click on Copy to
Plate Document then click on Done
- Uncheck the box under Use next to the original
detector
- Check the box under Use next to the new
detector
- Select the wells for non-template control. Click on Task cell next to selected
detector and choose NTC
- Select the wells for each replicate in the
standard curve. Click on Task cell
next to selected detector and choose Standard. Enter amount under Quantity
- Do the same for the other replicates in the
standard curve
- Select the other wells. Click on Task cell next to selected
detector and choose Unknown
- Click on Analyze button in the Toolbar or click
Analysis à Analyze
- Adjust Baseline and Threshold so that R^2 in
the standard curve is as high as possible and the slope of the standard
curve is near –3.3
- To export data, click on File à Export. Export as a .xls file for analysis in
Excel.
Last updated by KL 04/30/04.
Section 8 BAC cloning protocols
BAC Prep
(Bryce
Sopher, La Spada lab, Clontech Nucleobond AX-500)
1.
Inoculate 3 ml overnight culture from single colony on
plate.
2.
Dilute 1 ml of overnight culture into 250 ml culture.
3.
Grow to A600 of 1.0.
4.
Pellet bacteria by centrifuging at 5K, 10 minutes. Continue, or store pellet frozen at –80C.
5.
Carefully resuspend the bacterial cell pellet in 12 ml
buffer S1 + RNAse.
6.
Add 12 ml buffer S2.
Mix gently by inverting tube and incubate at room temperature for 5
minutes. Do not vortex.
7.
Add 12 ml buffer S3.
Mix gently by inverting 6-8 times until homogenous suspension is
formed. Incubate on ice for 10
minutes to precipitate SDS and cellular debris.
8.
Meanwhile, equilibrate Nucleobond AX-500 cartridge with 5
ml buffer N2.
9.
Put folded filter into funnel over equilibrated AX-500
cartridge and wet with ~1 ml H2O.
10.
Pour ice-cold suspension into filter/funnel and load onto
equilibrated cartridge. Collect flow-through
in 50 ml tubes (waste).
11.
Wash cartridge 2X with 12 ml buffer N3.
12.
Elute DNA into 15 ml tube with 7.4 ml buffer N5.
13.
Precipitate DNA with 5.1 ml (0.7 vol) of room
temperature isopropanol.
14.
For increased yield precipitate ON at 4C.
15.
Centrifuge for at least 1 hr at max speed at 4C in
table top swinging bucket rotor.
16.
Wash pellet with 70% EtOH and centrifuge at least 1 hr at
max speed at 4C.
17.
Pour off EtOH and air dry pellet briefly.
18.
Resuspend pellet in 100 ml
microinjection buffer.
Plasmid Mini-Prep:
Preparation of BAC DNA for analytical purposes.
- Pick colonies and inoculate 2ml of LB culture containing the
appropriate antibiotics. Incubate
at 37˚C overnight with shaking at 1100rpm.
Next Day –
- Transfer overnight culture to a 1.5ml to eppendorf tube.
- Spin down the tube for 2 min. at 11,000 rpm.
- Discard the supernatant and resuspend the cell pellet in 200 ml buffer P1 with RNase
(from Qiagen DNA Maxi-preparation kit). Gently mix the buffer and break up
the pellet without making too frothy.
- Add 200ml of buffer P2 (Qiagen)
and quickly mix by inverting the tube several times (Count to 6). Incubate
at RT for 5 mins. Solution will become viscous and clear.
- Add 200ml of buffer P3 (Qiagen)
and quickly mix by inverting the tube several times. Solution will become
gloppy and have big white globs. Incubate on ice for 5 mins.
- Spin down the white lysate at the highest speed for 5 mins.
- Transfer the clear supernatant into a new 1.5ml eppendorf tube and
add 0.60ml of 2-propanol (iso-propanol).
- Mix by inverting the tube. PPT in fridge for 1hr. Spin down the
DNA at highest speed for 10 mins.
- Discard the supernatant and add 1ml of 80% ethanol to rinse the
pellet. Be careful not to loose the small white pellet. Don’t even loosen
it (If you do loosen it, spin down for another 1-2 mins.).
- Clean the inner wall of the tube with a piece of tissue or cotton
stick.
- Dry the pellet under the speed vacuum for 2 mins. Or leave the
tube open on the bench for 5 to 10 min until the DNA pellet is completely
dried. DO not over dry to pellet otherwise the DNA will become difficult
to re-dissolve.
- Resuspend pellet in 20ml of TE.
- Spec on spectrophotometer – 1:200 dilution. Store in –20˚C
chest freezer.
Transformation
– to prepare cells to shuttle/carry your plasmid of interest
1. To a 2059 tube, add 50ml of competent cells (bought from Biochem stores, stored in –80˚C).
2. Add ~20ng of DNA plasmid.
3. Incubate on ice for 30 mins.
4. Heat shock in 42˚C water bath for 45 seconds.
5. Throw on ice for 2 mins.
6. Add 450ml of SOC medium – SOB media +
7. Incubate at 37˚C for 1 hr. or less.
8. Plate out on LB-AMP plates, grow at 37˚C overnight.
BACs containing GAPDH
![]() 62KB GAPDH 43 KB
62KB GAPDH 43 KB
CTD2224PD (104 KB)
in pBeloBACII from Research Genetics/Invitrogen

http://www.genome.clemson.edu/groups/bac/protocols/protocols2new.html
The complete sequence for pBeloBACII is on the U Drive U:\PUBLIC\BAC Constructs\BAC CTD2224P2\ CTD2224P2 sequence.doc.
Noel Hudson has removed the LoxP site from the CTD2224PD and replaced it with ampr, The ampr CTD2224PD will be the target for the mCAT, GCLM, and SOD constructs. The DNA for the ampr CTD2224PD is in the refrigerator in a 15 ml tube. Jeanne knows where this is. The BAC ampr CTD2224PD is in DY380 cells on plates in the refrigerator.
It may be necessary to grow this up (30ºC) and do a BAC prep. Digest it and do a pulse field to check to see if the Lox is gone and the amp is there.
We have a second BAC RP11-369N23 which has not been used.
 70KB GAPDH 139 KB
RP11-369N23 (210 KB)
in pBACe3.6 from BACPAC Resources
http://bacpac.chori.org/pbace36.htm
The complete sequence for pBACe3.6 is on the U Drive U:\PUBLIC\BAC Constructs\BAC RP11369N23\ RP11369N23 sequence.doc.
The sequence for the insert is
U:\Lab_Rabinovitch\PUBLIC\BAC Constructs\loxP.STOP.loxP.doc (loxPSTOP
lox P)
U:\PUBLIC\BAC Constructs\MCAT\MCAT cassette.doc (OCT and MCAT and a
portion of the poly A tail)
\\Pathology\Files\Lab_Rabinovitch\PUBLIC\BAC
Constructs\pBluescript II SK-.doc (Blue Scipt II from which the pY (p Martini) comes)
The multiple cloning site for pY is in Noel’s BAC notebook page 76.
Section 9 Flow Protocols for Cell Cycle, Proliferation, Viability and Coast Sea Food.
Viable Hoescht 33342 Stain
1. Cells should be maintained in the media that is
normal for their growth.
2. Add 10 ml of 1 mM Hoechst 33342/ml of media. Incubate for 30 minutes at 37°C.
3. Cells must be maintained in Hoechst, DO NOT wash
out the stain.
4. Run samples on the flow cytometer as soon as
possible (with in minutes) of staining.
Hoechst 33342
(viable DNA stain) 1mM
200 ml:
0.112 g Hoechst 33342*
200 ml of dH20
2 ml 95% ethanol
Mix
thoroughly. Cover the bottle with
aluminum foil to protect from
the light.
Store at 4°C.
* CALBIOCHEM cat.# 382065-Q
Bisbenzimide H 33342 Fluorochrome, Trihydrochloride.
BrdU/Ho/Eb
Ref. Rabinovitch, P.S., Kubbies, M., Chen, Y.C., Schindler, D., and Hoehn, H., BrdU-Hoechst Flow Cytometry: A Unique Tool for Quantitative Cell Cycle Analysis. Exp. Cell Res. 174:309-318. 1988.
1.
Plate
cells at 200,000/25 cm2 flask in 4 ml MEM, 0.1% FCS. Old cells should be plated at about 100,000
cells/flask.
2.
Purge
incubator several times to equilibrate media quickly.
3.
Leave
in 0.1% FCS for 5 days.
4.
On
day 5, feed with 3-4 ml MEM media containing 1.5 x 10⁻⁴ BrdU M and
desired concentrations of FCS (0.1-16% for experimental samples; 10% for
tests). You may include deoxycytidine
at this step.
5.
Feed
cells with fresh media every 2-3 days throughout experiment under a sodium
vapor light.
6.
Sample
at various time points (16 hours - 14 days for experimental samples; 7 days for
tests).
7.
Trypsinize
and pellet cells. Resuspend pellet in 1
ml MEM with 10% FCS, 10% DMSO and freeze (not preferred) or resuspend in 0.8 ml Hoechst buffer, can put on ice for at least
2 hours and analyze. Samples that have
been on ice for at least 2 hours may also be frozen (add 0.1 ml DMSO while
vortexing) and analyzed at a later time.
(Samples may also be stained with NEB-FMI instead of Hoechst)
8.
After
Hoechst stain add stock ethidium bromide for a final concentration of 2.0 mg/ml.
9.
Add stock Mg (500 mM MgCl2) for a final concentration of 5
mM.
Stock 10-2
M BrdU Solution: 0.0921 g BrdU (MW 307.4)
(keep stock for up to 1
month) 30 ml MEM – Filter sterilize
before use
Hoechst Buffer: for 500 ml
Final
concentration Amount
needed for 500 mls
0.154 M NaCl 4.5 g NaCl
0.1
M Tris, pH 7.4 50 ml of
1 M Tris pH 7.4
0.1%
NONIDENT P-40 500 ml of NONIDENT P-40
(IGEPAL CA-60)
1
mM CaCl2 1
ml of 500 mM CaCl2
5
mM MgCl2 5
ml of 500 mM MgCl2
0.2%
BSA 1 g BSA
2.5mg/ml Hoechst 33258 2 ml of 1.25 mg/ml Hoechst 33358
qs to 500 ml with dH20
Stock 10-2
M Deoxycytidine Solution:
(use 0.2 ml/100ml media for 0.0227 g deoxycytidine (MW 227)
final concentration of 20 mM) 10 ml MEM – Filter sterilize before
use
See Proliferative Survival Protocol – “Processing
data for the Proliferative Survival Protocol” for information about gating and
calculation to determine the number of cells in each component of the cell
cycle.
BrdU
(Reid/Rabinovitch)
This protocol works
well for measuring cells in S-phase.
1. Thaw samples to room temperature.
2. Spin cells to 1500 rpms for 10 minutes, decant.
3. Resuspend in 400 ml 0.1% NP40/PBS + 5% FCS and mince if using tissue.
4. Syringe using a 23G needle; slowly 3 times.
5. Denature DNA.
a. Best results used 4N HCl at 23°C for 40 minutes.
b. Can also use 2N HCl at 37°C for 40 minutes (4 ml).
NOTE: Vortex twice during 40 minutes.
6. Filter through millipore with 70 mm screen. This step is not necessary if you are using cells rather than tissue.
7. At 40 minutes, add 8 ml of Tris butter + 0.5% BSA + 5mM HEPES.
8. Spin at 1500 rpms for 10 minutes, decant.
9. Add 5 ml Tris + 0.5% BSA + 5mM HEPES, vortex.
10. Spin at 1500 rpms for 10 minutes, decant.
11. Add 20 ul BrdU conjugate and 20 ml PBS/5% FCS. Total volume = 50 ml.
12. Incubate 30 minutes at room temperature.
13. Add 5 ml PBS/5% FCS, vortex.
14. Spin at 1500 rpms for 10 minutes, decant.
15. Resuspend 500 ul PBS/5% FCS.
16. Add 5 ml Propidium Iodide stock = 10 ug/ml final concentration.
17. Add 50 ml RNAase 1% stock solution.
18. Incubate 20-30 minutes, RT.
19. Syringe with 25G needle; 3 times.
20. Run on flow cytometer.
Source BrdU conjugate
BrdU - Ab
Single Step BrdU Protocol
1. Spin down cells and decant.
2. Add 1 ml PBS + 5% NGS, spin down cells and decant.
3. QS pellets to 150 ml with PBS + 5% NGS.
4. Add 450 ml Membrane Shredding Solution.
5. Put samples on ice for 15 minutes, vortex periodically (every 3 minutes).
6. Add 600 ml 4 N HCl, agitate for 30 minutes at RT.
7. Add 1 ml of 1 M Tris (pH 7.2).
8. Spin down, resuspend with 3 ml of 1 M Tris (pH 7.2). Spin down, decant.
9. Resuspend in 100 ml of 1:20 FITC conjugated anti-BrdU antibody (from Caltag).
10. Add 1 ml of PBS + 5% NGS, spin down cells and decant.
11. Resuspend in 250 ml of PBS with 10 mg/ml DAPI.
Two Step BrdU Protocol
Adapted from Rissa Sanchez’s protocol
1. Spin down cells and decant.
2. Add 1 ml PBS + 5% NGS, spin down cells and decant.
3. QS pellets to 150 ml PBS + 5% NGS.
4. Add 300 ml Membrane Shredding Solution.
5. Put samples on ice for 15 minutes, vortex periodically (every 5 minutes).
6. Add 75 ml 2 N HCl, agitate for 30 minutes at RT.
7. Add 1 ml of 1 M Tris (pH 7.2).
8. Spin down, resuspend with 1 ml of 1 M Tris (pH 7.2). Spin down, decant.
9. Resuspend in 750 ml 1 M Tris (pH 7.2).
10. Add 20 ml of anti-BrdU primary from DAKO. Keep on ice, 15 minutes.
11. Add 1 ml of PBS + 5% NGS, spin down cells and decant.
12. QS to 200 ml with PBS + 5% NGS.
13. Add 10 ml GAM-PE (Biomeda) resuspended in PBS + 5% NGS.
14. Incubate on ice for 45-60 minutes.
15. Add 1 ml of PBS + 5% NGS, spin down cells and decant.
16. Resuspend in 200 ml of PBS with 10 mg/ml DAPI.
Three Step BrdU Protocol
Adapted from Rob Pierce’s protocol
1. Spin down cells and decant.
2. Add 1 ml PBS + 5% NGS, spin down cells and decant.
3. QS pellets to 150 ml with PBS |5% NGS
4. Add 300 ml of Membrane Shredding Solution.
5. Put samples on ice for 15 minutes, vortex periodically (every 5 minutes).
6. Add 75 ml 2 N HCl, agitate for 30 minutes at RT.
7. Add 1 ml of 1 M Tris (pH 7.2).
8. Spin down, resuspend with 1 ml of 1 M Tris (pH 7.2). Spin down, decant.
9. Resuspend in 500 ml of PBS + 5% NGS containing 10 ml of anti-BrdU antibody. Keep in dark 30’ @ RT.
10. Add 1 ml of PBS + 5% NGS. Spin down cells and decant.
11. Add 25 ml 1:50 secondary biotinylated goat-anti-mouse antibody (1:100 final dilution in 50 ml volume).
12. Incubate in dark for 30’ @ RT.
13. Add 1 ml of PBS + 5% NGS. Spin down cells and decant.
14. Add 25 ml 1:100 strepavidin-PE
15. Incubate at RT for 20’.
16. Add 1 ml of PBS + 5% NGS. Spin down cells and decant.
17.
Resuspend in 200 ml
of PBS with 10 mg/ml DAPI
Membrane Shredding
Solution:
100 ml PBS
500 ml
NP-40
20 mg EDTA, pH 7.2
1. Have ready two eppendorf tubes (5 x 10⁵ cells per tube) for each cell line to be tested. Cells may be suspended in media or PBS. Volume of cells in each tube should be 100 ml or less. One tube will be for a negative control to check for non-specific binding of Ig isotype antibody. For positive control, include a known epithelial cell line (e.g. HeLa or SW-48) in the assay.
2. Treat cells with 0.5 ml of 0.5% buffered formalin solution (dilute 2% stock) for 10 minutes on ice. [Use EM grade methanol-free formalin.]
3. Qs to 2 ml with PBA (1X PBS + 0.1% BSA fraction V). Keep PBA sterile by aliquoting into 15 ml tube.
4. Centrifuge for 8-10 minutes at 200 G at 4°C. Remove supernatant.
5. Add 1 ml of 0.1% Triton PBA (dilute 0.5% stock). Incubate on ice for 3 mins.
6. Qs to 2 ml with PBA and spin. Remove supernatant.
7. For each pair of tubes from each cell line, label one (+) for cytokeratin and one(-) for isotype. Add 10 ml of Anti-cytokeratin FITC (CAM 5.2) (Becton-Dickinson) straight from bottle into (+) tube. For (-) tube (negative control), add 10 ml of Mouse IgG2a FITC (Becton-Dickinson) straight from bottle. Incubate 45 mins on ice in dark.
8. Qs to 2 ml with 0.1% Triton PBA and spin. Remove supernatant.
9. Add 0.3 ml DAPI.
**All reagents are stored at 4°C
DAPI Staining
DAPI is used to stain DNA
and in our group is normally used to determine cell cycle information.
1. In most cases the cells will
be spun down and the supernatant removed before adding DAPI.
2. Resuspend the pellet in at
least 200 ml of DAPI. In general you would
want the
cells at a concentration of 2 x 10⁶/ ml of DAPI. The cells can be run on the flow cytometer
immediately.
3. The cells can also be frozen
for analysis at a later date.
Fresh cells in suspension:
DNA Content and Cell Cycle Analysis.
Analysis is performed as previously described
(Rabinovitch, P.S., Reid, B.J., Haggitt, R.C., Norwood, T.H., and Rubin,
C.E. Progression to cancer in Barrett's
esophagus is associated with genomic instability. Lab. Invest. 60:65‑71,1989).
In brief, cells in suspension are spun and resuspended in a solution of 10mg/ml 4,6-diamidino-2-phenylindole (DAPI) and
0.1% nonidet P-40 detergent in a Tris buffered saline. The suspension is
triturated with a 26 gauge needle and analyzed using a Coulter ELITE cytometer
(Coulter Corp., Miami FL), with ultraviolet excitation and DAPI emission
collected at >450nm. DNA content and
cell cycle are analyzed as previously described (Rabinovitch, P.S. DNA content histogram and cell cycle
analysis. Meth. Cell Biol. 41:263-296,1994) using the software program
MultiCycle (Phoenix Flow Systems, San Diego, CA).
Tissues:
DNA Content and Cell Cycle Analysis.
Analysis is performed as previously described
(Rabinovitch, P.S., Reid, B.J., Haggitt, R.C., Norwood, T.H., and Rubin,
C.E. Progression to cancer in Barrett's
esophagus is associated with genomic instability. Lab. Invest. 60:65‑71,1989).
In brief, tissue is minced with scalpels in a solution of 10mg/ml 4,6-diamidino-2-phenylindole (DAPI) and
0.1% nonidet P-40 detergent in a Tris buffered saline. The supernatant is
triturated with a 26 gauge needle, filtered through 40mm steel mesh, and analyzed using a Coulter
ELITE cytometer (Coulter Corp., Miami FL), with ultraviolet excitation and DAPI emission collected at
>450nm. DNA content and cell cycle
are analyzed as previously described (Rabinovitch, P.S. DNA content histogram and cell cycle
analysis. Meth. Cell Biol. 41:263-296,1994) using the software program
MultiCycle (Phoenix Flow Systems, San Diego, CA).
Cells from Paraffin:
DNA Content and Cell Cycle Analysis.
50mm sections cut from
paraffin-embedded tissue are processed by a variation of the technique
originally reported by Hedley et. al. (Hedley DW, Friedlander ML, Taylor IW,
Rugg CA, Musgrove EA. Method for analysis of cellular DNA content of
paraffin-embedded pathological material using flow cytometry. J. Histochem.
Cytochem. 31:1333-1335, 1983). In brief, sections are dewaxed in xylene,
gradually rehydrated in a step series of ethanol solutions, and digested in
water with 1% pepsin pH 1.5 37ºC for 40 min. The supernatant is triturated with
a 26 gauge needle and resuspended in an isotonic pH 7.4 buffered solution with
0.1% nonidet P-40 detergent, 10 mg/ml
diamidino-2-phenylindole (DAPI) and 1% RNAse, and filtered through 40mm steel mesh. The analysis is performed on an
ELITE cytometer (Coulter Corp., Miami FL) using UV excitation. 50, 000 cells are analyzed, if available,
and in all cases acceptable histograms contained at least 10,000 cells and a
coefficient of variation below 6.0%.DNA content and cell cycle are analyzed as
previously described (Rabinovitch, P.S.
DNA content histogram and cell cycle analysis. Meth. Cell Biol. 41:263-296,1994)
using the software program MultiCycle (Phoenix Flow Systems, San Diego, CA).
1X DAPI (Working Solution)
To 500 ml dd H2O add:
8.5g NaCl (final conc. = 146 mM)
1.2
g Tris Base (final conc. = 10 mM)
Adjust pH to 7.4 with HCl.
Add:
4 ml of 500 mM
CaCl2 solution (final conc. =
2 mM)
44
ml of 500 mM MgCl2 solution (final conc. = 22 mM)
50
mg (0.05g) BSA
1
ml nonident P-40 (NOT the same as NP-40) detergent (final conc. = 0.1%)
10
mg DAPI (4,6-diamidino-2-phenylindole*) powder
(final conc. = 10 ug/ml)
100
ml DMSO (final conc. = 10%)
Add dd H20 to final volume of 1 L.
Store in dark or foil wrapped bottle at 2-6o C.
*Accurate Chem.Co. #18860 (no substitutes)
KI-67 staining
Ki67/DNA content Multiparameter Flow Assay for Cell Cycle Proliferation
and Cell Sorting (Written by Rissa Sanchez)
I.
Materials
A.
Ice
in ice bucket
B.
Underpad,
Versidry, (Fisher 1420638)
C.
Splash
shield
D.
Gloves,
powder free
E.
Microfuge
rack
F.
Tube,
15 ml., conical (Fisher 05-53859B)
G.
Tubes,
microfuge, siliconized, RNase- and DNase-free, 1.7 ml, (National Brand through
Fisher 11-842-54)
H.
Syringes,
1 cc tuberculin with 25 gauge needle (Fisher 14-826-88)
I.
Syringe,
20 cc (Fisher 14-829-21B)
J.
Filter,
0.22 micron (Fisher DDA0202550)
K.
Pipettors,
Single channel: 1000 ml, 200 ml, 20 ml
L.
Pipette
tips, aerosol, ART brand
M.
Petri
dishes, 35 x 10 mm, bottoms only (Fisher 08-757-100A)
N.
Scalpel
handles (#9) and blades (#10, Fisher 08-916-5A)
O.
Hemostat
P.
Serum,
normal goat (Caltag #10000)
Q.
Ki67-PE
antibody (DAKO R0840)
R.
IgG1-PE
antibody (DAKO X0928)
S.
Pipettes,
5ml., transfer, individual wrap
(Fisher 13-675-22)
II.
Reagents
A. NST buffer (146 mM NaCl, 10mM Tris
Base (pH 7.5), 1 mM CaCl2, 0.5 mM MgSO4, 0.05%
Bovine serum albumin (BSA), 21 mM MgCl2, 0.2% Nonidet P40
B. 100X DAPI (4,6-diamindine-2-phenylindole
dihydrochloride) 1 mg/ml (Roche 236276)
III.
Safety
Use universal precautions for human tissue including lab coats, gloves,
splash shield. Never recap syringes. Discard syringes into biohazard safety
containers. Use disposable scalpels with
handles and discard in red
biohazard sharps containers when finished.
IV.
Protocol
A.
Control
Lymphocytes stimulated with
PHA for 48 hours or a lymphoblast cell line is used as a control for the Ki67
antibody and sorting protocol . Typically, several million cells are grown as a
lot and approximately 5 x 10⁵ cells subaliquotted into
microcentrifuge tubes and frozen with 10% DMSO. Use one aliquot per experiment.
To prepare control cells thaw aliquot, centrifuge at 2000 rpm (200g) on the
TOMY centrifuge at 0°C for 10 minutes. Decant. Add 200µl NST to pellet and
syringe with a 1cc syringe with 25-gauge needle to enucleate the cells about 5
times. Adjust the volume to 360µl with
NST and add 40µl normal goat serum. Divide the cell suspension into two
microfuge tubes with a final volume of 200µl each. Tubes are typically
pre-labelled as (1), the positive Ki67-PE control, and (2), the negative
IgG1-PE control. Keep tubes on ice until mincing of biopsies is complete. This
step can be performed either before or after tissue mincing. Use control cells
to recheck titer and antibody concentrations between different lots of
antibodies.
B.
Documentation
and set-up
Write flow experiment in lab
notebook including patient name, flow number, sample number and level. Note
relevant details on the experiment worksheet if different from the norm eg.
biopsies that are especially small or necrotic, if the media color is off. Also
note the lot number of a new vial of antibody when opened. Label tubes with
sequential numbers. Tube 1 is positive lymphocyte control, Tube 2 is negative
lymphocyte control. Each biopsy for the day will be assigned three tubes
labeled sequentially 3, 4 and 5; and the next patient sample will be assigned
6, 7 and 8, etc. The first of the three tubes is designated for DNA content
analysis, the second tube is for the negative antibody and the third tube is
for the positive antibody.
C.
Biopsy
Mincing-Always change scalpel blades
with each biopsy.
In the bottom of a petri
dish mince biopsy in 600 µl NST buffer. There is an “art” to mincing that
requires personal instruction to ensure that the highest yield of nuclei is
recovered per biopsy. The mechanics of tissue dissaggregation and enucleation
include mincing with scalpels into tissue fragments/suspension that can be
aspirated by a 1000µl pipetter. It is important that the pipetter be set at
least at 600µl as any volume less that 600µl will not create enough force to
shear adequately. The first step is to shear with the 1000µl pipetter several
times ~ 7 times. It is very important in all shearing steps to avoid creating
aerosols or “bubbles” which will severely compromise total yields. The second
shearing step uses a 1cc syringe with a 25-gauge needle. This step is
especially vexing as tissue fragments are prone to clog. This step is also one
of the most hazardous and requires extreme caution because one is using
potentially infectious tissue with a sharp under extreme pressures. NEVER force
the suspension through the bore of the syringe if there is a clog in the needle
because under pressure the needle will shoot off the end of the syringe
spraying suspension. It is best to avoid tissue fragments. If a fragment is
collected on the bore of the needle flick it off. Run the suspension through
the syringe about 7 times. Transfer the suspension into the patient’s negative
control tube. Add another 600µl of NST
to the petri dish and shear the suspension as before with both the 1000µl
pipetter and 1cc syringe and add to the same tube.
D.
DNA
Content
For each patient sample,
remove 100µl into the tube designated for DNA content. This is important
because the antibody staining protocol requires centrifugation that creates
aggregates. Given the importance of detecting 4N abnormalities in Barrett’s
esophagus it is imperative that nuclei suspensions for DNA content must NEVER
be centrifuged. Hold on ice while
preparing the other biopsies. The tube with the 100µl suspension of nuclei for
DNA content will require another 100µl of NST with DAPI at 10µg/ml final concentration.
E.
Antibody
staining
Centrifuge all the minced
samples at 2000 rpm (200g) on the TOMY centrifuge at 0°C for 10 minutes. Remove
proteolytic enzymes that degrade protein by decanting. Decant by inverting the
tube in one fluid motion onto the Versiday pad. NEVER tap the tube in an attempt
to remove all the fluid because you may loose the pellet. There will always be
about 50µl remaining in the tube held by surface tension. The following is a
fairly labor intensive distribution of each patient’s sample with the goal of
optimizing sorting yield by enriching the number of nuclei into the Ki67-PE
tube. Set the 200µl pipetter to 100µl. Add 200µl of NST + 10%NGS to the pellet
in the IgG1 negative antibody tube and resuspend with the pipetter. Then
transfer 200µl of the nuclear suspension into the Ki67-PE tube for that
patient. This tube will have 80-90% of the total number of nuclei harvested
from the biopsy. There should about 20-50µl left in the IgG1 tube which
typically should satisfy the 15,000 events required for the analysis of the
negative sample. Add enough NST + 10%NGS to the IgG1 tube to a final volume of
200µl. After all the samples have been distributed into their appropriate DNA
content, negative and positive tubes, appropriate antibody can be added.
Currently we add 10µl of the Ki67-PE and 7.5µl of the IgG1-PE to the
appropriate 200µl sample. After adding antibody, briefly mix each tube with
vortex. Place on ice. Incubate on ice for a minimum of 30 minutes, centrifuge
at 2000 rpm on the TOMY centrifuge at 0°C for 10 minutes. Decant as before.
Resuspend pellets with NST + 10% FCS + DAPI at 10µg/ml final concentration.
Tubes are ready for analysis and sorting.
F.
Flow
cytometer set-up (see Ki67/DNA protocol stored on Coulter Elite)
G.
Analysis
and sorting
Immediately before each
sample is run on the flow cytometer each sample is syringed again with a 1cc
syringe and a 25 gauge needle x 7 and transferred into a 5 ml. labeled falcon
tube through a custom made 70 micron prefilter. These prefilters are reused
after each use. Prefilters are cleaned with bleach, water washs, alcohol
sterilization and air-drying. Prefilters are also periodically checked with a
10x lens and discarded if corroded or damaged. Be sure that these filters are
isolated from fibers that may contaminate the nuclei suspension and become
trapped in the flow cell! The flow cytometer also has similar custom made
prefilters that are changed between patients.
Sorting strategy: If the
biopsy is diploid, sort Ki67 positive G1 and all the cells in the 4N fraction.
If the biopsy has an aneuploid and a non-cycling diploid, sort all the 2N cells
and all the aneuploid G0/G1 cells. If the biopsy has an aneuploid and a cycling
diploid fraction, sort the cycling diploid G1 fraction and all the aneuploid
G0/G1 cells.
Hoescht/Fluorescein Diacetate (FDA)/Propidium Iodide (PI)
Method A
1.
Label cells with 10 µM Hoechst 33342 for 30 minutes @
37ºC. (Add 10 µl of 1000 µM stock per
ml of media).
2. Harvest cells and resuspend in 400 µl of serum-free media containing 10 µM Hoechst 33342.
3. Add PI to final concentration of 5 µg/ml (Add 2 µl 1 mg/ml stock).
4. Add FDA to final concentration of 0.5 µg/ml (Add 1 µl of 220 µg/ml stock).
5. Incubate at room temperature for 5-15 minutes.
6. Run in flow cytometer.
Method B
1.
Harvest cells and resuspend in 400 µl of serum-free
media containing 10 µM Hoechst 33342.
2. Label cells with 10 µM Hoechst 33342 for 30 minutes @ 37ºC. (Add 10 µl of 1000 µM stock per ml of media.)
3. Bring to RT. Add PI to final concentration of 5 µg/ml (Add 2 µl 1 mg/ml stock) and FDA to final concentration of 0.5 µg/ml (Add 1 µl of 220 µg/ml stock).
4. Incubate at room temperature for 10-15 minutes.
5. Put on ice and run in flow cytometer.
Stohr M., and Vogt-Schaden M. A new dual staining
technique for simultaneous flow cytometric DNA analysis of living and dead
cells. In Laerum OD, Lindmo T., Thorud E., (eds), “Flow Cytometry” Vol IV
Bergen; Norway: Universitetsforlaget, pp. 96-99 (1979).
Hamori E., Arndt-Jovin D.J., Grimwade B.G., and Jovin
T.M., Selection of viable cells with known DNA content. Cytometry 1:132-135.
(1980).
Coast Seafood Sample Protocol
Coast Seafood Company sends oyster larvae samples every week to determine whether they are triploid populations. The triploid populations will not reproduce if released into the wild. The following is the protocol used to prepare and analyze the samples. They will always send a diploid sample for you to test.
You will need:
1. 10mg/ml DAPI w/NP40 in 10%DMSO (see Solutions Section)
2. Beaker with ddH20 for rinsing spatula
3. Spatula
4. Clean slides
5. 2 tubes per sample
6. funnels
7. 90 mm mesh squares (cut from stock supply;)
1. Label 2 tubes per sample – put a small amount of 1x DAPI into one of the tubes per sample.
2. Using a clean spatula, remove a small amount of larvae from the sample tube.
3. Using a dropper filled with 1x DAPI, drop the sample from the spatula onto a clean slide.
4. Using the flat side of the spatula, smush the larvae until the liquid is a muddy brown color.
5. Using the same dropper, suck up all the liquid and smushed larvae from the slide and place it in the tube containing a small amount of DAPI. You may need a few extra drops of clean DAPI on the slide to get everything. Mix it really well in the tube.
6. Place a funnel and 90 mm mesh square onto the empty tube for the same sample.
7. After mixing really well in the DAPI, suck everything up and push it through the mesh into the empty tube.
8. Before running in the cytometer, syringe and filter each sample. The samples tend to be really concentrated depending on how many larvae you took out at the beginning. You may need to filter twice or add more DAPI if it’s too concentrated.
Reagents used in this
protocol and their sources:
DAPI from Accurate Chem. Co.; Cat#
18860 (No Substitutes)
90mm mesh from Small Parts,
Inc.; Cat# CMN -0090
Section 10 Protocols for Arrays and RNA preps for Arrays
Basic RNA extraction detailed protocol
Materials needed: Trizol (Life technologies cat #15596-026)
Chloroform
70%
ethanol (made with DEPC-treated water)
Qiagen
RNeasy spin columns (cat# 74104 mini, cat# 75142 midi)
Buffer
RW1 (Qiagen RNeasy kit)
Buffer
RPE (with ethanol) (Qiagen RNeasy kit)
RNASE
free water (Qiagen RNeasy kit)
Microcentrifuge
Protocol (for 5x10⁶ cells – adjust accordingly):
q Thaw on ice and spin 1000 x
g for 5 minutes (in microcentrifuge tube)
q Add 1ml Trizol to pellet
(mix by pipetting or with polytron if necessary)
At this step you should freeze on dry ice if you have more than TWO
samples.
You can store if you need to at –70°C then thaw at 37°C and proceed with the
chloroform step SKIPPING the 5 minutes at room temp.
q Incubate 5’ at room temp
q Add 0.2 ml chloroform
q Shake vigorously
q Incubate at RT for 2-3
minutes
q
Centrifuge at 12,000 x g for 2-3 minutes
q Remove aqueous phase (top
layer) into a new 1.5 ml microfuge tube
q Slowly add an equal volume
of 70% ethanol (RNAse free)
q Load on 2 RNEASY mini
columns (no more than 3x10⁶ cells per column)
q
Centrifuge at >8,000 x g for 15 seconds
q Discard flow-through
q Add 700 ml buffer RW1 to each column
q
Centrifuge at >8,000 x g for 15 seconds
q Discard flow-through and
collection tube
q Transfer column to a new
collection tube
q Add 500 ml buffer RPE (with ethanol
added) to each column
q
Centrifuge at >8,000 x g for 15 seconds
q Discard flow-through
q Add 500 ml buffer RPE (with ethanol
added) to each column
q
Spin at >8,000 x g for 2 min
q Discard flow-through and
collection tube
q Transfer each column to a
new collection tube
q
Centrifuge at full speed for 1 min
q Transfer to a 1.5ml
collection tube
q Add 50 ml RNAse-free water to each
column
q
Centrifuge at > 8,000 x g for 1 minute
q (optional) Add 0.5ml RNASE inhibitor (like
RNASE-out)
q Store immediately at –80°C
q Run 2ul on spec and 1ul on
Agilent bioanalyzer to access quality. A260/280 should be 1.8-2 and 28s:18s
total RNA peak ratio should be 1.4-2.
RNA Extraction from Pancreatic Tissue (LiCl/RNeasy combination method)
|
LiCl/Urea (100ml), pH 5.2 ·
12.7g
LiCl (3M) ·
36g
Urea (6M)
20%SDS (100ml) ·
20g
SDS
PK buffer (prepare fresh at RT) (5ml) ·
20
ml 0.5M EDTA (2 mM final) ·
250
ml 4M NaCl (200mM final) ·
125
ml 20% SDS (0.5% SDS final) ·
50
ml 1M Tris-HCL pH 8.0 (10mM final) ·
100
ml Proteinase K (200 mg/ml final) ·
4455
ml Nuclease-free water |
Phenol/Chloroform/IAA (pH <6) – we use
Ambion Chloroform 70% ethanol mixed in DEPC treated water Qiagen RNeasy mini prep kit |
q
Weigh
out 25 mg of RNAlater-stabilized tissue (for approximately 20 ug RNA).
q
Homogenize
tissue quickly in 1 ml LiCl/Urea buffer on ice with 25ml 20%SDS added. Polytron-type homogenizer (Fisher PowerGen) works well.
q
Incubate
o/n on ice in cold room (the lithium will precipitate the RNA)
q
Centrifuge at 3400rpm (max speed) for 15 min 4°C
q
Remove
supernatant
q
Resuspend
in 1 ml LiCl/Urea buffer (without SDS)
q
Incubate
30’ on ice
q
Centrifuge at 3400 rpm (max speed) for 15 min 4°C
q
Remove
supernatant
q
Resuspend
in 500 ml PK buffer and transfer to 1.5 ml Eppendorf tube
q
Incubate
20’ @ 37°C
q
Add 500 ml phenol/Choloroform/IAA (pH <6)
q
Vortex
1 min
q
Incubate
on ice 5 mins
q
Centrifuge at 10,000rpm for 5 min
q
Remove
upper (aqueous) phase and transfer to new tube
q
Add 500 ml phenol/ Chloroform/ IAA (pH <6)
q
Repeat
above steps
q
Remove
upper (aqueous) phase and transfer to new tube
q
Add 500 ml Chloroform
q
Repeat
above steps
q
Remove
upper (aqueous) phase and transfer to new tube
q
Add equal volume 70% Ethanol slowly
q
Mix
gently
q
Add
immediately to Qiagen RNEASY column (25mg tissue per mini column)
q
Centrifuge
15 sec at > 8000 x g
q
Discard
flow-through
q
Add
700 ml Buffer RW1
q
Centrifuge 15 sec at > 8000 x g
q
Discard
flow-through and collection tube & place in new collection tube
q
Add
500 ml buffer RPE (with ethanol added)
q
Centrifuge 15 sec at > 8000 x g
q
Discard
flow-through
q
Add
500 ml buffer RPE (with ethanol added)
q
Centrifuge 2 min at > 8000 x g
q
Discard
flow-through and collection tube & place in new collection tube
q
Centrifuge 2 min at full speed
q
Discard
collection tube and transfer to a 1.5 ml RNASE-Free tube
q
Add
50 ml RNASE-free water directly to the membrane
q
Centrifuge 1 min at > 8000 x g
q
Add
0.5 ml RNASE-out RNASE inhibitor and store aliquotted at -80°C
q
Avoid
freeze-thaw cycles
General Instructions for Bioanalyzer RNA
Day before run – Call ahead to make sure
the analyzer is available at the time you would like to run. (phone: 5-7285)
Things to take with you
Bucket of ice for samples
Electrode Cleaning Chips (two)
Gel dye matrix mix
Sample Buffer
RNA ladder
Samples
Call ahead (5-7285) to make sure someone can let you in the room.
When you get to the room at Roosevelt
- Turn on the heat block (high 95°C) and put RNA ladder
in to heat.
- Turn on the computer screen.
- Turn on Bioanalyzer.
- Gel Dye matrix in small box at RT and close to
protect from light
Clean Bioanalyzer:
- Add 350 ml of RNase ZAP (Ambion
Cat. # 9780.9782.9782) to RNase electrode cleaning chip.
- Close lid for 1 minute. Remove chip
- Add 350 ml of nuclease free
water to the water chip.
- Close lid for 10 seconds. Remove chip
- Air dry 10 seconds.
- Set aside chips for use later
Loading Chip.
- Put the RNA chip in the “Chip Primer
w/syringe”.
 Make sure the Chip
Primer is set to position C.
Make sure the Chip
Primer is set to position C.- Load 9 ml of gel dye matrix mix
into the chip in the G
well.
- Close the top of the chip holder and click
shut.
- Depress the plunger until it is locked in place
and WAIT 30 seconds.
- Unlock the plunger, pull the plunger to 1 ml
and then release the top.
- Add 9 ml to the two other
wells labeled G.
- The remaining wells are for your samples. You want to load between 100 and 200
ng/well. You may use up to 3 ml of RNA but the
remaining volume should be sample buffer provided in the kit. The total volume should be 6 ml. Load the appropriate
amount of sample buffer to each well.
Then add the appropriate amount of RNA. Make sure you have a plan for adding the RNA so you know
which wells are which.
- Do NOT leave any sample wells empty. Add 6 ul of sample buffer to any empty
wells.
- Add 1 ml of the RNA 6000
ladder to the ladder well. This
has been heated in the heat block.
Then add 5 ml of the Sample Buffer to that same well.
- Place the chip on the vortex. Tape it down on the corner. Mix for 1 minute.
- Start run within five minutes of loading.
Running chip.
- On the computer click on the Agilent 2100 to
open the software.
- Click on Assay.
- Click on Other.
- Click on Eukaryotic total RNA or mRNA.
- Choose the number of lanes to be analyzed and
label them.
- Click on OK.
- While the samples are running, CLEAN UP the
work area so it is clean for the next user.
After run is complete
- SAVE the file in the
Rabinovitch folder.
- Print the electropherograms for your samples.
- Clean the Bioanalyzer as described above. When cleaning is complete, flick the
liquid from the chip and save the chip for use next time you run an RNA
chip
- Turn off the Bioanalyzer, heat block, and computer
screen.
- Gather your things and make sure the door is
locked when you leave.
- Return the key if necessary.
Make Gel dye mix
- Add 400 ml gel matrix + 4 ml dye to a 1.5 ml
microfuge tube.
- Vortex to mix
- Add to provided spin column
- Centrifuge @ 7000 x g for 10 min.
- Store at 4°C and protect from
light
Preparation of cDNA from total
RNA (Reverse Transcription, RT)
Description:This protocol describes the preparation of complementary DNA, cDNA, from total RNA using oligo-dT primers complementary to the poly-A tail of messenger RNAs. This procedure strongly favors 3’ sequences, a consideration for downstream applications using cDNA prepared in this manner. However, any reverse primer can be substituted for the oligo-dT primer if desired. High quality RNA should be used, and it is not necessary to DNAse-treat the RNA prior to cDNA preparation as the initial step in this protocol encompasses a DNAse digestion to remove contaminating DNA.
Step 1
Per rxn: Total RNA (0.1
– 2 mg) x (to 4 ml)
RNAsin (40 U/ml) 0.25 ml (Promega, 2500 U, #N2111)
DTT (100
mM) 0.5 ml
DNAse I (1 U/ml) 0.25 ml (Roche, #776 785)
H2O
(DEPC or RNAse-free) q.s. to 5 ml
Run on RTPCR1, Rabinovitch lab Eppendorf cycler
30’ @ 37°C (This step is to digest residual DNA.)
5’ @ 70°C (This step destroys DNAse and denatures
RNA.)
Step 2
Add 1 ml
of oligo-dT primer* (0.13 mg/ml)
to each tube. Vortex briefly @ 5, spin
down.
Run on RTPCR2, Rabinovitch lab Eppendorf cycler
5’ @ 70°C (This step is to denature RNA so that it
anneals to primer.)
Snap on ice immediately so RNA doesn’t form secondary
structure.
Step 3
To each rxn add:
5x First Strand Buffer 2 ml (Prepare master mix, keep at RT.)
DTT (100 mM)
0.5 ml
dNTPs (10 mM) 0.5 ml
Superscript 0.5 ml (Invitrogen, Biochemistry stores)
Run on RTPCR3, Rabinovitch lab Eppendorf cycler
1 hr @ 45°C (This step is reverse transcription, first
strand synthesis.)
When complete, final volume is 9.5 ml. Add 90.5 ml
H2O (q.s. to 100 ml).
Store at –20°C.
*Oligo-dT primer from Roche, #814 270, resuspended in H2O
to 0.13 mg/ml
ENZO RNA prep for generation of cRNA
DAY 1 (FIRST AND
SECOND STRAND cDNA SYNTHESIS)
Refer to
Affymetrix protocol in blue notebook if you have any questions.
Use program AFFYDNA on eppendorf cycler. Mix and spin down briefly after adding each set of reagents. Use 0.2 ml PCR tube. Most reagents are in “Affy Reagents” box in chest freezer.
|
Reagent Name |
Vol
(ul) |
Temp |
Time |
Location |
|
Total RNA (5mg) |
10 |
|
|
-80°C |
|
42 uM T7 Oligo dT primer |
2.5 |
|
|
-20°C aliquots |
|
|
|
70°C |
10 min |
|
|
5x First Strand cDNA buffer * |
4 |
4°C |
HOLD |
-20°C stratacooler |
|
0.1M DTT * |
2 |
|
|
-20°C stratacooler |
|
10mM DNTP * |
1 |
|
|
-20°C aliquots |
|
|
|
42°C |
2 min |
|
|
Superscript II RT |
1 |
4°C |
HOLD |
-20°C stratacooler |
|
|
|
42°C |
1 hour |
|
|
DEPC H20 * |
91 |
4°C |
HOLD |
RT (MB grade) |
|
5x Second Strand Rxn Buffer * |
30 |
|
|
-20°C |
|
10 mM DNTP * |
3 |
|
|
-20°C aliquots |
|
10 U/ml E. coli DNA
ligase |
1 |
|
|
-20°C |
|
10 U/ml E. coli DNA Polymerase
I |
4 |
|
|
-20°C |
|
2 U/ml E. coli RNASE H |
1 |
|
|
-20°C |
|
|
|
16°C |
2h |
|
|
10 U/ml T4 DNA Polymerase |
2 |
16°C |
HOLD |
-20°C |
|
|
|
16°C |
5 min |
|
|
0.5 M EDTA |
10 |
|
|
RT (MB grade) |
* can be made up as a cocktail if doing multiple samples
Store at -20°C if stopping here.
q Transfer to 1.5 –2 ml
microfuge tube
q Add 600 ml cDNA binding buffer.
q Vortex 3 seconds. Color
should be yellow. If not refer to
manual.
q Add 500 ml to cDNA spin column from
Affymetrix (Qiagen).
q
1 min @ 8,000xg
q Discard flow-through
q Add remaining mixture cDNA
spin column & spin as above
q Transfer column to new
collection tube
q Add 750 ml cDNA wash buffer
(with ETOH added)
q
1 min @ 8,000xg
q Discard flow-through
q
5 min @ maximum speed (with cap open)
q Transfer column to 1.5 ml
collection tube.
q Add 14 ml elution buffer
q Incubate 1 min @ RT
q
1 min @ max speed
q Save 1 ml for analysis later. Be sure to mark as cDNA.
q Store at -20°C
DAY 2 (IN VITRO TRANSCRIPTION & HYB COCKTAIL
PREP)
Eppendorf protocol AFFYIVT
|
Reagent Name |
Vol (ml) |
Temp |
Time |
Location |
|
CDNA from above (in 0.2 ml tube) |
10 |
RT |
|
-20°C |
|
Mol bio grade H20 |
12 |
|
|
RT |
|
10x HY Rxn buffer (ENZO #1) |
4 |
|
|
-20°C |
|
10x Biotin-labeled ribonucleotides (ENZO #2) |
4 |
|
|
-20°C |
|
10x DTT (ENZO #3) |
4 |
|
|
-20°C |
|
RNASE inhib (ENZO #4) |
4 |
|
|
-20°C |
|
20x T7 RNA pol (ENZO #5) |
2 |
|
|
-20°C |
|
|
|
37°C |
5h – mix every 30 min |
|
Store @ -70°C if stopping here
q Transfer to 1.5-2 ml tube
q Add 60 ml RNAse-free water to mix
and vortex 3 sec
q Add 350 ml IVT cRNA binding
buffer & vortex 3 sec
q Add 250 ml ethanol and mix by
pipetting
q Apply to IVT cRNA cleanup
spin column
q
15 seconds @ 8,000xg
q Transfer to a new collection
tube
q Add 500 ml IVT cRNA wash buffer
(with ethanol added)
q
15 seconds @ 8,000xg
q Discard flow through
q Add 500 ml 80% ethanol to the spin
column
q
15 seconds @ 8,000xg
q Open the cap
q
5 minutes at maximum speed
q Transfer to 1.5 ml tube
q Add 11 ml RNASE free water
q
1 min @ max speed
q add 10 ul RNASE free water
q
1 min @ max speed
q Check spectrophotometer at
1:100 dilution 0.5 ml into 99.5 ml of RNase free water
q Calculate as adjusted cRNA
= measured cRNA – (10/12)*(RNA
concentration at start)
q Remove an aliquot (0.5 ml) for Bioanalyzer
q Store at –80°C
Fragmentation
o
Plug
sample name, measured [cRNA], total RNA into the grey columns of the excel
template “template for affy fragmentation.xls”
u:\PUBLIC\AffyPublic\affy public\protocols\ template for affy fragmentation.xls
§
[
cRNA] is calculated using the formula:
adjusted [cRNA]=measured
[cRNA] – (10/12)*([total RNA] at start)
§
This
will calculate the volume needed (RNA, water, and 5x fragmentation buffer) in
the fragmentation reaction for 1,2, or 3 hybridizations.
o
Fragment
enough RNA for the maximum number of hybridizations possible (if you only have
16 ug, you can only do 1 hybridization. If you have 50 ug, you should fragment
enough for 3 hybridizations.)
o
94°C for 35 minutes (PCR
program: FRAGMEN). Store on ice or freeze at -80°C
o
remove
an aliquot (0.5 ul) for Bioanalyzer.
o
Adjust
the volume of water and cRNA below depending on the volume of the fragmentation
reaction (copy from “add to hyb” column on the template).
o
Take
the aliquots of cRNA before and after fragmentation to the Bioanalyzer to
assess quality before sending to CEA.
Hybridization cocktail
|
Reagent Name |
Vol
(ml) |
Location |
Instructions |
|
Fragmented cRNA |
13.3 |
-80°C |
|
|
B2 oligo |
5 |
-20°C |
|
|
20x euk hyb control |
15 |
-20°C |
Heat to 65°C for 5 min first!!!!! |
|
Herring Sperm DNA |
3 |
-20°C |
(10 mg/ml stock) |
|
Acetylated BSA |
3 |
-20°C |
(50 mg/ml stock) |
|
2x hyb buffer |
150 |
Cold Room |
Discard if yellow |
|
RNASE-FREE H20 |
110.7 |
RT |
|
Either
place on dry ice and send to CEA immediately or store at -70°C
AFFYmetrix RNA prep for generation of cRNA using IVT kit
DAY 1 (FIRST AND
SECOND STRAND cDNA SYNTHESIS)
Refer to
Affymetrix protocol in blue notebook if you have any questions.
Use program AFFYDNA on eppendorf cycler. Mix and spin down briefly after adding each set of reagents. Use 0.2 ml PCR tube. Most reagents are in “Affy Reagents” box in chest freezer.
|
Reagent Name |
Vol
(ul) |
Temp |
Time |
Location |
|
Total RNA (5mg) |
10 |
|
|
-80°C |
|
42 uM T7 Oligo dT primer |
2.5 |
|
|
-20°C aliquots |
|
|
|
70°C |
10 min |
|
|
5x First Strand cDNA buffer * |
4 |
4°C |
HOLD |
-20°C stratacooler |
|
0.1M DTT * |
2 |
|
|
-20°C stratacooler |
|
10mM DNTP * |
1 |
|
|
-20°C aliquots |
|
|
|
42°C |
2 min |
|
|
Superscript II RT |
1 |
4°C |
HOLD |
-20°C stratacooler |
|
|
|
42°C |
1 hour |
|
|
DEPC H20 * |
91 |
4°C |
HOLD |
RT (MB grade) |
|
5x Second Strand Rxn Buffer * |
30 |
|
|
-20°C |
|
10 mM DNTP * |
3 |
|
|
-20°C aliquots |
|
10 U/ml E. coli DNA
ligase |
1 |
|
|
-20°C |
|
10 U/ml E. coli DNA Polymerase
I |
4 |
|
|
-20°C |
|
2 U/ml E. coli RNASE H |
1 |
|
|
-20°C |
|
|
|
16°C |
2h |
|
|
10 U/ml T4 DNA Polymerase |
2 |
16°C |
HOLD |
-20°C |
|
|
|
16°C |
5 min |
|
|
0.5 M EDTA |
10 |
|
|
RT (MB grade) |
* can be made up as a cocktail if doing multiple samples
Store at -20°C if stopping here.
q Transfer to 1.5 –2 ml
microfuge tube
q Add 600 ml cDNA binding buffer.
q Vortex 3 seconds. Color
should be yellow. If not refer to
manual.
q Add 500 ml to cDNA spin column from
Affymetrix (Qiagen).
q
1 min @ 8,000xg
q Discard flow-through
q Add remaining mixture cDNA
spin column & spin as above
q Transfer column to new
collection tube
q Add 750 ml cDNA wash buffer
(with ETOH added)
q
1 min @ 8,000xg
q Discard flow-through
q
5 min @ maximum speed (with cap open)
q Transfer column to 1.5 ml
collection tube.
q Add 14 ml elution buffer
q Incubate 1 min @ RT
q
1 min @ max speed
q Save 1 ml for analysis later. Be sure to mark as cDNA.
q Store at -20°C
Overnight (IN VITRO TRANSCRIPTION & HYB
COCKTAIL PREP)
Thaw all components
and do NOT assemble on ice because 10X IVT Labeling buffer has spermidine that
will precipitate the cDNA
|
Reagent Name |
Vol (ml) |
Temp |
Time |
Location |
|
CDNA from above (in 0.2 ml tube) |
6 |
RT |
|
-20°C |
|
Mol bio grade H20 |
14 |
|
|
RT |
|
10x IVT Labeling buffer |
4 |
|
|
-20°C |
|
IVT Labeling NTP Mix |
12 |
|
|
-20°C |
|
IVT Labeling Enzyme mix |
4 |
|
|
-20°C |
|
|
|
37°C |
16 hours |
|
Store @ -70°C if stopping here
q Transfer to 1.5-2 ml tube
q Add 60 ml RNAse-free water to mix
and vortex 3 sec
q Add 350 ml IVT cRNA binding
buffer & vortex 3 sec
q Add 250 ml ethanol and mix by
pipetting
q Apply to IVT cRNA cleanup
spin column
q
15 seconds @ 8,000xg
q Transfer to a new collection
tube
q Add 500 ml IVT cRNA wash buffer
(with ethanol added)
q
15 seconds @ 8,000xg
q Discard flow through
q Add 500 ml 80% ethanol to the spin
column
q
15 seconds @ 8,000xg
q Open the cap
q
5 minutes at maximum speed
q Transfer to 1.5 ml tube
q Add 11 ml RNASE free water
q
1 min @ max speed
q add 10 ul RNASE free water
q
1 min @ max speed
q Check spectrophotometer at
1:100 dilution 0.5 ml into 99.5 ml of RNase free water
q Calculate as adjusted cRNA
= measured cRNA – (10/12)*(RNA
concentration at start)
q Remove an aliquot (0.5 ml) for Bioanalyzer
q Store at –80°C
Fragmentation
o
Plug
sample name, measured [cRNA], total RNA into the grey columns of the excel
template “template for affy fragmentation.xls”
u:\PUBLIC\AffyPublic\affy public\protocols\ template for affy fragmentation.xls
§
[
cRNA] is calculated using the formula:
adjusted [cRNA]=measured
[cRNA] – (10/12)*([total RNA] at start)
§
This
will calculate the volume needed (RNA, water, and 5x fragmentation buffer) in
the fragmentation reaction for 1,2, or 3 hybridizations.
o
Fragment
enough RNA for the maximum number of hybridizations possible (if you only have
16 ug, you can only do 1 hybridization. If you have 50 ug, you should fragment
enough for 3 hybridizations.)
o
94°C for 35 minutes (PCR
program: FRAGMEN). Store on ice or freeze at -80°C
o
remove
an aliquot (0.5 ul) for Bioanalyzer.
o
Adjust
the volume of water and cRNA below depending on the volume of the fragmentation
reaction (copy from “add to hyb” column on the template).
o
Take
the aliquots of cRNA before and after fragmentation to the Bioanalyzer to
assess quality before sending to CEA.
Hybridization cocktail
|
Reagent Name |
Vol
(ml) |
Location |
Instructions |
|
Fragmented cRNA |
15 |
-80°C |
|
|
B2 oligo |
5 |
-20°C |
|
|
20x euk hyb control |
15 |
-20°C |
Heat to 65°C for 5 min first!!!!! |
|
Herring Sperm DNA |
3 |
-20°C |
(10 mg/ml stock) |
|
Acetylated BSA |
3 |
-20°C |
(50 mg/ml stock) |
|
2x hyb buffer |
150 |
Cold Room |
Discard if yellow |
|
DMSO |
30 |
|
|
|
RNASE-FREE H20 |
79 |
RT |
|
Either
place on dry ice and send to CEA immediately or store at -70°C
MCAT Genotyping Protocols
(from John Morton in Warren Ladiges lab)
Description:
The 5’ Primer OCT/CAT,
located in the OCT leader sequence, can be used with three different 3’ primers
giving three primer sets which amplify products of different size from the MCAT
transgene. OCT/CAT and 3’ primer CAT1
amplify a 692 bp product, OCT/CAT
and 3’ primer CAT2 amplify a 900 bp
product, and OCT/CAT and 3’ primer CAT3 amplify a 1429 bp product.
The primer CATX7 and CATX8 span exon 7 and 8 of the human
catalase gene. These primers can be
used to genotype cDNA prepared from total RNA using oligo dT primers, a key
advantage over using the OCT/CAT Forward primers with on the the three
Reverse primers used for genotypeing DNA This is because the OCT/CAT
Forward primers bind the 5’ end of the gene, and oligo dT primed RT-PCT
strongly favors 3’ sequences. Expected
product size using the CAT X7 and CATX8 primers is 256 bp.
Primers (purple rack in fridge #2):
OCT/CAT 5’- ctg agg atc ctg
tta aac aat gc – 3’
CAT2 5’– ggg aaa gtc tcg ccg cat
ctt c – 3’
Primers (located in –20 C
freezer FNH Box 10A)
CATX7 (hCAT F) 5’- gaa gat gcg
gcg aga ctt tcc c –3’
CATX8 (hCAT R) 5’- cta tct gtt caa
cct cag caa ag –3’
These primers are not in the lab but can be
obtained from John Morton.
CAT1 5’ – gaa gtc cca gac cat gtc cgg at – 3’
CAT3 5’ – ctc cgc act tct cca gaa tat tg – 3’
Reaction Mix for OCT/CAT & CAT2 Reaction Mix for CATX7 & CATX8
(For one 25ul reaction): (For
one 25ul reaction):
H2O 12.5ml 10X PCR Buffer +Mg2+ 2.5ml
10X PCR Buffer 2.5ml 20mM 5’Primer 1.0ml
25mM MgCl2 1.5ml 20mM 3’Primer 1.0ml
25mM 5’Primer 1.0ml 10mM dNTP 0.5ml
25mM 3’Primer 1.0ml Taq Polymerase 0.2ml
25mM dNTP 0.2ml cDNA template 5.0ml
5X Rapid-Load Buffer* 5.0ml H2O 14.8ml
(optional -- add 5 ml H20 if not
available)
Taq Polymerase 0.3ml
DNA 1.0ml
*= 5X R.L. Buffer – OriGene Technologies, Catalog # RL-105
Thermocycler Settings for Thermocycler
Settings for
OCT/CAT & CAT2: CATX7
& CATX8
94°C for 4 min 94°C for 4 min
cycle 30 times cycle
30 times
94°C for 30 sec 94°C for 30 sec
55°C for 30 sec 60°C for 30 sec
72°C for 1.5 min 72°C for 1.5 min
72°C for 5 min 72°C for 5 min
4°C forever 4°C forever
Run products on a 1% agarose gel.
Run products on a 2% agarose gel
Section 11 Macros, SAM, GeneTraffic hints
Entropy Macro
Written by Mike Shen April 2004
Theory: ENTROPY (Diversity)
A measure or variation or diversity defined on the probability distribution of observed events. Specifically, if P is the probability of an event a, the entropy H(A) for all events a in A is:
H(A) = -SUMa P(a) log2 P(a)
i.e., The sum of the log2 probs of the model p, weighted by the real probs p.
The quantity is zero when all events are of the same kind, p =1 for any one a of A and is positive otherwise. Its upper limit is log_2 N where N is the number of categories available (see degrees of freedom) and the distribution is uniform over these, p = 1/N for all a of A (see variety, uncertainty, negentropy). The statistical entropy measure is the most basic measure of information theory.
Simpson's index of diversity
Simpson's index is the first of a set of non-parametric approaches to determining sample heterogeneity. Simpson (1949) did not want to make assumptions about the distribution of the species abundance curve and so defined the following:
Simpson's index
where D is Simpson's index and can be defined as the probability of two individuals in a random sample being in same category. Pi is the proportion of category i in the community.
Simpson's index of diversity = 1 - D ,
Range(0 to ~1),
Maximum (1 - 1/categories).
The probability that two randomly selected individuals in a community are of the different categories.
Also see http://www.tiem.utk.edu/~gross/bioed/bealsmodules/simpsonDI.html
Entropy Macro “SID.xlm” (general purpose)
(1)
Excel
Macro is available on U:\public\Entropy_Diaversity Macro\SID.xlm
(2)
Example
data is in U:\public\Entropy_Diaversity Macro\tsSID.xls with following format:
a.
Title: starts at row #5
b.
Data
Set: First set starts at row #6 with next data set at next row.
c.
Data
entry: First event starts at column C with next event at next column.
Example (tsSID.xls):
|
|
A |
B |
C |
D |
E |
FISH abnormality template |
G |
H |
I |
J |
K |
L |
M |
N |
O |
P |
Q |
R |
S |
T |
U |
V |
W |
X |
Y |
Z |
AA |
AB |
AC |
AD |
AE |
AF |
AG |
|
2 |
|
|
|
|
|
FISH abnormality template |
|
|
|
|
|
|
|
|
|
|
|
|
|
|
|
|
|
|
|
||||||||
|
3 |
|
|
|
|
|
|
|
|
|
|
|
|
|
|
|
|
|
|
|
|
|
|
|
|
|
|
|
|
|
|
|
|
|
|
4 |
|
|
|
|
|
|
|
|
|
|
|
|
|
|
|
|
|
|
|
|
|
|
|
|
|
|
|
|
|
|
|
|
|
|
5 |
|
|
0r1g |
0r2g |
0r3g |
0r4g |
1r0g |
1r1g |
1r2g |
1r3g |
1r4g |
2r0g |
2r1g |
2r2g |
2r3g |
2r4g |
2r5g |
3r0g |
3r1g |
3r2g |
3r3g |
3r4g |
3r5g |
4r0g |
4r1g |
4r2g |
4r3g |
4r4g |
5r2g |
5r3g |
5r4g |
5r5g |
Cell # |
|
6 |
121 ja20 chrom 17 |
0 |
0 |
0 |
0 |
0 |
1 |
|
0 |
0 |
0 |
5 |
# |
6 |
0 |
0 |
0 |
0 |
31 |
9 |
0 |
0 |
0 |
0 |
0 |
1 |
1 |
0 |
0 |
0 |
0 |
199 |
|
|
7 |
12u #12 chr8 |
|
0 |
0 |
0 |
0 |
0 |
2 |
|
1 |
0 |
0 |
1 |
85 |
5 |
0 |
0 |
0 |
1 |
3 |
0 |
0 |
0 |
0 |
0 |
0 |
0 |
1 |
0 |
0 |
0 |
0 |
103 |
|
8 |
131j d6 (2d=4) |
0 |
0 |
0 |
0 |
0 |
0 |
|
0 |
0 |
0 |
3 |
# |
5 |
1 |
0 |
0 |
1 |
# |
3 |
0 |
0 |
0 |
0 |
0 |
0 |
0 |
0 |
0 |
0 |
0 |
204 |
|
|
9 |
27u #17 chr 8 |
|
0 |
0 |
0 |
0 |
0 |
5 |
|
2 |
0 |
0 |
5 |
95 |
# |
0 |
0 |
0 |
2 |
11 |
2 |
0 |
0 |
0 |
0 |
0 |
0 |
1 |
0 |
0 |
0 |
0 |
145 |
|
10 |
35r 5cm |
|
0 |
0 |
0 |
0 |
0 |
0 |
|
0 |
0 |
0 |
0 |
# |
6 |
1 |
0 |
0 |
0 |
1 |
0 |
0 |
0 |
0 |
0 |
0 |
0 |
0 |
0 |
0 |
0 |
0 |
158 |
|
11 |
36x 80 cm |
|
0 |
0 |
0 |
0 |
0 |
1 |
|
0 |
0 |
0 |
2 |
# |
3 |
0 |
0 |
0 |
0 |
4 |
1 |
0 |
0 |
0 |
0 |
0 |
0 |
0 |
0 |
0 |
0 |
0 |
198 |
|
12 |
37u 15cm |
|
0 |
0 |
0 |
0 |
0 |
2 |
|
0 |
0 |
0 |
1 |
# |
6 |
0 |
0 |
0 |
0 |
3 |
4 |
0 |
0 |
0 |
0 |
0 |
0 |
0 |
0 |
0 |
0 |
0 |
210 |
|
13 |
46t #21 chr 18 |
0 |
0 |
0 |
0 |
0 |
1 |
|
1 |
0 |
0 |
1 |
# |
5 |
0 |
0 |
0 |
1 |
4 |
1 |
0 |
0 |
0 |
0 |
0 |
0 |
1 |
0 |
0 |
0 |
0 |
171 |
|
|
14 |
46t 21 cm |
|
0 |
0 |
0 |
0 |
0 |
3 |
|
1 |
0 |
0 |
2 |
# |
8 |
1 |
0 |
0 |
0 |
2 |
2 |
0 |
0 |
0 |
0 |
0 |
0 |
0 |
0 |
0 |
0 |
0 |
200 |
|
15 |
4z c23 ch17 |
|
0 |
0 |
0 |
0 |
0 |
5 |
|
3 |
0 |
0 |
5 |
# |
# |
2 |
0 |
0 |
2 |
12 |
3 |
1 |
0 |
0 |
0 |
1 |
0 |
2 |
0 |
0 |
1 |
0 |
200 |
|
16 |
82u #2 chr 8 |
|
0 |
0 |
0 |
0 |
0 |
2 |
|
0 |
0 |
0 |
2 |
# |
3 |
0 |
0 |
0 |
0 |
5 |
0 |
0 |
0 |
0 |
0 |
0 |
0 |
2 |
0 |
0 |
0 |
0 |
201 |
|
17 |
95u #22 chr 8 |
|
0 |
0 |
0 |
0 |
0 |
2 |
|
1 |
0 |
0 |
2 |
85 |
8 |
2 |
0 |
0 |
1 |
0 |
3 |
0 |
0 |
0 |
0 |
0 |
0 |
0 |
0 |
0 |
0 |
0 |
104 |
Column A and B are reserved for Label.
Column C is the first event, column D is the second event, etc up to column AF. The entry is the frequency or the probability.
Row 1-4 is for general labels.
Row 5 is the detail labels
Row 6 is the first data set, row 7 is the second data set, etc.
To Run SID.xlm
(1) prepare the excel data as shown in example above.
(2) Click on SID.xlm to open the macro.
(3) Click on Tools\Macro\Macros (or ALT F8) to bring up function list of this macro. Click Start_SID and RUN
(4) At prompt, choose your excel data file.
(5) Macro takes over and summary is appended at completion:
Result summary (Output by macro):
|
|
AP |
AQ |
AR |
AS |
AT |
AU |
|
2 |
|
|
|
|
|
|
|
3 |
|
|
|
|
|
|
|
4 |
|
|
|
|
|
|
|
5 |
TotalSid |
TotalEntropy |
ArmSid |
ArmEntropy |
CentomereSid |
CentomereEntropy |
|
6 |
0.46 |
1.46 |
0.37 |
0.94 |
0.21 |
0.64 |
|
7 |
0.31 |
1.14 |
0.21 |
0.67 |
0.20 |
0.63 |
|
8 |
0.34 |
1.05 |
0.26 |
0.65 |
0.12 |
0.42 |
|
9 |
0.55 |
1.88 |
0.36 |
1.00 |
0.36 |
0.99 |
|
10 |
0.14 |
0.51 |
0.06 |
0.23 |
0.09 |
0.29 |
|
11 |
0.18 |
0.67 |
0.13 |
0.44 |
0.07 |
0.26 |
|
12 |
0.16 |
0.63 |
0.10 |
0.35 |
0.12 |
0.38 |
|
13 |
0.21 |
0.81 |
0.14 |
0.49 |
0.12 |
0.42 |
|
14 |
0.19 |
0.73 |
0.09 |
0.31 |
0.16 |
0.52 |
|
15 |
0.52 |
1.89 |
0.36 |
1.06 |
0.32 |
0.96 |
|
16 |
0.16 |
0.63 |
0.11 |
0.41 |
0.09 |
0.33 |
|
17 |
0.32 |
1.13 |
0.13 |
0.42 |
0.32 |
0.92 |
Entropy Macro “SID.xlm” (Telomere arm gain_loss, centromere gain_loss)
(1) Excel Macro is available on U:\public\Entropy_Diaversity Macro\SID.xlm
(2) Example data is in U:\public\Entropy_Diaversity Macro\telomere_SID.xls: There are more calculations that are associated with telomere data that is not applicable in general. Use this file as your template. Rename the file and edit the content, save the file before running the macro.
To Run SID.xlm
(1) prepare the excel data as shown in example above.
(2) Click on SID.xlm to open the macro.
(3) Click on Tools\Macro\Macros (or ALT F8) to bring up function list of this macro. Click Start_SID and RUN
(4) At prompt, choose your excel data file.
(5) Macro takes over and summary is appended at completion:
Result summary (Output by macro):
|
|
AP |
AQ |
AR |
AS |
AT |
AU |
|
2 |
|
|
|
|
|
|
|
3 |
|
|
|
|
|
|
|
4 |
|
|
|
|
|
|
|
5 |
TotalSid |
TotalEntropy |
ArmSid |
ArmEntropy |
CentomereSid |
CentomereEntropy |
|
6 |
0.46 |
1.46 |
0.37 |
0.94 |
0.21 |
0.64 |
|
7 |
0.31 |
1.14 |
0.21 |
0.67 |
0.20 |
0.63 |
|
8 |
0.34 |
1.05 |
0.26 |
0.65 |
0.12 |
0.42 |
|
9 |
0.55 |
1.88 |
0.36 |
1.00 |
0.36 |
0.99 |
|
10 |
0.14 |
0.51 |
0.06 |
0.23 |
0.09 |
0.29 |
|
11 |
0.18 |
0.67 |
0.13 |
0.44 |
0.07 |
0.26 |
|
12 |
0.16 |
0.63 |
0.10 |
0.35 |
0.12 |
0.38 |
|
13 |
0.21 |
0.81 |
0.14 |
0.49 |
0.12 |
0.42 |
|
14 |
0.19 |
0.73 |
0.09 |
0.31 |
0.16 |
0.52 |
|
15 |
0.52 |
1.89 |
0.36 |
1.06 |
0.32 |
0.96 |
|
16 |
0.16 |
0.63 |
0.11 |
0.41 |
0.09 |
0.33 |
|
17 |
0.32 |
1.13 |
0.13 |
0.42 |
0.32 |
0.92 |
Result associated with telomere:
|
|
AH |
AI |
AJ |
AK |
AL |
AM |
AN |
|
2 |
|
|
|
|
|
|
|
|
3 |
|
|
|
|
|
|
|
|
4 |
|
|
|
|
|
|
|
|
5 |
% normal |
% arm loss |
% arm gain |
% arm abnormal |
%. Cen. Loss |
%. Cen. Gain |
% Cen. Abnl |
|
6 |
71.36 |
2.01 |
21.11 |
23.12 |
3.02 |
8.54 |
11.56 |
|
7 |
82.52 |
6.80 |
4.85 |
11.65 |
3.88 |
6.80 |
10.68 |
|
8 |
80.39 |
0.49 |
14.71 |
15.20 |
1.96 |
4.41 |
6.37 |
|
9 |
65.52 |
10.34 |
11.03 |
21.38 |
8.28 |
13.10 |
21.38 |
|
10 |
92.41 |
2.53 |
0.63 |
3.16 |
0.00 |
4.43 |
4.43 |
|
11 |
90.40 |
4.55 |
2.53 |
7.07 |
1.52 |
2.02 |
3.54 |
|
12 |
91.43 |
1.90 |
3.33 |
5.24 |
1.43 |
4.76 |
6.19 |
|
13 |
88.89 |
3.51 |
4.09 |
7.60 |
1.75 |
4.68 |
6.43 |
|
14 |
90.00 |
2.50 |
2.00 |
4.50 |
2.50 |
6.00 |
8.50 |
|
15 |
68.50 |
10.50 |
11.00 |
21.50 |
6.00 |
12.50 |
18.50 |
|
16 |
91.54 |
2.49 |
3.48 |
5.97 |
1.99 |
2.49 |
4.48 |
|
17 |
81.73 |
2.88 |
3.85 |
6.73 |
4.81 |
13.46 |
18.27 |
Where
% normal = #2r2g/total
% arm gain = #xrng/total where x>2
% arm loss = #xrng/total where x<2
% cen gain = #nryg/total where y>2
% cem loss = #nryg/total where y<2
Transfer of Data from CEA to GeneTraffic
Transfer of array data from the CEA to the U drive
Down loading of array data into Gene Traffic
Transfer of array data from the CEA to the U drive
When the arrays have been scanned
the data is stored on the RA at the CEA.
To access this data you will need to open “SSH secure ftp” usually on your
desktop. Click on quick connect and
fill in the boxes
ra.microslu.washington.edu
petersr
22
Password

![]()
Type our password in the box (you can get this from Katy) and click OK.
Operations
 The page will then look like this.
On the left side go to
My Computer
Lab_Rabinovitch on ‘Pathology\Files’ (U:)
PUBLIC
Affy Public
AFFY RAW DATA FROM CEA
Create a folder for your data
Now go to the right side
Click on the folder and then files you want to transfer, include *.CEL, *.CHP and *.DAT
Click on “Operations” in the toolbar and then download.
Down loading of array data into Gene Traffic
· Open Iobion Informatics GeneTraffic
· Log on with password provided by Dick Byer dbeyer@u.washington.edu
· Click on “Create New Project”


SAM Autopilot macro
Purpose:
The SAM Autopilot macro is intended to automate some of the common ways of producing gene lists and probe sets using SAM in excel. Starting with a gene table or probe set, it generates .txt files containing gene lists and probe sets for roughly 85, 180, and 280 of the most statistically significant genes.
Installation:
SAM Autopilot is an excel add-in. To install it, select the tools–>Add-Ins menu item in excel. When the Add-Ins dialog box appears, push the Browse button and navigate to U:\PUBLIC\Affy Public\Excel Macros. There should be one or more files named SAM Autopilot <date>; chose the one with the most recent date. When it asks if you would like to copy it to your AddIns director, click yes.
Creating a Toolbar button for SAM Autopilot (optional):
If you’d like to add a menu item or toolbar button for SAM Autopilot, you can do the following: First, choose the Tools->Customize menu item. In the dialog that appears, chose the Commands tab and select the Macro item from the categories list. In the commands list you should see two items, “Custom Menu Item” and “Custom Button.” Drag and drop the “custom button” into the toolbar just to the right of the “SAM Plot Control” button. Without closing the dialog box, click on the new toolbar button. A black border should highlight it, and the Modify Selection button in the dialog box should now be enabled. Click on the Modify Selection button, and choose Assign Macro. In the Assign Macro dialog box, type “GenerateSAMFiles”, then click OK. Click on the Modify Selection button again, select Name, and type “SAM Autopilot”. Click on Modify Selection one more time, and then select “Text Only (Always)”. Finally, click on the close button to close the dialog box.
Uninstallation:
Select the tools–>Add-Ins menu item in excel. When the Add-Ins dialog box appears, uncheck the checkbox next to SAM Autopilot in the add-ins list.
Using SAM Autopilot:
To use SAM Autopilot, open the file containing the gene table. If this is the first time you’ve run SAM Autopilot on the data, make sure that the worksheet with the gene table is the one in front. Next, run the macro by pressing control-T (or press the toolbar button if you created one).
If this is the first time you’ve run SAM Autopilot, a dialog box will appear stating:
“Data categories not found - please enter the data categories, then run the macro again.” The active sheet will now be the “Categories” sheet. In the first row is a list of the column names from the gene table. In the second row is the SAM category for each column – initially these will all be set to “1”. You will also see a “Type” field (initially “One Class”) and a suffix field (initially blank).
The categories can be assigned according to the standard SAM types (1 or 2 for two class, 1 to n for multiclass, -n to n for paired, etc.). If a category field is left blank, the macro will ignore that chip in the SAM analysis – this is an easy way of analyzing a subset of the data (for example comparing just young wild type vs young KO). The type field can be any one of the SAM analysis types, but generally you won’t need to change it (by default is figures it out the analysis type based on what you entered for categories). The suffix field is a suffix to be added to all of the file names, for example “YWT vs YKO”; it’s primarily intended to be used when you’re analyzing subsets of the data and don’t want to overwrite the files you’ve generated from other subsets.
After adjusting the categories, you can then run the SAM Autopilot macro again (using ctrl-T or the toolbar button). IMPORTANT: Do not switch to another application while SAM Autopilot is running. SAM Autopilot controls SAM by emulating a user at the keyboard; if you switch to another application those key presses will go to the other application instead of SAM. (The macro certainly won’t work, and who knows what the other application might do).
While the macro runs, you will see the SAM plot controller dialog box once or twice (roughly once for every 30,000 genes in the analysis). When you see the SAM plot dialog, just press “List Delta Table”. (If you hit “list significant genes” or adjust the slider, don’t worry – the data will still be good, but the macro will take a few seconds longer to run). Since the current version of SAM can’t handle more than 32,000 genes, larger gene sets are broken up into smaller sets of 30000 genes.
When the macro has finished, it will have created a new folder in the same folder as the original gene table. The folder will be called <gene table filename>[-<suffix>] (for example “GRKO-YWT vs YKO”), and will contain a list of probe sets and gene lists. The files will have the names <gene table filename>-<list type>[-suffix]-<set size (1, 2, or 3)><gene subset>.txt (for example “GRKO-ProbeSet-YWT vs YKO-2A.txt”). The list type is either genelist or probeset, the set size is 1 for ~85 genes, 2 for ~180 genes, and 3 for ~280 genes. The gene subset is only relevant for analyzing more that 30000 genes - files generated from the analysis of the first 30000 genes will end in ‘A’, the next block of genes in ‘B’, etc.. The new gene lists and probe sets can be imported into gene traffic as tab-delimited text files.
In addition to the new files, SAM Autopilot also saves the gene lists, probe sets, and SAM output as new worksheets in the current workbook. The SAM Output[-suffix]-<setsize><gene subset> sheets in particular provides a convenient record of the genes and category assignments used to generate a particular gene list.
Extracting pixel intensity data from BAC array images
using GenePix software
FHCRC computer lab is located in CD-111; use computers #15, 16, or 17
To logon to computer, user: affychip
Password: DNA_Array
1. Copy GAL file onto the desktop—this contains positional information for each clone. Note: There are several files so compare slide # and batch # to be sure you copy the right file.
To access GAL files, open Internet Explorer and go to this website: ftp://milano.fhcrc.org/spotted.arrays/array/files/Human_BAC/GAL_Files/
2. Open GenePixPro3.0 (shortcut on desktop).
3. Check the ratio setting 635nm/532nm (upper left corner).
4. Open image file. (Click on button with picture of file folder—upper right)
To confirm that the original (unmodified) image is shown—equalize brightness & contrast settings.
5. Open the GAL list and move it with mouse to align it roughly with the blocks.
6. Click on the zoom feature (magnifying glass with “+” in the center) and select 4 blocks with marquee.
7. Click on feature and block alignment button (button with circle) and select “find all blocks and align features”.
8. Confirm the feature alignment by scrolling over each block—adjust as necessary using block manipulation feature (square with arrow pointing to upper left corner).
9. Manipulate features using the single feature button (circle with arrow pointing to upper left and away).
a. All absent features should already be marked with null symbols.
b. Bad features or those not clearly defined should be marked as “Absent”—hit A.
c. To shrink the feature size, hit CTRL and down arrow.
d. To enlarge the feature size, hit CTRL and up arrow.
e. Any regions with scratches should be marked to exclude those samples.
Note: Background pixels are calculated outside of a 2-pixel exclusion region surrounding each feature.
10. Click “ANALYZE” button (upper right).
11. Save gpr result file. Use “SAVE AS” selection in upper left corner.
12. Transfer files to memory stick or CD.
Analysis of BAC array data using R scripts
Note: This analysis uses BATCH mode in the command line not in the R program.
1. Open command line for BATCH analysis in R.
Go to START menu, then to Run. Open “cmd”
The command window will open and the “M:>” prompt will appear.
2. Type “cd BAC files” to change directory to BAC files.
3. Open normalization text file and verify/edit lines highlighted below. The rest of the file can be left as is.
## R script to normalize BAC arrays
############## BEGIN USER
SPECIFICATION OF INFO NEEDED BY PROGRAM ##############
## Name of file containing
map info: ID, Block, Column, Row, Chrom, Mid, Start, End
## for *ALL* BACs (if
locations not known then missing values are present)
## (this file is created by
another program)
map.file <-
"map10K_OG3_05-21-04.txt" # New map
#map.file <- "map10K_11-17-03.txt"
## File containing list of
BACs to drop due to FISH results
#bad.FISH.file <-
"259CloneSamples_ExcludeOnFISH_111203.txt"
bad.FISH.file <- "Exclude_On_FISH_04-15-04.txt"
## File containing list of
BACs to drop due to performance issues
poor.BAC.file <- "BAD_BACs_06-09-03.txt"
## List of clones that have
"bad" FISH results but that are still of interest
bad.FISH.to.use <-
c("", "")
# Specify name of directory
containing GPR files and names of GPR files.
# 'dir' can be full path or
relative to directory in which this script is run.
dir <- "GPR files"
files <- c("2004-06-18_BAC-709_XXRef-vs-39Y-PAL.gpr",
"2004-06-18_BAC-710_XXRef-vs-39Y-NAL.gpr",
"2004-06-18_BAC-711_XXBulk-vs-39Y-Bulk.gpr",
"2004-06-10_BAC-706_XXRef-vs-39Y-P_0500.gpr",
"2004-06-10_BAC-708_XXRef-vs-39Y-N_0500.gpr",
"2004-05-14_BAC-599_XXRef-vs-39YCrypt.gpr"
)
#files <-
paste(names,".gpr",sep="")
## Specify names of files
that raw and normalized spot data should be written to
outfile.raw <- "Samples-20040621-raw.txt"
#paste(names,"-raw.txt", sep="")
#"Samples_ABCDE_raw-spot.txt"
outfile.norm <- "Samples-20040621-norm.txt"
#paste(names,"-norm.txt", sep="")
#"Samples_ABCDE_norm-spot.txt"
## Names to be used in
labelling samples in 'outfile.raw' and 'outfile.norm'
sample.names <- c("39Y-PAL",
"39Y-NAL", "39Y-bulk", "39Y-P",
"39Y-N", "39Y-crypt")
## Should normalization also include scale adjustment (i.e. should
we scale
## values so each array has the same variability as the
others)? TRUE/FALSE
scale.adjust <- FALSE
## *IF* scale.adjust == TRUE
then should adjustment be done using the robust
## MAD (median absolute
deviation)? TRUE/FALSE (otherwise use variance)
use.mad <- FALSE
## If you wish to set the
scale of the arrays to a particular value then set
## 'specify.scale' to TRUE,
and set 'scale.val' to the value you want to use.
## Otherwise set
'specify.scale' to FALSE, and scale.val to anything (its
## value will be
ignored). If a value is not specified,
then the value used
## will be the median value
of the arrays being normalized (those in 'files')
specify.scale <- FALSE
scale.val <- NULL
## This code/script/program
assumes that the "reference" sample has been
## labelled with Cy3 (green)
dye and the "test" sample with Cy5 (Red) dye.
## The log-ratios are
computed (by default) as log2('Cy5 sample'/'Cy3 sample').
## However, if we want
log2(test/reference) and the reference is not labelled
## with Cy3 then we won't get
what we want by default. The variable
'ref.Cy5'
## allows us to change the
default and to calculate the log-ratio as
## log2(Cy3/Cy5) instead.
'ref.Cy5' should contain the position(s) in the vector
## 'files' of all experiments
for which the reference was labelled with Cy5
## rather than Cy3. For example a value of c(2,4) would indicate
that the
## 2nd and 4th files names in
'files' have Cy5 labelled references.
If there
## are no such files then
ref.Cy5 should have value c() or NULL.
ref.Cy5 <- c()
## Did any of the reference
samples contain >=1 "Y" chromosome? TRUE/FALSE
any.Y.refs <- TRUE
## Which files in 'files'
used a reference sample having a "Y" chromosome. This
## is only used if
'any.Y.refs == TRUE, and should be a vector of position
## numbers (e.g. c(1,4) means 1st and 4th file have
ref. with Y chrom.)
Y.chrom.samps <-
1:length(files)
## Should code (following
user specified values) be printed in the BATCH output
## file, or just
values/messages generated by the program?
TRUE/FALSE
show.code <- FALSE
########\/\/\/\/\/\/\/\/\/\/\/\/\/\/\/\/\/\/\/\/\/\/\/\/\/\/\/\/\/\/\/\#########
######## END USER SPECIFICATION: NO CHANGES BEYOND THIS POINT!!! #########
########/\/\/\/\/\/\/\/\/\/\/\/\/\/\/\/\/\/\/\/\/\/\/\/\/\/\/\/\/\/\/\/#########
options(echo=show.code)
cat("\n\n\n")
## Add directory info only
file names to create full path to files
dfiles <-
paste(dir,files,sep="/")
## CHECK FOR USER
SPECIFICATION ERRORS ###
## read in and run error
checking code
source("norm_input_errors.r")
###### BEGIN PREP OF BAC MAP
########
# read in map info (BAD BACs
already dropped), and keep subset of columns
map.info <-
read.table(map.file, header=T, sep="\t", as.is=T)
map.info <-
map.info[,c("ID","Block","Column","Row","Chrom","Mid","Start","End")]
## delete BACs not having
location info
map.info <-
map.info[!is.na(map.info$Mid),]
## read in BACs from bad FISH
file
bad.FISH <- scan(bad.FISH.file,
what="")
## read in BACs from poor
performance file
poor.BAC <-
scan(poor.BAC.file,what="")
## make BAC names uppercase
(in case they aren't) and combine
## them into a single vector
BACs.to.drop <-
unique(toupper(c(bad.FISH, poor.BAC)))
## Remove some BACs from list
to examine
BACs.to.drop <-
BACs.to.drop[!(BACs.to.drop %in% bad.FISH.to.use)]
map.info <-
map.info[!(map.info$ID %in% BACs.to.drop),]
###### END PREP OF BAC MAP
########
############# START LOOPING
OVER ARRAYS ##############
## read data into a single
data frame
for (indx in
1:length(dfiles)) {
v <-
substring(read.table(dfiles[indx],as.is=T,skip=2,nrows=1),22,24)
if (v == "1.4") skip <- 30 #how many lines to skip
in the header
chip <- read.table(dfiles[indx], sep="\t", header=T,
skip=skip, as.is=T,
na.strings="Error",
comment.char="", check.names=FALSE)
# subset out columns, then rename two fields
chip <-
chip[,c("Block","Column","Row","F635
Median","F532 Median","Flags")]
names(chip)[4:5] <- c("R","G")
## ******** add map info to BAC data ***********
## add chromosome and location info, then drop some merging
variables
chip <-
merge(map.info,chip,by=c("Block","Column","Row"),sort=FALSE)
chip <- chip[,!(names(chip) %in% c("Column","Row"))]
## ******** End adding map info
***********
## Save BAC name and location info in a dataframe, so we can drop
them from 'chip'
## Also create dataframes for storing raw and normalized data
if (indx == 1) {
info.df <- chip[,c("ID","Chrom","Mid","Start","End")]
raw.df <-
as.data.frame(matrix(NA,nrow=nrow(chip),ncol=2*length(dfiles)))
norm.df <-
as.data.frame(matrix(NA,nrow=nrow(chip),ncol=length(dfiles)))
}
chip <- chip[,!(names(chip) %in%
c("ID","Chrom","Mid","Start","End"))]
## calculate raw data log-ratios and intensity values for each
spot
chip <- transform(chip, log.ratio=log2(R)-log2(G),
intensity=.5*(log2(R)+log2(G)))
## Change log-ratios to log2(G/R) for experiments where reference
labelled Red
if ( indx %in% ref.Cy5 )
chip[,"log.ratio"] <- (-1)*chip[,"log.ratio"]
######## **** ASSIGN MISSING VALUES TO LOG RATIOS *****
############
## insert missing values for log.ratios of flagged spots
chip$log.ratio[chip$Flags<0] <- NA
## insert NAs for log.ratios of Y chrom BACs when ref. sample has
no Y chrom
if (!any.Y.refs || !(indx %in% Y.chrom.samps))
chip$log.ratio[which(info.df$Chrom=="Y")] <- NA
## drop more un-needed variables
chip <- chip[,!(names(chip) %in%
c("R","G","Flags"))]
######## **** END SETTING LOG RATIOS TO MISSING *****
############
############### *****
NORMALIZE DATA ****** #################
## create vector to store normalized ratios in
norm.ratio <- rep(NA, nrow(chip))
## make vector indicationg rows that don't have log ratios of NA
not.excluded <- !is.na(chip$log.ratio)
for(k in 1:length(unique(chip$Block))) {
blk <- (chip$Block == k
& not.excluded)
## Get loess fit
pt.fit <- predict(loess(log.ratio~intensity, data=chip,
subset=blk,
degree=1, span=.65,
family="symmetric",
control=loess.control(surface="direct")),
newdata=data.frame(chip$intensity[blk]))
## get normalized value by subtracting fitted value from raw
value
norm.ratio[blk] <- chip$log.ratio[blk] - pt.fit
}
raw.df[, 2*(indx-1) + 1:2] <-
chip[,c("log.ratio","intensity")]
norm.df[,indx] <- norm.ratio
}
## Do scale adjustment if
chosen by user
if (scale.adjust) {
if (use.mad) {
var.fun <- mad
var.meth <- "Median Absolute Deviation (MAD)"
abbrev<- "MAD"
} else {
var.fun <- sd
var.meth <- "Standard Deviation (SD)"
abbrev<- "SD"
}
array.scale.vals <- round(apply(norm.df, 2, var.fun,
na.rm=TRUE),dig=3)
if (!specify.scale) scale.val <-
round(median(array.scale.vals),dig=3)
norm.df[] <- apply(norm.df, 2, function(x,sv,vf) {
x * (sv / vf(x,na.rm=T)) }, scale.val,
var.fun)
cat("\n\n*****************************************************************************\n")
cat("* Applied scale normalization to all arrays.",
"\n* The measure of variability used was the: ",
var.meth,
"\n* Arrays were scaled to have a",abbrev,"
of:", scale.val,"\n",
"\n* The individual arrays had the following original
scale values:",
"\n*
-------------------------------------------------------------\n")
print(data.frame(Sample=I(sample.names),
Scale.Value=array.scale.vals))
cat("*****************************************************************************\n\n\n")
}
## create data.frame to
output to file, then reorder columns
names(norm.df) <-
sample.names
raw.names <-
paste(rep(sample.names,each=2),c("lr","int"),sep=".")
names(raw.df) <- raw.names
norm.df <- cbind(info.df,
norm.df)
raw.df <- cbind(info.df,
raw.df)
## sort rows into order by
Chrom, Mid and ID
norm.df <-
norm.df[order(norm.df$Chrom, norm.df$Mid, norm.df$ID),]
raw.df <- raw.df[order(raw.df$Chrom, raw.df$Mid,
raw.df$ID),]
## Output raw and normalized
data to files
write.table(raw.df,
outfile.raw, sep="\t", row.names=F)
write.table(norm.df,
outfile.norm, sep="\t", row.names=F)
options(echo=TRUE)
print(proc.time())
q(save="no")
4. Run script to normalize data. To run analysis, type
M:\BAC files> “c:\ProgramFiles\R\rw1090\bin\rcmd”
BATCH normalization-lisa-3.txt test.txt
5. Run script to average pixel intensities (each BAC is spotted twice per array). Adjust highlighted portions as required.
## This file reads in normalized
data files and creates a file
## with only one row per BAC,
i.e. it averages over all the spots
## for a BAC to produce one
value for each BAC.
## File containing normalized
spot data
spot.file <- "Samples-20040621-norm.txt"
## Name of file to contain
normalized data averaged by BAC (i.e. one value per BAC)
outfile.ave <- "Samples-20040621-norm-ave.txt"
## drop BACs with only one
good spot (of the two on the array)
drop.single.spots <- TRUE
spots <-
read.table(spot.file, sep="\t", header=T, as.is=T)
uniq.chip <-
unique(spots[,c("ID","Chrom","Mid","Start","End")])
n.samps <- ncol(spots) -
ncol(uniq.chip)
if (n.samps >1) {
aves <- t(apply(as.matrix(uniq.chip$ID),1,function(x,id,tmp) {
ind <- (id == x)
cm <- colMeans(tmp[ind,],na.rm=TRUE)
if (drop.single.spots)
cm[colSums(is.na(tmp[ind,])) >= 1 ] <- NA
cm
},spots$ID, spots[,!(names(spots) %in%
names(uniq.chip))]))
} else {
aves <- apply(as.matrix(uniq.chip$ID),1,function(x,id,ns,tmp)
{
ind <- (id == x)
cm <- mean(tmp[ind],na.rm=TRUE)
if (drop.single.spots) cm[sum(is.na(tmp[ind]))
>= 1 ] <- NA
cm
},spots$ID, n.samps, spots[,!(names(spots) %in%
names(uniq.chip))])
}
aves <- data.frame(aves)
names(aves) <-
names(spots)[!(names(spots) %in% names(uniq.chip))]
aves <- cbind(uniq.chip,
aves)
write.table(aves,
outfile.ave, sep="\t", row.names=FALSE)
print(proc.time())
q(save="no")
6. Generate chromosome plots using normalized data—pdf files can be viewed with Acrobat Reader.
## This program reads in the
normalized BAC-averaged data and creates a
## chromosome-by-chromosome
plot for each tumor.
##
## A postscript file is
created for *each* array
norm.ave.file <- "Samples-20040621-norm-ave.txt"
centromere.file <- "chrom_info_GPApr2003.txt"
## Do you want to provide
names for the program to use when labelling
## the sample plots?
(TRUE/FALSE) If 'use.my.names' is FALSE
then
## the column names from the
file 'norm.ave.file' will be used.
use.my.names <- FALSE
my.samp.names <- c(
)
## read in data
aves <-
read.table(norm.ave.file, sep="\t", header=T, as.is=T)
## drop BACs having no
position information (if not previously removed)
aves <-
aves[!is.na(aves$Mid),]
## Rescale "Mid"
values so they are in Mbp rather than bp
aves$Mid <- aves$Mid/10^6
## get sample names
samp.names <-
names(aves)[!(names(aves) %in%
c("ID","Chrom","Mid","Start","End"))]
uniq.chrom <- sort(unique(aves$Chrom))
## read in centromere data
cent <-
read.table(centromere.file, sep="\t", header=TRUE, as.is=TRUE)
options(papersize='letter')
for (i in
1:length(samp.names)) {
pdf(paste(samp.names[i],".pdf",sep=""),horizontal=FALSE,width=7.5,height=10)
#postscript(paste(samp.names[i],".ps",sep=""),horizontal=FALSE)
par(mfrow=c(4,2),oma=c(0,0,1.5,0), mgp=c(2,.5,0),
mar=c(4,3,3,1.5)+.1)
for (j in uniq.chrom) {
ind <- (aves$Chrom==j)
y.lim <- c(-1,1)
y.lim <- range(c(y.lim,aves[ind,samp.names[i]]),na.rm=TRUE)
plot(aves$Mid[ind], aves[ind,samp.names[i]],
xlab="Distance along Chromosome (in
Mbp)",ylab="Normalized Log-Ratio",
xlim=range(c(0,aves$Mid[ind]),na.rm=TRUE),
ylim=y.lim, main=paste("Chromosome",j), pch=20,
cex=.5, cex.lab=1.2, cex.main=1.35)
# cex=.5, cex.lab=1.2, cex.main=1.35)
abline(h=0)
## put line segment on plot corresponding to centromere
pos <- cent$cent.pos[cent$Chrom==j]/10^6
segments(pos,y.lim[1],pos,y.lim[2],lwd=1.5)
if (which(uniq.chrom==j) %in% seq(1,23,8))
mtext(paste("Sample:
",samp.names[i],sep=""),outer=T,cex=1.3)
}
dev.off()
}
q(save="no")
Quality control evaluation of array data
Section 12 Analysis of DNA for Genetic Instability and General DNA protocols
Multiple Displacement Amplification (MDA) using GenomiPhi kit
Amersham #25-6600-01
Protocol for sorted cells
1. Sort cells or nuclei into PCR tubes containing 10 ml mineral oil. Store tubes in the freezer at –20 oC until use.
2. Thaw cells on ice. Spin briefly to pellet cells. Estimate volume of cells/nuclei. (for 400 cells, ~1 ml after sorting)
3. Ideally, can add 1 ml of cell lysate to each 20 ml GenomiPhi reaction so adjust volumes accordingly. (*If volume is <0.1 ml, assume volume is zero)
4. Use either alkali or proteinase K lysis. For alkali lysis, mix an equal volume (or 0.5 ml) of lysis buffer: 400 mM KOH, 100 mM DTT, 1 mM EDTA. Incubate at RT for 10 minutes. Add an equal volume (or 0.5 ml) of neutralization buffer (400 mM HCL, 600 mM Tris-Cl). Mix gently.
5. For proteinase K, add volume of buffer: 1X TE, 1% Tween 20, 0.4 mg/ml proteinase K. Incubate samples at 55oC for 3 hours.
6. Transfer 1 ml of the crude lysate to a new tube and mix in 9 ml GenomiPhi sample buffer.
7. In a separate tube,. mix 1ml GenomiPhi enzyme with 9 ml GenomiPhi reaction buffer per sample. Add 10 ml of this enzyme-reaction buffer mix to each sample tube.
8. Incubate samples at 30oC for 3 hours.
9. Heat inactivate enzyme at 65 oC for 10 minutes.
10. Remove aliquot for DNA
quantiation by Pico Green and store remainder of reactions at –20 oC.
*Expected yield of ~1-2 mg after 3 hours when starting with <1ng DNA
DNA purification using QIAGEN QIAEXII kit
*Use this kit to purify DNA fragments ranging in size from 40 bp-50 kb.
1. Thaw samples on ice. Verify sample volume.
2. Mix 3X volume QX1 buffer and 2X volume water.
3. Vortex QIAEXII beads for 30 seconds to resuspend.
4. Add 10 ml beads to each tube. Incubate for 10 minutes at RT, flicking gently every 2 minutes to keep beads resuspended.
5. Spin tubes at 12000 rpm for 20 seconds. Discard supernatant.
6. Wash pellet with 500 ml l PE buffer twice. (Do not resuspend pellet—just let buffer stand for 3-5 minutes.)
7. Spin tubes at 12000 rpm for 30 seconds.
8. Remove ALL remaining supernatant.
9. Air dry pellet for 15 minutes or until pellet turns white.
10. Add 15-20 ml TE per tube and flick gently to resuspend pellet. (Do not vortex—this could shear the DNA.)
11. Incubate tubes at 50oC for 10 minutes to elute the DNA.
12. Spin tubes for 30 seconds. Transfer supernatant to new tube.
Re-quantitate DNA yield using Pico Green.
Arbitrarily Primed PCR (AP-PCR)
AP-PCR detailed protocol revised 4/26/04 by Lisa Lai
Methods are the same as Nancy Linford’s protocol except for the following
revisions (see below). Following sample
preparation, perform analysis as outlined previously.
PCR reactions (adapted from Rosana’s protocol—primer labeling step is omitted)
· Make the reagents up in order as a cocktail and add to DNA in 0.2 ml tube. Keep reagents on ice and ensure that they have thawed completely - vortex to mix
· Once the primer is added, all tips must go in acrylic box and reactions must be behind shield.
|
Sterile Water |
6.3 ml |
Hospital grade |
|
10xPCR buffer with MgCl2 |
1 ml |
|
|
Primer (100 ng/ml)* |
0.1 ml |
MCG1 primer |
|
MgCl2 (25 mM) |
0.4 ml |
|
|
dNTPs (10 mM) * |
0.1 ml |
|
|
32P-dCTP |
0.1 ml |
(1mCi/rxn; can decrease to 0.5mCi) |
|
Taq polymerase |
0.5 ml |
Promega |
|
DNA (5 ng/ml)** |
1 ml |
|
Primer: MCG1 5’-AAC CCT CAC CCT AAC CCC AA-3’
*aliquot to reduce freeze-thaw
cycles
**measure DNA concentration with Pico Green and dilute accordingly
· Amplify DNA using the “APPCR” program on Thermocycler
AP-PCR
Program:
94°C 3 min
Low
stringency portion (5 cycles)
94°C 30 sec
45°C 1 min
72°C 1.5 min
High
stringency portion (35 cycles)
94°C 15 sec
50°C 15 sec
72°C 1 min
72°C 7 min
4°C hold
Store samples at –20oC after amplification is completed
Gentra+ Puregene DNA Isolation from Sorted Nuclei
Cell
Lysis
1.
Go
to room K094 (at 4° C).
2.
Make sure samples are thawed on ice before putting them in
centrifuge. Centrifuge sorted nuclei at
14,000rpm on Eppendorf Centrifuge 5415D (13,000-x
g, 6cm radius) for 2 minutes to
pellet cells.
3.
Working
on ice, pipette off supernatant or drain on Sorbeez pad (if volume >500 ml) leaving <100 ml liquid. 100ul is
approximate. 50ul-150ul should be
fine. You can also pipette off greater
than 500ul if you like.
4.
Thaw
proteinase K (20 mg/ml) in ice bucket.
Add 200 ml Cell Lysis Solution and 10
ml proteinase K to each tube,
and Vortex. Keep
on ice until cell lysis is added (you can drop from above the 200ul using only
one pipette tip if you don’t put it in the tube). You can add proteinase K off ice and then at this stage they can
be off ice indefinitely.
5.
Mix
by flicking the tube. Place tube in 50°C water bath overnight. After mixing you
should see bubbles/ foam. If not cell
lysis was forgotten.
RNase Treatment
6.
Flash
spin.
7.
Add
1.0 ml RNase A Solution to the
cell lysate.
8.
Mix
the sample by inverting the tube 25 times.
9.
Incubate
at 37° C for 15-60 minutes. No difference in
cell recovery based on time at this stage.
Protein
Precipitation
10.
Flash
spin. Cool the sample to room
temperature.
11.
Add
66 ml Protein Precipitation
Solution. You
can drop from above the 66ul with one pipette tip if you don’t touch the
tube. This can be done off ice.
12.
Vortex
for 20 seconds.
13.
Centrifuge
at 10,500 rpm (10,000g, 8cm radius) in Eppendorf Centrifuge 5417C for 10
minutes at room temperature. The
precipitated proteins will form a tight pellet.
DNA
Precipitation
14.
Add
200 ml Isopropanol to a new
1.5-ml tube (add
1ul of glycogen if cells numbers are lower than 200k). Your new tubes need to be labeled on
side with name, flow, level and top with DNA number, fraction (G1/4N, etc) and
cell count before transferring original DNA sample.
15.
Pipette
off the supernatant containing the DNA (leaving behind the precipitated protein
pellet) and add to the Isopropanol in the new 1.5-ml tube. You can put your
tip down to meniscus and draw up until slightly over the visible protein
pellet. Usually this will take 2 pipettes.
I use 200ul tips. Don’t use
larger b/c tip is too big and will suck up protein pellet. If protein pellet is not visible something
is wrong. Start at step 11 again if
you don’t see a pellet. If you dislodge
pellet or accidentally suck up part of the protein pellet you need to start at
step 13 again because it will mix with the DNA. Normal tends to be very thick at this stage (almost mucous like)
and proceed carefully b/c it’s easy to dislodge the pellet w/ normal.
16.
Mix
the sample by inverting gently 50 times.
Allow to precipitate at -20°C overnight. You can
precipitate for indefinite amount of time (nights, week, etc)
17.
Centrifuge
at 11,500 rpm (9000g, 6cm radius) in Eppendorf Centrifuge 5415D in Room K094
for 30 minutes at 0°C.
18.
Pour
off the supernatant and drain tubes on a clean absorbent paper. There will be no
visible pellet at this stage.
19.
Add
500 ml 70% EtOH and invert the
tubes several times to wash the DNA pellet.
Doesn’t need to be on ice at this stage and
below.
20.
Centrifuge
at 10,500 rpm (8000g, 6cm radius) in Eppendorf Centrifuge 5415D in Room K094
for 10 minutes. Carefully pour off the
ethanol.
21.
Repeat
steps 20 and 21.
22.
Allow
to air dry overnight or speed-vac on medium heat until dry (around 30
minutes). Air
dry unless in a big hurry. The air dry
can be several nights (indefinite) if needed.
DNA
Hydration
23.
Add
1 ml DNA Hydration Solution for
every 1,000 cells. For example, add 10 ml DNA Hydration Solution to
10,000 sorted cells. If you’ve only dried over one night check each tube for
remaining liquid. If found heat
vacuumed dry or wait to rehydrate sample.
24.
Heat
at 65°C for 1 hour. Tap tube periodically to aid in dispersing
the DNA.
Record of Reagents Used
Cell Lysis Solution:
20 mg/ml proteinase K:
RNase A:
Protein Precipitation Solution:
Isopropanol:
Glycogen:
70% EtOH:
DNA Hydration Solution:
Last updated 07/28/2003, PG & LJ
Further revised 07/31/2003, KL
PICOGREEN PROTOCOL TO QUANTIFY DNA IN FLUOROCOUNTER
Set up samples
1. Prepare a standard curve with a reference DNA (for example, Lambda DNA from Invitrogen).
2. Thaw the picogreen dye at 37C (DMSO freeze point is 18.55°C)
3. Dilute picogreen in TE (1/400). For one plate: 10ml TE and 25ul picogreen.
4. Mix the dye solution and add 95ul to each well of the black 96-well plate.
5. Add 5ul of DNA (fluorocounter saturates at 50ng, dilute accordingly) to each well.
6. Add 5ul of standard curve and. It’s better not to use any positive control for the max RFU position. Use just a standard curve. See Fluorocount Manual Pg 84 or below.
7. Let the mix sit in the dark for 5-10 min.
8. Test the samples on the fluorocounter.
Fluorocounter
1. Turn the fluorocounter and the light-source on (for maximum efficiency the light-source should be on 15min before analyzing. Leave a note on the machine indicating that is on use).
2. Sign into the fluorocounter log book.
3. Double-click fluorocount icon
4. Click ‘Plate out’ icon
5. Load your plate into the machine and click the ‘Plate in’ icon
6. Click File, Open, rosana.pf, OK
7. Click Plate, Read settings, Read modeTab. Type Upper Left position (i.e. A01) and Lower Right position (i.e. H12). The rest is by default.
8. Click
Sensitivity Tab. Leave max RFU blank
and select read length 2.0, gain 1.0 and PMT 1100. These are the optimal
settings. If a RFU well is indicated then the program doesn’t use the
optimal settings but the ones appropriate for the max RFU. Since the max
RFU changes between plates, this introduces variability in the comparison of
data of different plates. For concentrations of DNA between 2 and 0.06 ng/ul
(10ng and 0.3ng) use gain 7.0 PMT 1100.
9. Click Filter pairs Tab. Scan 2. Ex: 485, Em: 530
10. Click OK to exit.
11. Click Read Plate icon (looks like a large P). You should see the UL well, LR well and the Max RFU well that you selected in step 6 and 7). Click Read (it should produce numbers in all of the wells you selected). Gain and PMT are autoset: the fluorocounter selects the best values to read the plate. That’s why if RFU is too concentrated the sensitivity to read the rest of plate will be lower.
12. Close the window when it is finished by clicking cancel.
13. Click File/export. Export to select Microsoft Excel. Change the name of the file to what you want it to be. Click on Export Dir to select your folder in SpectraCount. Click on the Data to Export tab. Scroll down to the last reading and select it (it should be something like {110, 1/1}). Click Export. It should show you the name that you selected. Click Export. It will say Export is complete when done. Click OK to close the box.
14. Remember to take out your plate and if you are done then exit the program.
15. You can e-mail the file to yourself, it’s a few Kb.
16. Close the windows, shut off the light source and the flourocounter. If you plan to use it in a hour or so you can keep the light source on. Leave a note indicating that you’d come back.
NOTE: The fluorocounter has a program called i-smart to analyze the plate. You can use it or make your own calculations in Excel.
Black plates: 300ul, black polypropylene, flat bottom, Whatman 7701-7350 (101.20$/50plates). The plates can be washed and recycled. They can be autoclaved too.
PicoGreen® dsDNA quantitation reagent *200-2000 assays*, 1 mL. Molecular Probes P7581 www.probes.com
Gel Electrophoresis Protocol
Preparation of 0.7% agarose
-
Add
1.75g agarose and 250ml of 1X TAE (tris-acetate) to a 500ml Erlenmeyer flask
-
Heat
mixture in microwave until agarose is totally dissolved
-
Cool
mixture with tap water
-
Add
12.5ul EtBr (10mg/ml)
-
Continue
cooling mixture to about 40-50 degrees Celsius
-
Pour
into long gel rig
-
Wait
for 30 minutes
Preparation of 1% agarose
-
Add
2.5g agarose and 250ml of 1X TBE (tris-borate) to a 500ml Erlenmeyer flask
-
Heat
mixture in microwave until agarose is totally dissolved
-
Cool
mixture with tap water
-
Add
12.5ul EtBr (10mg/ml)
-
Continue
cooling mixture to about 40-50 degrees Celsius
-
Pour
into long gel rig
-
Wait
for 30 minutes
Preparation of Buffer Solution (replace TAE with 1X TBE if TBE is used)
-
Mix
2L 1X TAE (40ml 50X TAE + 1960ml water) and 0.5ug/ml EtBr (100ul 1% EtBr
solution)
-
Swirl
Loading Samples and Markers
-
Spin
down all samples
-
Get
a plastic plate (353911)
-
For
samples: Add 2ul of 6X LB (loading buffer; obtained in 4 degrees fridge) and
10ul of sample to each well on the plate
-
For
markers: Add 4ul of 100bp DNA ladder (obtained in 4 degrees fridge)
-
Load
the gel, using unfiltered pipet tips
-
Plug
wires into power source
-
Set
at approximately 120V
-
Run
the gel for 2 to 6 hrs
To view the gel
-
Disconnect
from power source
-
Wash
gel with distilled water
-
Go
to UV room and shine UV light on gel (turn lights off)
-
Zoom
in/zoom out and adjust contrast
-
Print
picture of gel
Note: All
amounts can be scaled depending on the amount of gel needed and the DNA to be
analyzed.
Last
updated by KL 4/30/04
Southern Blotting Protocol
Depurination
-
Soak
gel in 0.25M HCl for 15 minutes in glass tray
-
Discard
HCl
Denaturation
-
Soak
gel in at least 2 gel volumes (~500ml) of 1.5M NaCl/0.5N NaOH for 30 minutes in
glass tray
-
Discard
liquid
Set up
-
Stack
brown paper towels to height of 5cm
-
Cut
4 pieces of cardboard paper (obtained in drawer) to the same size as gel
-
Put
2 cardboard paper on top of paper towels
-
Cut
nylon membrane to the same size as gel
-
Put
membrane on top of cardboard paper
-
Put
gel (upside down) on top of membrane
-
Put
2 cardboard paper on top of gel
-
Soak
2 sponges in buffer solution and put them on top of cardboard paper
-
Surround
the gel with plastic wrap
-
Wrap
the whole thing with plastic wrap
Preparation of Pre-hyb. Solution
-
Add
10ml water to tube using pipet
-
Add
6ml 20X SSC (store in lab)
-
Add
2ml 10% SDS (prepare 1L pH 7.2)
-
Add
2ml 50X Denhardt’s (melt in boiling water)
-
Add
66ul 10mg/ml Herring Sperm DNA
Preparation of Hyb. Solution
-
Add
10ml water to tube using pipet
-
Add
6ml 20X SSC
-
Add
2ml 10% SDS
-
Add
2ml 50X Denhardt’s (melt in boiling water)
-
Obtain
50ul of Probe (7.6*10^6 cpm)
-
Denature
5’ in boiling water
-
Put
in ice
-
Add
Probe to Hyb. solution using a pipet
Hybridization
-
Cut
mesh as the size of the membrane
-
Coil
the mesh and membrane and put in bottle
-
Prewet
in 2X SSC and warm in 37 degrees
-
Prewarm
Pre-hyb. and Hyb. solution at 37 degrees
-
Discard
2X SSC and add Pre-hyb. solution
-
Warm
at 37 degrees for 2 hours
-
Discard
Pre-hyb. and add Hyb. solution
-
Warm
at 37 degrees overnight
Washes
-
Discard
Hyb. solution and add 50ml 2X SSC
-
Warm
at 37 degrees for 15 minutes
-
Discard
SSC and add 50ml 2X SSC
-
Warm
at 37 degrees for 15 minutes
-
Discard
SSC and add 50ml of 2X SSC and 0.1% SDS
-
Put
at room temperature for 30 minutes
-
Discard
solution and add 50ml of 0.1X SSC
-
Put
at room temperature for 5 minutes
-
Take
out membrane
-
Dry
membrane
-
Blot
membrane on Whatman paper
-
Wrap
membrane in plastic wrap
-
Expose
to phosphorimage screen for 1.5 hours
Last updated by KL 6/30/03
Phenol Chloroform extraction for Buffy Coat Cells or other tissue
Protocol modified from Jon E Digel at FHCRC (11-4-03)
Notes
and Precautions
All buffy coat samples
should be handled in accordance with procedures specified in the Blood Bourn
Pathogen course (gloves, lab coat, and face protection). Autoclave all plastics before disposal.
Principle
Buffy Coats from prepared
blood samples, drawn into vacutainer tubes containing EDTA as anticoagulant for
epidemiological studies, are stored at -80oC in a media that
maintains the integrity of the cells under freezing conditions. The buffy coat is washed twice prior to DNA
extraction. [Washing removes the components of any freezing media as well as
any contaminating red blood cells that may interfere with PCR and other
molecular biology procedures.] The
washed white cells undergo digestion in a solution of 10% SDS and the enzyme
Proteinase K (Protease). What remains
is the DNA that has been released from the cell nucleus. Two phenol:chloroform extractions are
performed to remove the digested proteins. A single chloroform extraction is
performed to remove any residual phenol.
DNA is then precipitated out of the aqueous solution using 100% ethyl
alcohol and a salt solution of sodium acetate. [More than one precipitation
with cold 100% ETOH may be performed at cold temperatures (-20°C) to deplete a sample of all
DNA.] The DNA precipitate is then washed with 70% ethyl alcohol to remove any
remaining salts. Pure DNA is then dissolved in buffer and quantitation (mg/mL) determined by
spectrophotometry. A final
concentration (ng/uL) is produced based on the needs of the recipient.
Equipment
and Supplies
Equipment
repeating pipetter,
adjustable from 1 mL - 50 mL
rocker
platform
refrigerated
centrifuge
water bath
temperatures up to 70oC
vortex
mixer, such as Thermolyne
spectrophotometer capable of
reading 260/280 wavelengths
Supplies
centrifuge tubes, sterile, 15 ml, polypropylene, conical bottoms with
caps
Eppendorf, microcentrifuge conical tubes
syringe-style
pipet tips, 50 mL capacity
disposable
transfer pipettes
beakers of various sizes
reagent bottles, 500 mL
capacity
styrofoam
racks for centrifuge tubes
UV
transparent disposable plates, 96 wells
Chemicals
1X PBS, sterile Made
in lab
Proteinase K, 500 mg Roche
Tris pH 7.5, or pH 8.0 Made
in lab
NaCl Fisher
Scientific
EDTA, pH 7.5 or 8.0 Made
in lab
10 % sodium dodecyl (Lauryl)sulfate in water (SDS) prepared in lab
ETOH 200 proof (100%) Fisher
Scientific
3M sodium acetate, pH 5.0 prepared
in lab
Phenol - buffer saturated, pH 6.7 +/- 0.2 Fisher Scientific
CAUTION:
Organic Solvent! Goggles and gloves must be worn when handling this chemical
Chloroform - purified, molecular biology grade Fisher
Scientific
CAUTION:
Organic Solvent! Goggles and gloves must be worn when handling this chemical
Laboratory’s preparation of
WORKING solutions:
24:1 phenol/chloroform mixture To extract 48 samples:
Add 144 mL phenol
6 mL chloroform
1X STE
1 liter stock solution: 20X STE Add 24.23 g Tris
116.88 g NaCl
7.45 g EDTA
QS
to 1000 mL with ddH20, pH to 8.0
Autoclave
or filter sterilize
Store
at room temperature
Indefinite
expiration
Laboratory prepares 500 mL working solution: 1X STE
25 mL stock
475
mL ddH20
Store
at room temperature
Indefinite
expiration
10% SDS.
1 liter working
solution: 10% SDS Add 100 g
SDS to 1000 mL ddH20
Store
at room temperature
Indefinite
expiration
3M NaOac (sodium acetate)
500 mL working
solution: 3M Add
123.1g NaC2H3O2 to 500 mL ddH2O,
pH to 5.2
Autoclave
or filter sterilize
Store
at room temperature
Indefinite
expiration
Proteinase K (Freezer 4 Rack 9
Box 1)
Laboratory prepares 10
mL working solution: 50 mg/mL Add
10 mL ddH20
to
one vial of 500mg Proteinase K
Store
at -20o C
Indefinite
expiration
70% ETOH
1 liter working
solution: 70% ETOH Add 700 mL of 100% ETOH
300 mL ddH20
Mix
well
Store
at 2-8°C
Indefinite
expiration
TE Buffer
1 liter stock
solution: 20X TE buffer Add 24.23 g
Tris
7.45 g EDTA
QS
to 1000 mL with ddH20, pH to 7.5
Autoclave
or filter sterilize
Store
at room temperature
Indefinite
expiration
500 mL working solution: 1X TE buffer Add 25 mL stock TE buffer
to 475 mL ddH20
Store
at room temperature
Indefinite
expiration
Procedure
Sample Preparation and DIGESTION (Day 1):
Samples are to
be thawed in the refrigerator.
Transfer the
thawed samples into appropriately labeled, sterile 15 mL centrifuge tubes. Add 5 mL 1X PBS. Mix well.
Centrifuge for
15 minutes 1500 rpm, at RmT°.
Pour off the
supernatant. Samples are to be visually
inspected for the presence of red blood cell/hemolysis contamination for
reference during protein digestion and
measurement (mm) of the buffy coat.
To the pellet,
add 6 mL of 1X STE. Manually agitate
the conical tubes to break up cell pellets.
Add
150 mL of 10% SDS
and 50 mL of working
solution Proteinase K to digest cells. Mix well.
Incubate
overnight at 55°C in a water bath. Gently
mix several times over the course of the first hour
or two.
EXTRACTION and PRECIPITATION PROCEDURE (Day 2):
Add 5 mL phenol (an equal volume to the volume in the
conical tube) to the 15 mL conical tube.
Using a rocker,
rock the samples at room temperature for 20 minutes.
Centrifuge for
20 minutes at 3000 rpm, RmT°.
Transfer the supernatant (the upper layer) to a clean
15 mL conical tube.
NOTE: The phenol is disposed of in phenol waste in
the fume hood.
Add 5 mL chloroform (an equal volume to the volume in
the conical tube) to the 15 mL conical tube.
Using a rocker,
rock the samples at room temperature for 20 minutes.
Centrifuge for
20 minutes at 3000 rpm, RmT°.
Add two volumes
(approximately 12 mL) of 100% (200 proof) ETOH and 600 mL (or 1:10 volume of the supernatant) of 3M NaOac, pH
5.2. Place on ice for 10 minutes.
Shake vigorously for 2 minutes, or rock for 1 hour, to
precipitate all of the DNA.
[Notice the flocculation
of the DNA as the conical tube is first agitated.]
NOTE: Since small volumes of DNA are expected,
the tubes may be held overnight at -20°C to facilitate precipitation of all of the DNA
present. Allowing the tubes to remain
at low temperatures will INCREASE the salt concentrations.
Centrifuge for
30 minutes at 3500 rpm, RmT°.
Remove and
discard the ETOH/NaOac by aspiration or decant.
Add 5 ml 70% ETOH to the conical tube and gently
dislodge the pellet from the bottom of the tube. DO NOT shake. [Notice the crystalline presence (salt) at the
interface of the pellet and the dilute alcohol. Rock for 1 hour at RT.This step dissolves the salts that
precipitated out of solution along with the DNA.]
Centrifuge for
20 minutes at 3500 rpm, RmT°.
Remove and
discard the 70% ETOH by aspiration or decant.
Air dry the
pellet for 30 minutes. DO NOT over dry
the pellet.
Add 1 mL 1X TE
buffer to the conical tube dependent
upon amount of DNA present) and again dislodge the pellet from the bottom of
the tube. Allow the pellet to dissolve
overnight at 38+/- 2°C in a shaking incubator.
QUANTITATION
PROCEDURE (Day 3):
Read the absorbance at 260/280 on the Smartspec. A 1:50 dilution is good. Save
the DNA concentration print out in mg DNA/mL.
Aliquote 100 ul into a 0.5 ul tube for Rosana and put in the
refrigerator. Put the remaining DNA
into a 1.7 ul tube and freeze.
Limitations
Pure DNA has a A260/280 ratio of 1.8. An allowable performance limit for each
specimen is a A260/280 ratio of >
1.70 and < 2.14. If a ratio is
outside of the allowable limit, the specimen must be re-processed. Ratios below 1.75 are indicative of
proteins being present in the final solution.
Ratios greater than 2.10 are indicative of salts being present in the
final solution. If the presence of
proteins is suspected, the specimen is to be re-extracted. If the presence of salts is suspected, the
specimen is to be re-precipitated using
100% ethanol and washed overnight
with 70% ethanol.
Low
concentrations of DNA with good A260/280 ratios are acceptable for PCR.
High concentrations of DNA with
poor A260/280 ratios need to be allowed to dissolve longer and then reread.
The linearity of the indicates
that L1 values (OD260) below 0.01 and above 2.5 do not provide dependable
values. Any reading outside of this
range MUST be repeated at an appropriate dilution.
References
Innis M.A., Gelfand D.H.,
Sninsky J.J., White T.J., PCR Protocols: A Guide to Methods and
Applications, Harcourt Brace
Jovanovich, publ., 1990, p.148.
Farkas D.H., Molecular Biology and Pathology: A Guidebook for
Quality Control, Harcourt Brace
Jovanovich, publ., 1993.
McDougall J., McDougall HLA
Lab Standard Procedures.
Maniatis T., Fritsch E.F., Sambrook J., Molecular Cloning, A
Laboratory Manual, Cold Spring Harbor, publ, 1989.
Protocol: QIAamp Blood Kit, Rapid Purification of DNA for Direct Use in
PCR Amplification, QIAGEN Inc. 9600 De
Soto Avenue, Chatsworth CA 91311.
Edwards A.M., Hunter S.V., Hankin R.C., Gene Rearrangement Analysis by
Nonorganic Extraction and Chemiluminescent Detection, Laboratory Medicine: 24
(10), Oct 1993.
SOFTmax PRO Protocol Guide, Version P1.12, Molecular Devices
Corporation, Sunnyvale, CA 94925.
Section 13 Solutions
AMP
To make 25 mg/ml AMP:
2.5 g ampicillin
100 ml d H20
1. Swirl well (don’t need stir bar).
2. Filter-sterilize.
3. Aliquot into 25 - 5ml snap-cap tubes (4 ml per tube).
4. Label “25 mg/ml AMP”.
5. Store in the freezer.
Reagents
Information:
Ampicillin: Location – Refrigerator #1, Shelf
#3, Box #5
Manufacturer –
Shelton Scientific; Cat# IB02040
To make 1 L:
20 g LB broth
10 ml 1M MgSO4
10 g Bacto-Difco agar
qs d H2O to 1 L
Notes: Make this solution in two 500ml batches. Bacto-Difco agar doesn’t dissolve so divide it into each 500 ml solution when making up 1 L.
For LB plates, don’t add AMP.
1. Autoclave then cool in 55˚C bath
2. Add 2 ml of 25 mg/ml AMP to 500 ml LB AGAR solution.
3. Pour 15 ml into each plate.
Reagents
Information:
LB broth: Location – Lower Shelf 1
Manufacturer –
DIFCO Industries; Cat# 0446-17-3
MgSO4: Location – Upper Shelf 1
Manufacturer –
Sigma; Cat# M-1880
Bacto-Difco
agar: Location – Lower Shelf 1
Manufacturer – Becton Dickinson; Cat# 214010